Records
- Stonebranch (Deactivated)
Introduction
A record is an entry in the Universal Controller database. Most records are created by the user via the user interface, but others (such as Agent records) are created by the Controller.
All system-supplied and/or user-supplied information about a record is contained in the record Details.
Naming Tips
Many functions within Controller are executed against one or more records.
For example, you can assign a user permission to:
- Change only certain tasks.
- Issue commands against a group of task instances.
- Filter a trigger list to display only certain triggers.
Two methods are available to help you organize your records to facilitate the use of these functions.
|
Method 1 |
Develop a naming scheme for records. |
|---|---|
|
Method 2 |
Use Business Services, which simply is a method of grouping records. Whenever you create a record, you can assign it to a Business Service. |
Creating a Record
|
Step 1 |
Select a record type from the appropriate navigation pane of the Services. The records list for that record type displays. |
|---|---|
|
Step 2 |
Either:
|
|
Step 3 |
Click the Save, Save & New, or Save & View button to save the record. |
Note
You also can create a record by copying and renaming an existing record.
Opening a Record
Opening a record refers to the displaying of a record Details.
|
Step 1 |
Select a record type from the appropriate navigation pane of the Services. The records list for that record type displays. |
|---|---|
|
Step 2 |
Either:
|
Record Details
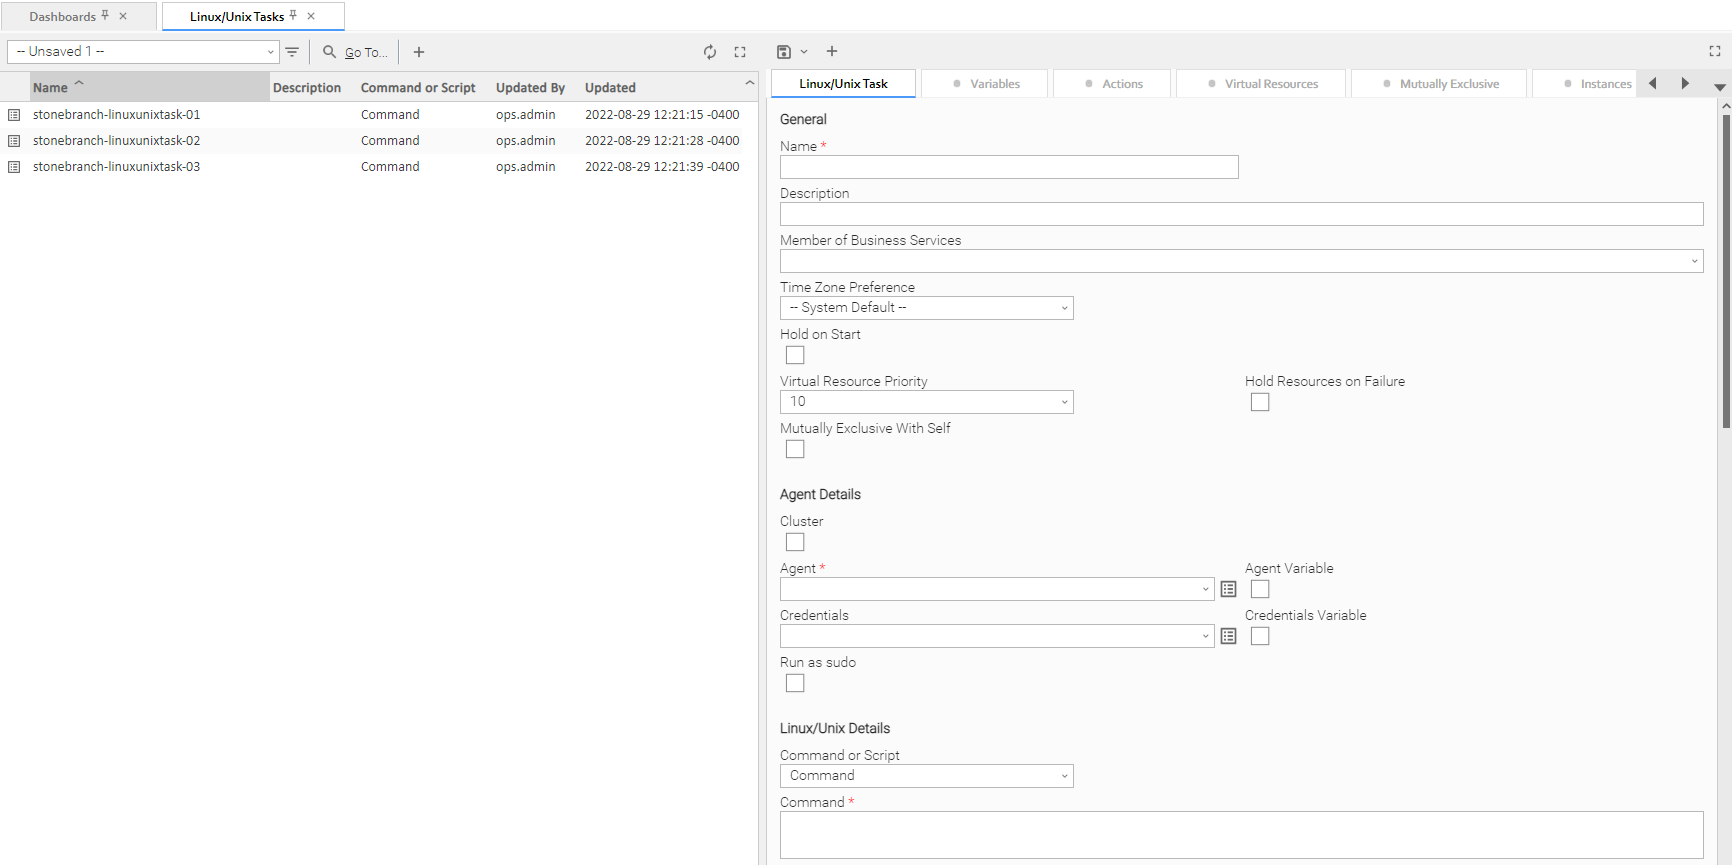
When you select a record type from the Services, a list of records for that type displays. To the right of the list, an empty record Details for a new record of that type displays.
For example:
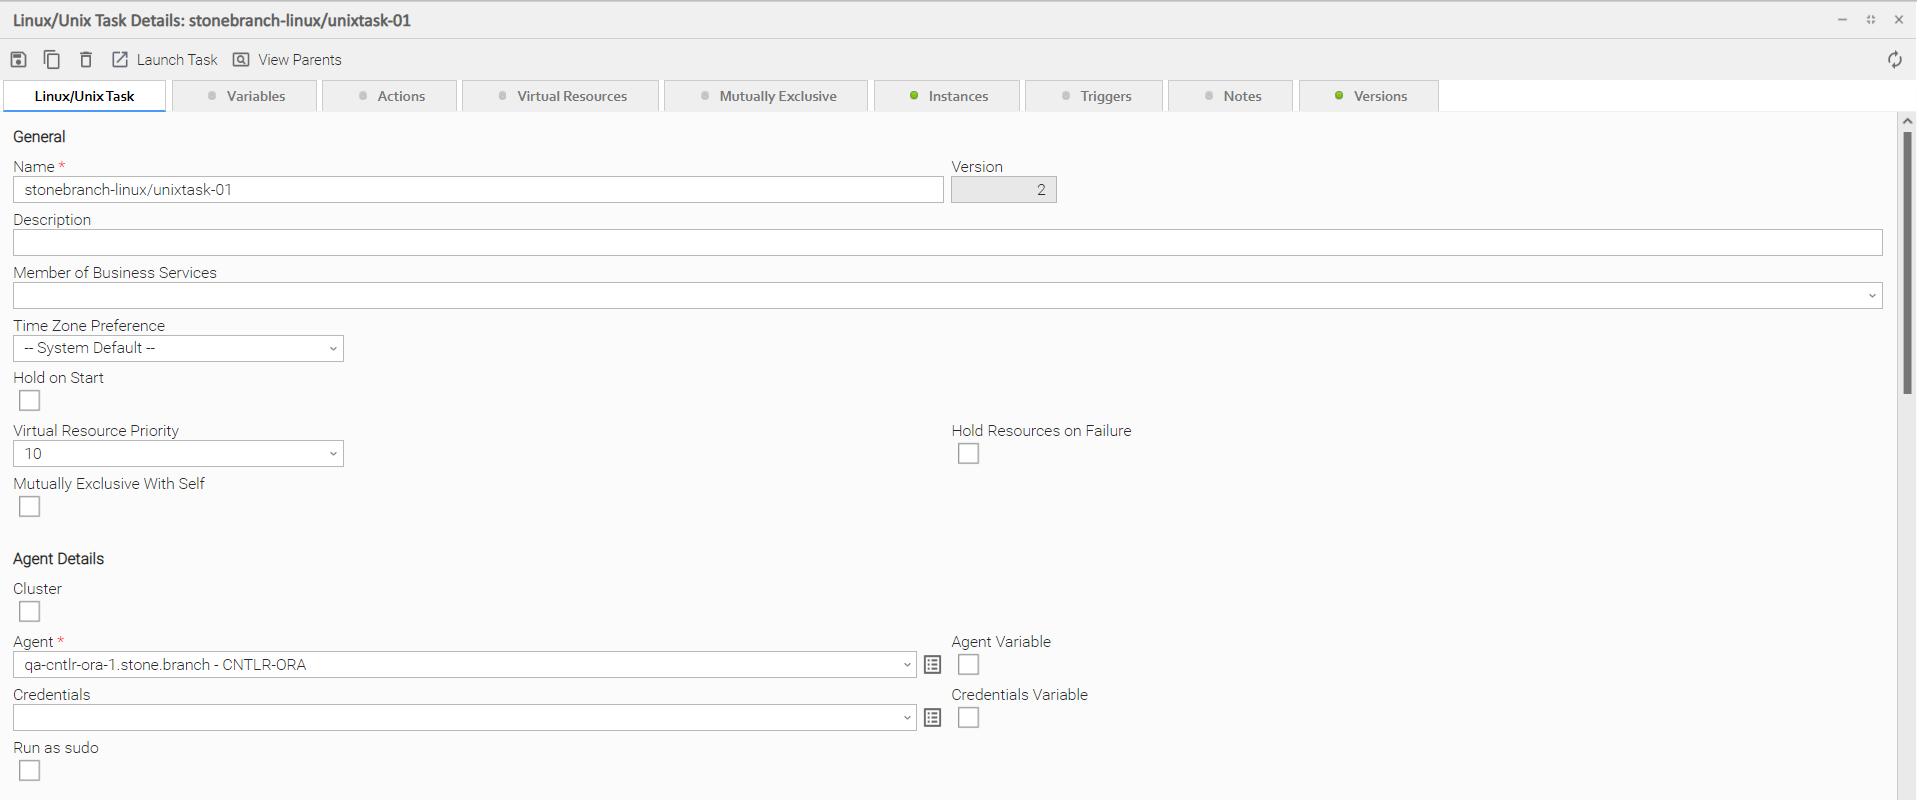
To see Details of an existing record, open the record.
For example:
Record Details Fields
The following formatting applies to fields for all record types:
- Fields with names followed by an asterisk ( * ) are required.
- Gray fields are read-only.
- White fields are editable. They may accept any value or only values selected from a drop-down list.
- Some fields provide a drop-down list of values, which are the only selections available for that field.
- Some fields contain a default value.
- Some fields provide hints that describe value to be entered/selected for that field.
Selecting Field Values
Many fields provide a drop-down list of values for that field. These fields have a down arrow next to it, which you must click to display the list of values.
Additionally, drop-down list fields whose available values are records (as identified by a Details Icon), provide a filter for only listing records that contain the sequence characters that you enter in any of the provided record fields.
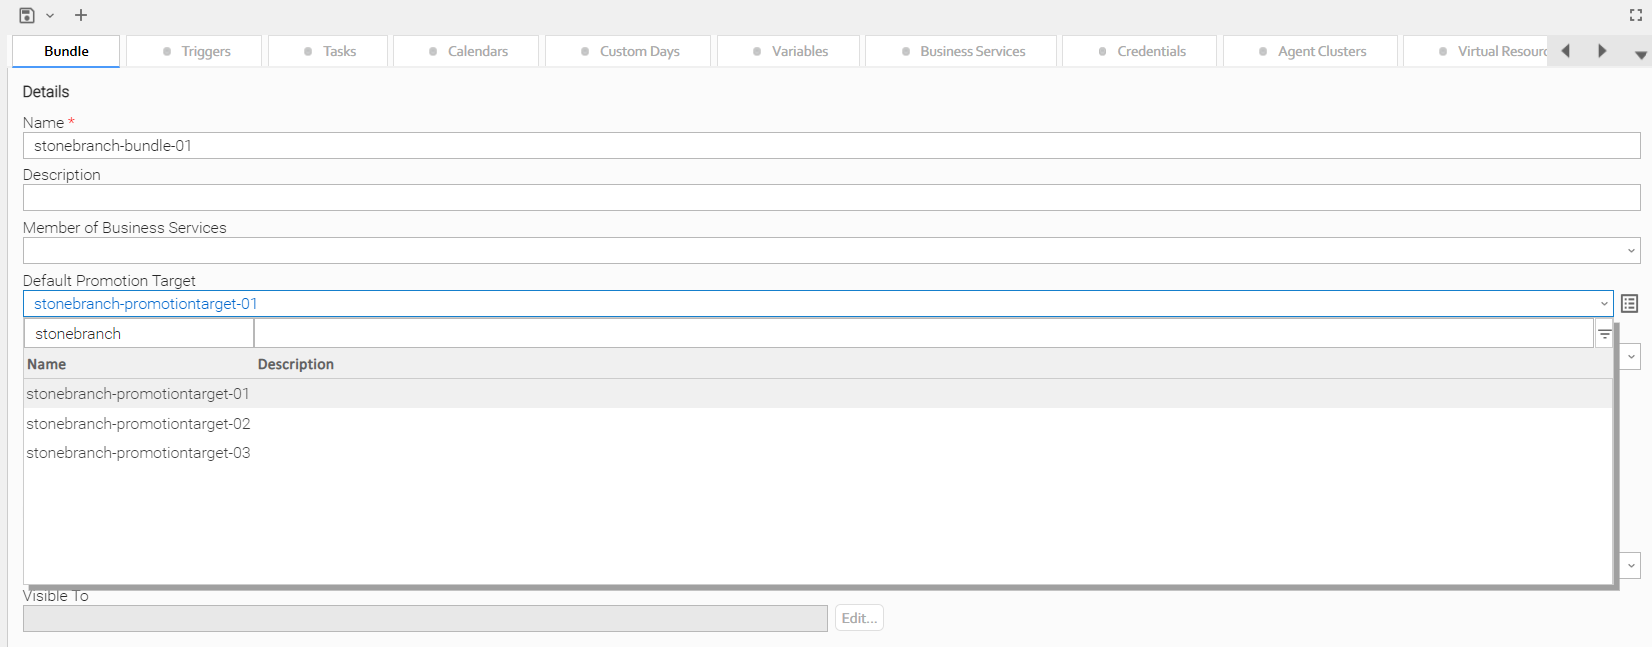
In the following example, the drop-down list for Default Promotion Target lets you filter the list of Promotion Target records by Name or Description field:
Details Icon
A Details icon displays next to a drop-down list field if the values available for that field are records.
- If the drop-down list field contains a value (a record selected from the list), you can click the Details icon to view (and modify) that record.
- If the drop-down list is empty, you can click the Details icon to create a record of that record type.
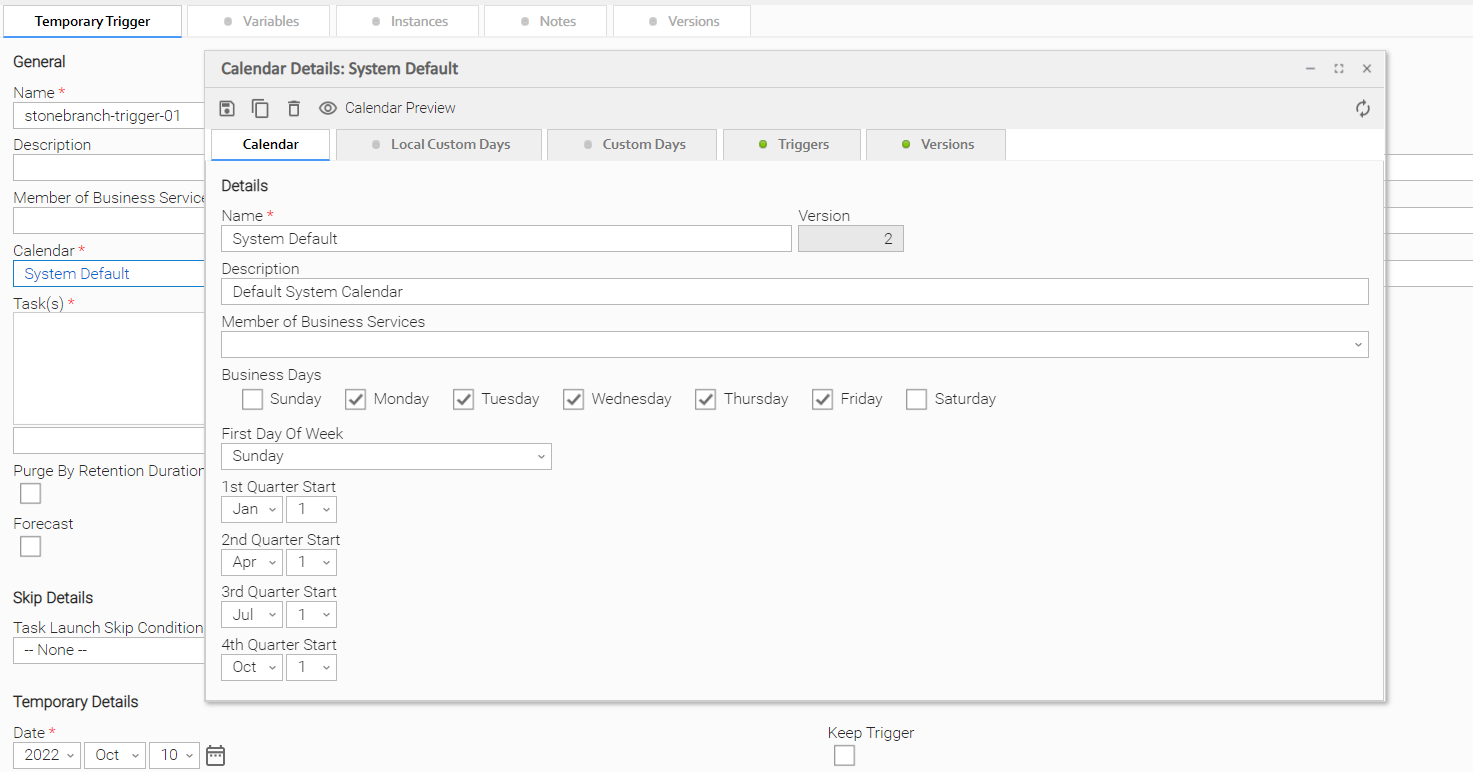
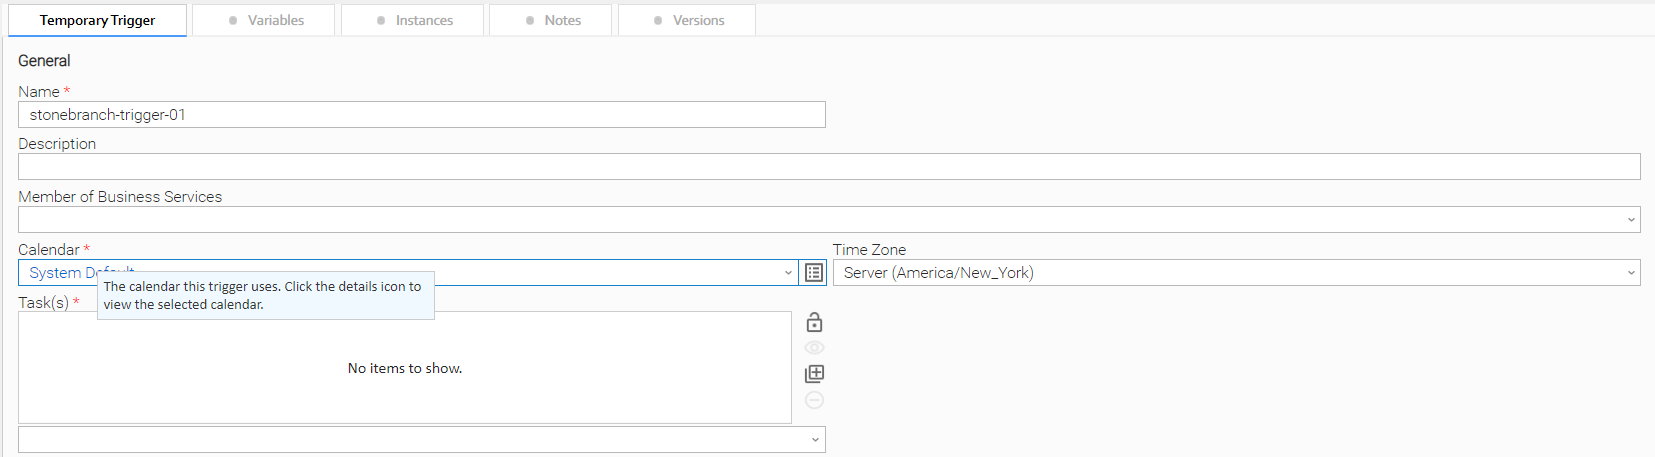
For example, every Trigger record contains a Calendar field whose value is the name of a Calendar selected from the drop-down list:

If you click the Details icon next to the Calendar field, the Details for that Calendar displays.
Field Hints
Fields hints describe the value to be entered/selected for that field.
To display a field hint, hover your cursor over the field value.
For example:
Record Details Tabs
The record Details for every record contains one or more tabs, including the default <record type> tab that provides detailed information about the record.
The currently selected tab displays in white. All other tabs display in gray.
Each tab displays a list of records that have been user-defined to be associated with the record. For example, the Triggers tab for a task would list any trigger records that specify this task in its trigger Details.
As appropriate for the type of record listed for a tab, the following also is provided:
- Details icon that allows you to view and edit Details for that record.
-
 button that allows you to create a new record of that type and automatically associate it with the record whose Details are displayed in the <record type> tab.
When you click a tab to display a list of records associated with the current record, you can:
- View details about each record on the list.
- Create a new record of that type.
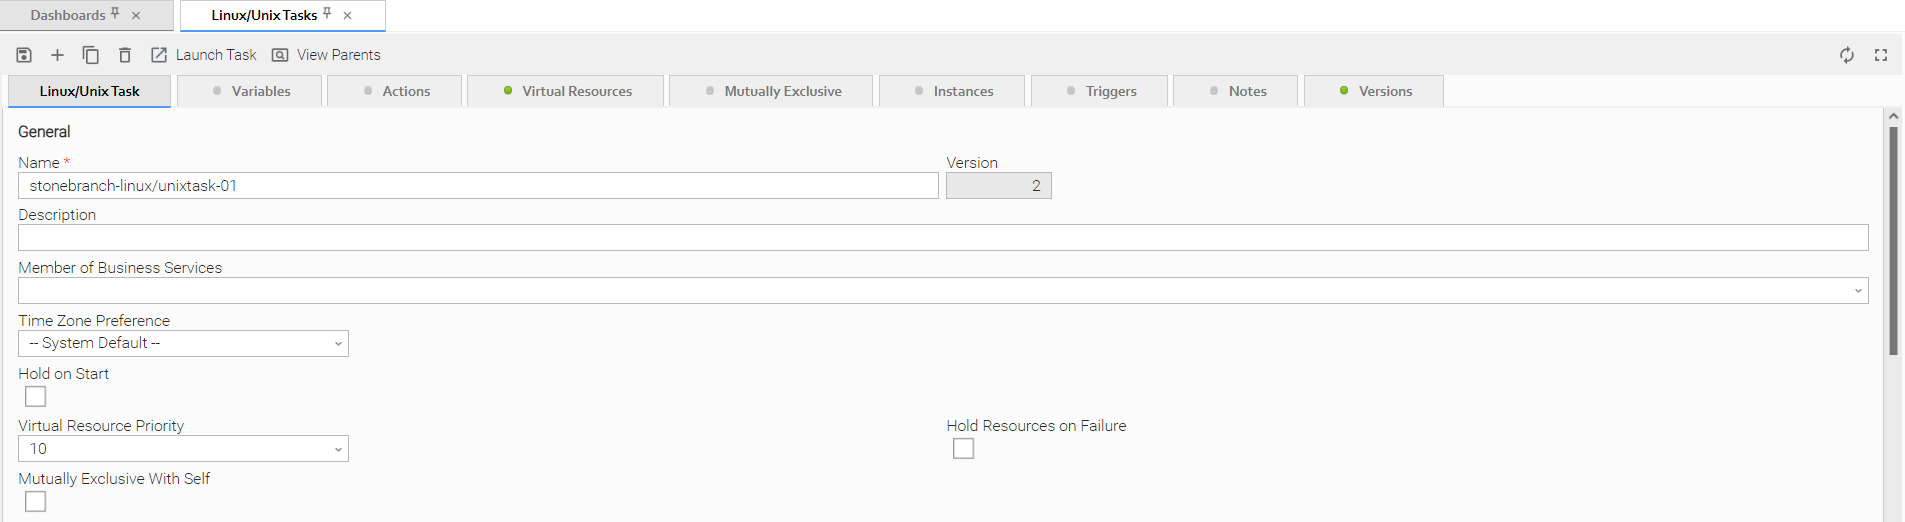
Color-Coding of Tabs
Tabs are color-coded:
- Current tab displays in white.
- Tabs that contain records display a green icon.
- Tabs that do not contain records display a gray icon.
For example, this Linux/Unix Task Details shows that there are one or more records under the Virtual Resources and Versions tabs:
Re-Ordering of Tabs
You can change the order of one or more tabs for a record type by clicking the tabs in any record of that type and dragging them left or right to a new position.
The tabs for all records of that record type will display in that order.
To restore the original order of the tabs, right-click any tab and click Restore Tab Order.
Any tab re-ordering that you apply is associated with your user own account. The re-ordering is automatically persisted in the Universal Controller database and will apply any time that you log into the user interface.
Complete Database Details
The information displayed in the Details for any record is only a portion of the complete details for that record contained in the Controller database.
To see the complete details, right-click anywhere in the record Details to display an Action menu and then click Details > Show Details.
The database Details for all records contains the following fields:
- UUID
- Updated By
- Updated
- Created By
- Created
The database Details for some record types (for example, any Task Instance record, as shown below) may show additional fields, such as Status History.

Record Details Metadata
The Action menu for every record Details contains a Details sub-menu. If you click Show Metadata on this sub-menu, a Metadata section displays at the bottom of the Details. (If Metadata is being displayed, the Details sub-menu contains a Hide Metadata entry.)
Note
You can choose to display Metadata automatically via the Show Metadata Universal Controller system property, and you can override the Show Metadata property setting via the Show Metadata user preference.
The Metadata for all records contains the following fields:
- UUID
- Updated By
- Updated
- Created By
- Created
The Metadata for any Task Instance record, as shown below, also contains a Status History field.
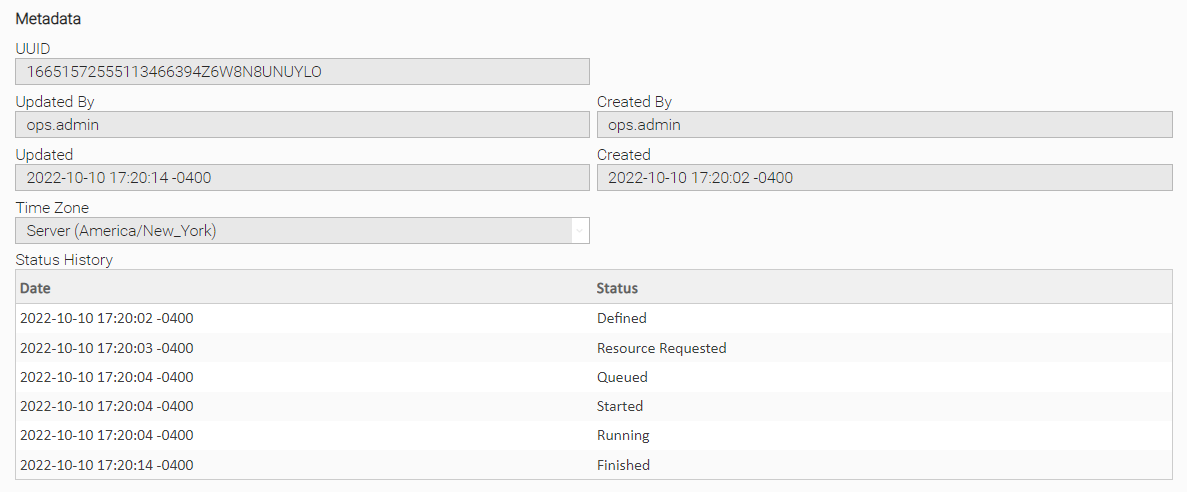
Metadata Field Descriptions
The following table describes the fields that display in the Metadata section of record Details.
|
Field Name |
Description |
|---|---|
|
UUID |
Universally Unique Identifier of this record. |
|
Updated By |
Name of the user that last updated this record. |
|
Updated |
Date and time that this record was last updated. |
|
Created By |
Name of the user that created this record. |
|
Created |
Date and time that this record was created. |
|
Status History |
Task instance only; History of all statuses that the task instance has gone through. |
Performing Actions on a Record
You can perform many actions on a record by right-clicking anywhere in the the record Details to display an Action menu of all actions available for that record.
You also can perform many actions on a record (or multiple records) from a records list; that is, without having to open the record (see Performing Actions on a Record from a List).
Note
The actions available for a record when selecting an Action menu from the record Details may not be the same as the actions available when you select an Action menu from a list.
The following actions can be performed for all user-defined records:
Updating a Record
|
Step 1 |
Open the record that you want to update. |
|---|---|
|
Step 2 |
Make any desired updates to the record and click the Update button. |
Note
Copying a Record
|
Step 1 |
Open the record that you want to copy. |
|---|---|
|
Step 2 |
In the <record> Name field, enter a new name for the record. |
|
Step 3 |
Right-click in the Details and then click Insert on the Action menu. The displayed record becomes a copy of the record you selected and is added to the list. |
Note
Caution
Do not use Insert to copy the following types of records unless you do not want to copy any records associated with them, such as Actions, Notes, and Variables. Using Insert does not copy any records associated with these types of records:
- Tasks
- Triggers
- Calendars
- Scripts
- Connections
- SNMP Managers
To copy any of these record types and all of their associated records, use the methods described in:
- Copying Tasks
- Copying Triggers
- Copying Calendars
- Copying Scripts
- Copying Email Templates
- Copying Database Connections
- Copying Email Connections
- Copying PeopleSoft Connections
- Copying SAP Connections
- Copying SNMP Managers
Also, do not use the Update button to copy a record; the Update button overwrites the existing record.
Printing a Record
To print a hard copy of the Details of any record:
|
Step 1 |
Either:
|
|---|---|
|
Step 2 |
Select a printer and click OK. |
Deleting a Record
Deleting a record removes it from the Controller database.
|
Step 1 |
Either:
|
|---|---|
|
Step 2 |
On the Confirmation pop-up that displays, click Yes. |
Record Versioning
Universal Controller maintains historical copies of most user-created records in the database. These include tasks and their associated records (virtual resources, variables, actions, notes), calendars and their custom day associations, custom days, variables, credentials, virtual resources, scripts (and associated notes), email templates and connections, database connections, SNMP managers, SAP connections, PeopleSoft connections, agent clusters, applications, Business Services, and triggers (and associated variables).
These historical copies - old versions of the current records - are read-only.
When you update any of these records, the Controller creates an image of the old version and stores it in the record's Versions tab. It also updates the Version field in the current version of the record. For example, if you have updated a task three times, there will be three versions of that task stored in the Versions tab, and the current version will be identified as Version 4.
Although you can purge old versions of records, the Versions field in the current record always will show how many versions of the record have been created.
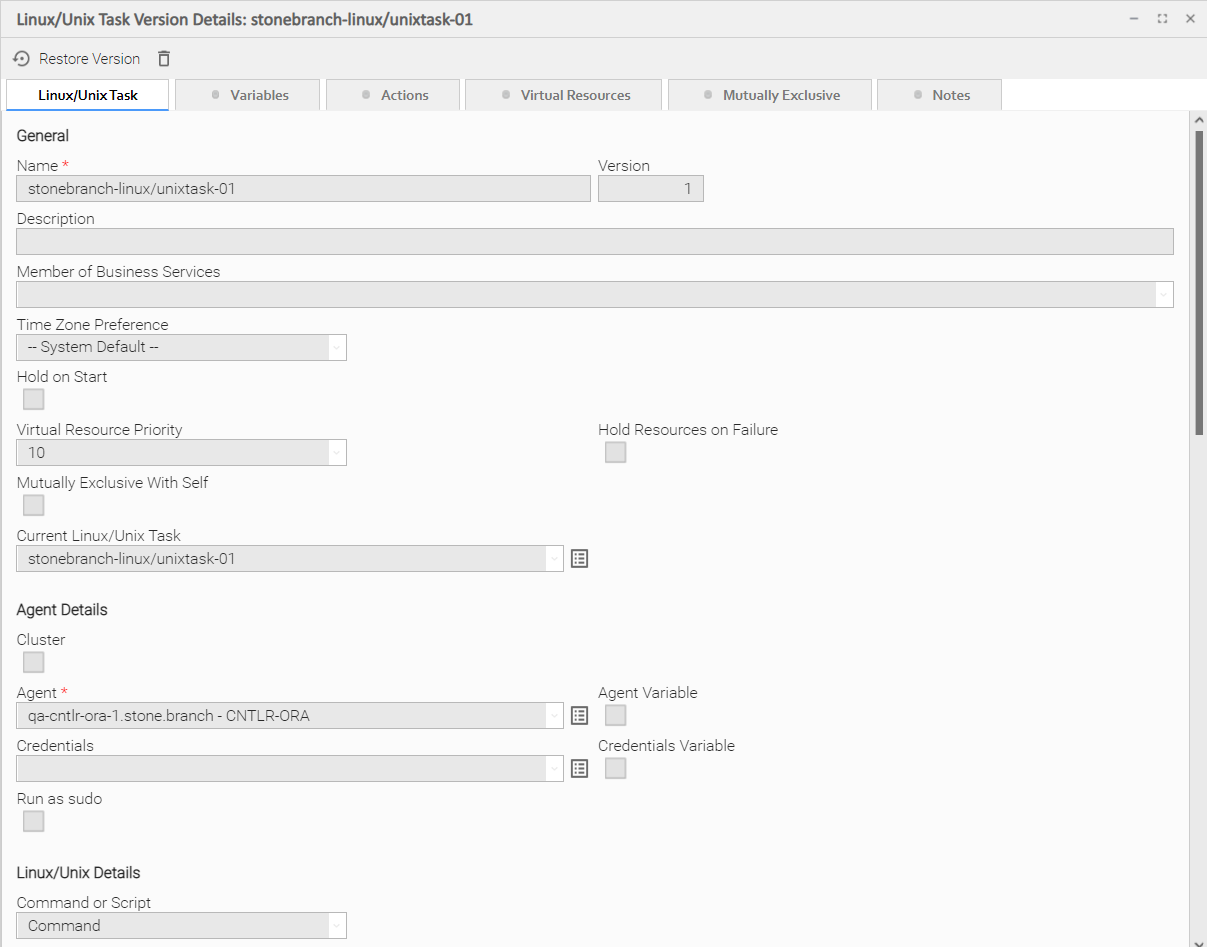
Viewing Old Versions of Records
To view old versions:
|
Step 1 |
Open the record Details for which you want to view old versions. The Version field indicates how many versions of this record have been made. |
|---|---|
|
Step 2 |
Click the Versions tab. A list of old versions that currently exist for this record displays. |
|
Step 3 |
Click the Details icon next to the Name of the version, or double-click anywhere in the version row, to displays Details for that version. |
|
Step 4 |
Click Close to return to the version list. |


Restoring Old Versions of Records
You can restore an old version of a record to the current version. When you restore an old version, the current version will become the newest old version.
|
Step 1 |
Display the Details of the record for which you want to restore an old version. |
|---|---|
|
Step 2 |
Click the Versions tab. |
|
Step 3 |
Either right-click a Version record in the Versions list and then click Restore Version, or open a Version record and click the Restore Version button. |
Fields Not Restored
The following fields are not restored when you restore an old version of a record.
|
Record Type |
Fields |
|---|---|
|
Trigger (all types} |
|
|
Agent Cluster |
|
|
Application |
|
|
Email Connection |
|
|
Task (all types) |
|
|
Workflow Task |
|
|
Virtual Resource |
|
Purging Old Versions of Records
The Controller provides two methods for purging old versions of records.
Note
When you purge old versions of records, the version number of the current version remains the same.
Purge Specific Versions
|
Step 1 |
Display the Details of the record for which you want to purge versions. |
|---|---|
|
Step 2 |
Click the Version tab to display a list of old versions of that record. |
|
Step 3 |
Either:
|
Purge All Outdated Versions
|
Step 1 |
From the Administration navigation pane, select Configuration > Server Operations. The Server Operations list displays. |
|---|---|
|
Step 2 |
Run the Purge Versions server operation to purge versions that exceed the maximum number of records allowed, as defined by the System Default Maximum Versions Universal Controller property. |
Enabling/Disabling Versioning
Two properties are available that allow you to control if and when the Controller automatically creates a new version of a record (and all its associated records):
- The Automatically Create Versions Universal Controller system property (true or false) determines whether modifications to the record itself will cause the Controller to create a new version of the record. The default value is true. If this property is set to false, the Controller does not create versions.
- The Create Version On Related List Change Universal Controller system property (true or false) determines whether changes, deletions, or additions to a related list will cause the Controller to create a new version of the record. For example, if this property is enabled, the Controller will create a new version of the task and all its associated records when the user adds a variable to the task, deletes a Note, or changes an Email Notification. The default value is true. If this property is set to false, and the Automatically Create Versions property is set to true, the Controller creates a new version only if the base record is updated.
To change one or both of these properties:
|
Step 1 |
From the Administration navigation pane, select Configuration > Properties. |
|---|---|
|
Step 2 |
Locate the property you want to change. |
|
Step 3 |
Double-click the Value and select true or false. |
Exporting and Importing Records
There are two different types of exports/imports:
- Bulk exports/imports let you export/import all records in a Controller database.
-
List exports/imports let you export/import all records selected on a list.
Note
Critical Path settings for tasks and Workflows are not exported/imported.
Important!
It is strongly recommended that you do NOT use the Import and Export functions for modification of Universal Controller records. API functions are available if you need to programmatically update, copy, insert, or otherwise manipulate Universal Controller records.
Bulk Export/Import
Universal Controller provides Server Operations that allow you to perform a bulk export and bulk import of all records in your Controller database.
You would use bulk export and bulk import to migrate data, in bulk, from an existing Universal Controller deployment to a new Universal Controller deployment. See:
List Export/Import
You also can perform a list export of records selected on a list, or a list import of an XML file to any list for a specific record type.
Updating Multiple Records
You can update multiple records from any of the following lists:
- Agents list for any Agent type (Credentials field and Member of Business Services field only)
- All Agents list (Credentials field and Member of Business Services field only)
- Tasks list for any task type
- All Tasks list
- Triggers list for any trigger type
- All Triggers list
- Database Connections, Email Connections, PeopleSoft Connections, and SAP Connections lists
- SNMP Managers list
- Credentials list (all fields except Type and Key Location (FTP only))
- Email Templates list
- Global Variables list
- Scripts list
- Users (these fields only: Active, Command Line Access, Department, Locked Out, Manager, Password, Password Requires Reset, Time Zone, Web Browser Access, Web Service Access)
- Virtual Resources list
There are two actions available for updating multiple records:
- Update - Updates all manually selected records on the list.
- Update Filtered - Updates all records that match the currently selected filter for the list.
Updates are applied and validated per selected record, since a valid update for one record may not be valid for another. A validation failure for one update does not prevent the update of other records.
Updating Manually Selected Records
|
Step 1 |
Select the list from which you want to update multiple records. |
|---|---|
|
Step 2 |
Ctrl-click each record on the list that you want to update. |
|
Step 3 |
Right-click any of the selected records to display an Action menu. |
|
Step 4 |
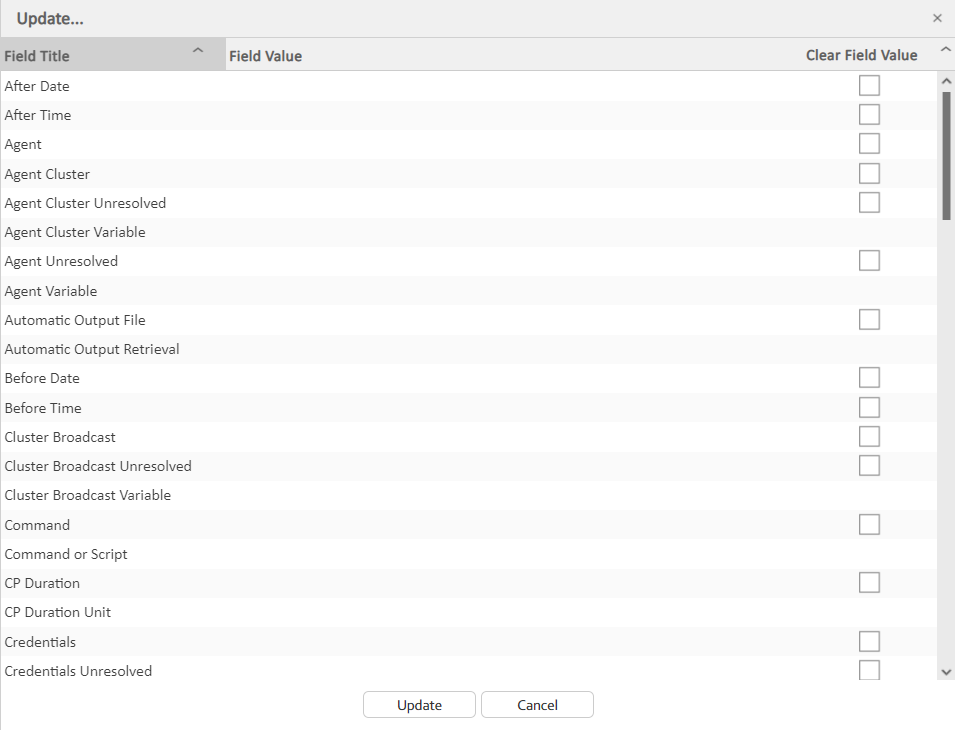
Click Update... to display the Update dialog, which lists every field that can be updated for that record type (since read-only fields cannot be updated, they are not displayed). |
|
Step 5 |
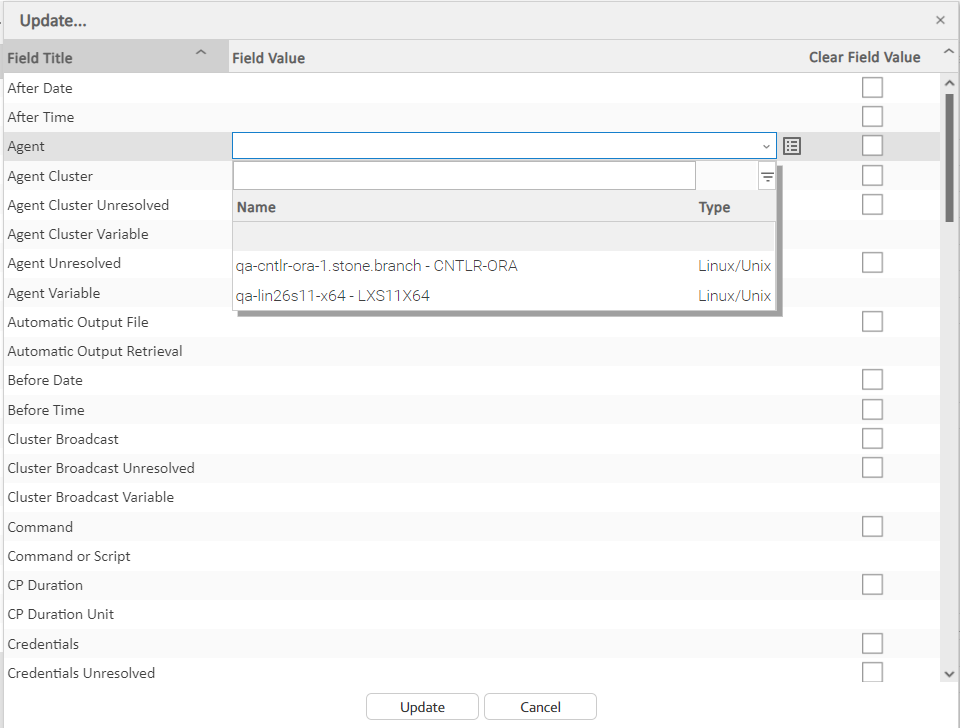
For any field, click anywhere in the Field Value cell to display an editor where you can enter / select a value. |
|
Step 6 |
If you want to clear the value of a field for each selected record and not select a new value, click the Clear Field Value check box. |
|
Step 7 |
Click the Update button to update all of the fields with the changed values. |
Updating Records That Match the Current Filter
|
Step 1 |
Select the list from which you want to update multiple records. |
|---|---|
|
Step 2 |
Create a Filter to display only those records that you want to update. |
|
Step 3 |
Right-click the list header to display an Action menu. |
|
Step 4 |
Click Update Filtered.... A Confirm pop-up displays. |
|
Step 5 |
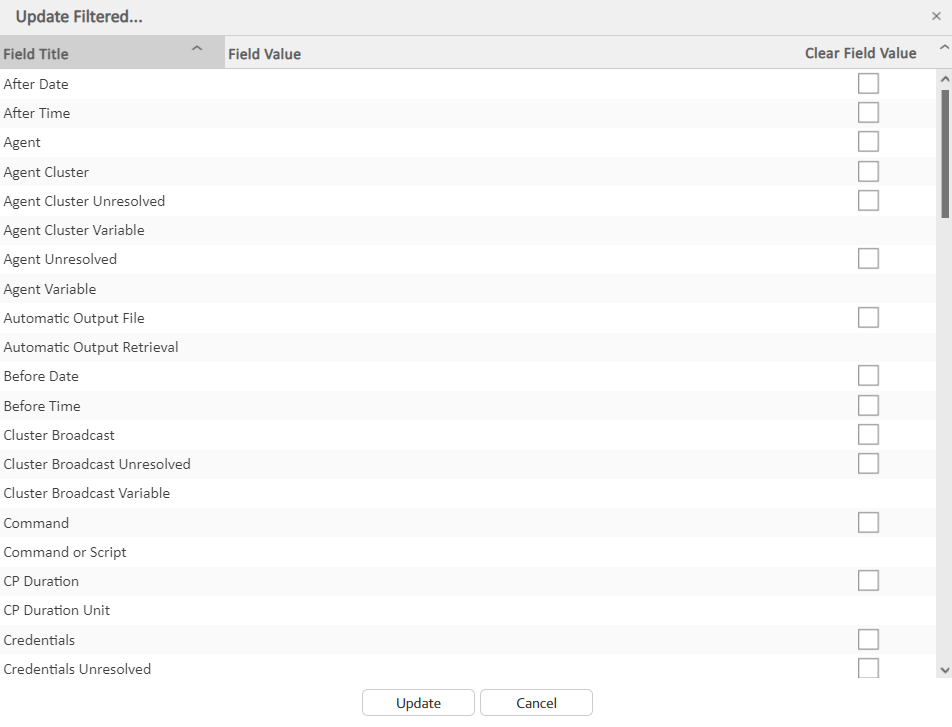
Click OK to display the Update Filtered dialog, which lists every field that can be updated for that record type (since read-only fields cannot be updated, they are not displayed). |
|
Step 6 |
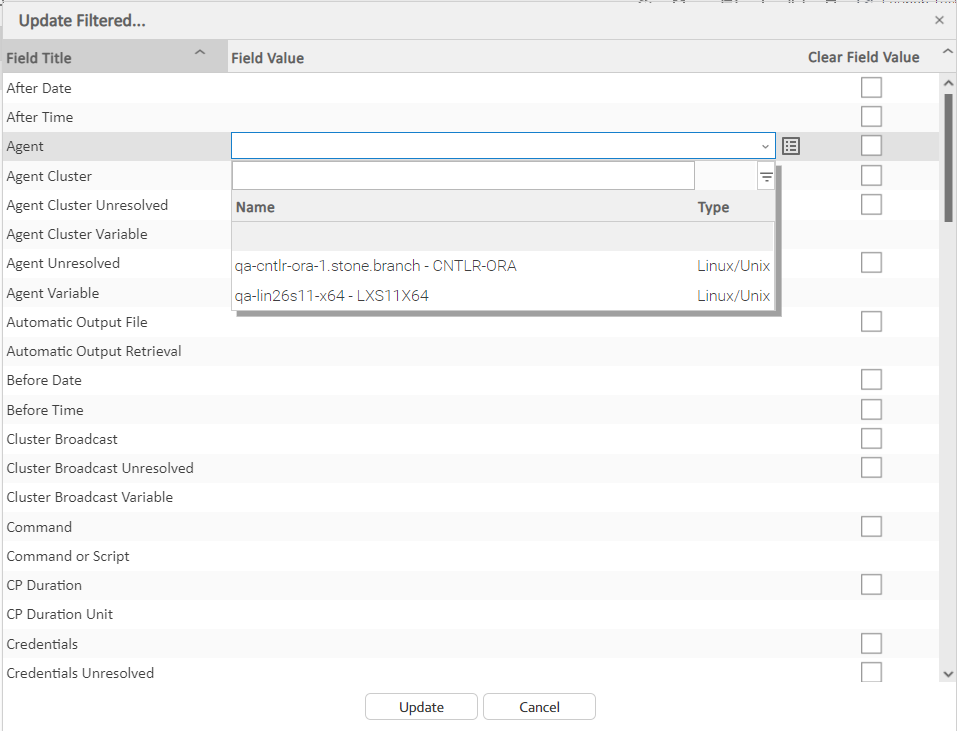
For any field, click anywhere in the Field Value cell to display an editor where you can enter / select a value. |
|
Step 7 |
If you want to clear the current value of a field for each selected record and not select a new value, click the Clear Field Value check box. |
|
Step 8 |
Click the Update button to update all of the fields with the changed values. |
Update / Update Filtered Dialog Columns
The following columns display on the Update / Update Filtered dialog:
|
Field Title |
Name of the field as displayed in the Record Details. |
|---|---|
|
Field Value |
Value that you want to select for this field in all of the selected records. |
|
Clear Field Value |
Check box indicating whether or not to clear the value from this field when the record is updated. By default, this column is unselected for all fields. |
Since read-only fields cannot be updated, they are not displayed on the List.
If you are updating multiple records on the All Tasks list or All Triggers list, the Update / Update Filtered dialog contains only fields that are common to all types of tasks or triggers.
Note
When updating manually selected Universal Task records on the All Tasks list, the Update dialog will only contain mapped fields if all of the records have the same Universal Template UUID (that is, those Universal Tasks were based on the same Universal Template).
Update / Update Filtered Dialog Variable Fields for Tasks
The Record Details for many individual tasks contain one or more Variable fields that allow you enter a variable instead of a record.
For example:
If you select Agent Variable in the Details for a single Linux/Unix task, the Agent field converts from a reference field (where you browse and select a record) into a text field that allows you to enter the variable.
In the Update / Update Filtered dialog for multiple tasks, the Agent field is not converted into a text field if you select Agent Variable. Instead, an additional field - Agent Unresolved - is provided, into which you enter a variable, variable and text, or Agent name. The Agent field is not used.

Uploading Records
You can upload records (as contained in a zip and/or JSON file) from your local system to any of the following lists:
- Agent Clusters list
- Bundles list
- Business Services list
- Calendars list
- Connections list (Database Connections, Email Connections, PeopleSoft Connections, and SAP Connections)
- Credentials list
- Custom Days list
- Email Templates list
- OMS Servers list
- Promotion Targets list
- Scripts list
- Simulation list
- SNMP Managers list
- Tasks list (for any task type)
- All Tasks list
- Triggers list (for any trigger type)
- All Triggers list
- Variables list
- Virtual Resources list
The Upload operation takes a zip file (containing one or more files) or a JSON file.
- For a zip file, each JSON file in the zip file will parsed, and non-JSON files will be ignored.
- For a JSON file, the file is parsed to update/create a record.
Note
A zip can contain multiple files, where each file could be for a different record type. For example, the zip might contain two files; one file for a task and one file for a trigger. The zip file can be uploaded from any list that supports upload (for example; tasks list, triggers list, and calendars list). When the zip file has been successfully uploaded, both the task record and the trigger record will be uploaded.
A JSON file contains data for one record type only. The exportTable property in the JSON file is used to identify the record type. Any file without this attribute will be ignored.
- For a record type that supports download/upload, the JSON response from Read web service API contains the
exportTableproperty. - For a Read response from an older release, you must manually add the
exportTableproperty in order to be upload compatible.
|
Step 1 |
Right-click any column on any list that supports uploads to display an Action menu. |
|---|---|
|
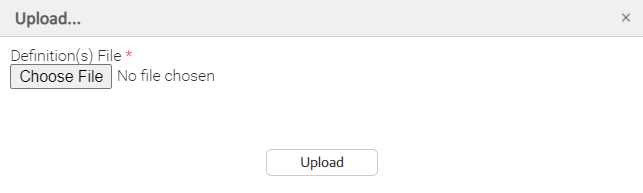
Step 2 |
Click Upload... to display the Upload dialog.
|
| Step 3 |
Click Browse to Select a file to upload. |
| Step 4 | Click Upload to upload the selected file. |
Downloading Records
You can download multiple records from a list (or download a single record from its record details) from any of the following lists:
- Agent Clusters list
- Bundles list
- Business Services list
- Calendars list
- Connections list (Database Connections, Email Connections, PeopleSoft Connections, and SAP Connections)
- Credentials list
- Custom Days list
- Email Templates list
- OMS Servers list
- Promotion Targets list
- Scripts list
- Simulation list
- SNMP Managers list
- Tasks list (for any task type)
- All Tasks list
- Triggers list (for any trigger type)
- All Triggers list
- Variables list
- Virtual Resources list
There are two actions available for downloading records from a list:
-
Download
Downloads all manually selected records on the list. -
Download Filtered
Downloads all records that match the currently selected filter for the list.
There is one action available for downloading a single record from its record details:
-
Download
Downloads the current record.
Download Manually Selected Records from a List
|
Step 1 |
Select the list from which you want to download multiple records. |
|---|---|
|
Step 2 |
Ctrl-click each record on the list that you want to download. |
|
Step 3 |
Right-click any of the selected records to display an Action menu. |
|
Step 4 |
Click Download to download the selected records. |
Download Records That Match the Current Filter
|
Step 1 |
Select the list from which you want to download multiple records. |
|---|---|
|
Step 2 |
Create a Filter to display only those records that you want to download. |
|
Step 3 |
Right-click the list header to display an Action menu. |
|
Step 4 |
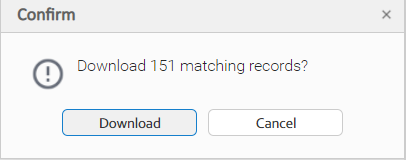
Click Download Filtered.... A Confirm pop-up displays.
|
|
Step 5 |
Click Download to download the matching records |
Download a Single Record from its Record Details
|
Step 1 |
Select the list from which you want to download a single record. |
|---|---|
|
Step 2 |
Open the record that you want to download. |
|
Step 3 |
Right-click anywhere in the record details to displays an Action menu. |
|
Step 4 |
Click Download to download the record. |
Note
You also can download a single record by manually selecting it from the records list.