Manually Running and Controlling Tasks
- Stonebranch (Deactivated)
Overview
A number of commands are available on the Activity Monitor and the Task Instances list that allow you to intervene in task processing where needed. Some commands are applicable only to certain task types and others are appropriate only when the task is in a particular status. In addition, commands require appropriate permissions.
Issuing Commands Against Task Instances
You can issue commands against task instances from:
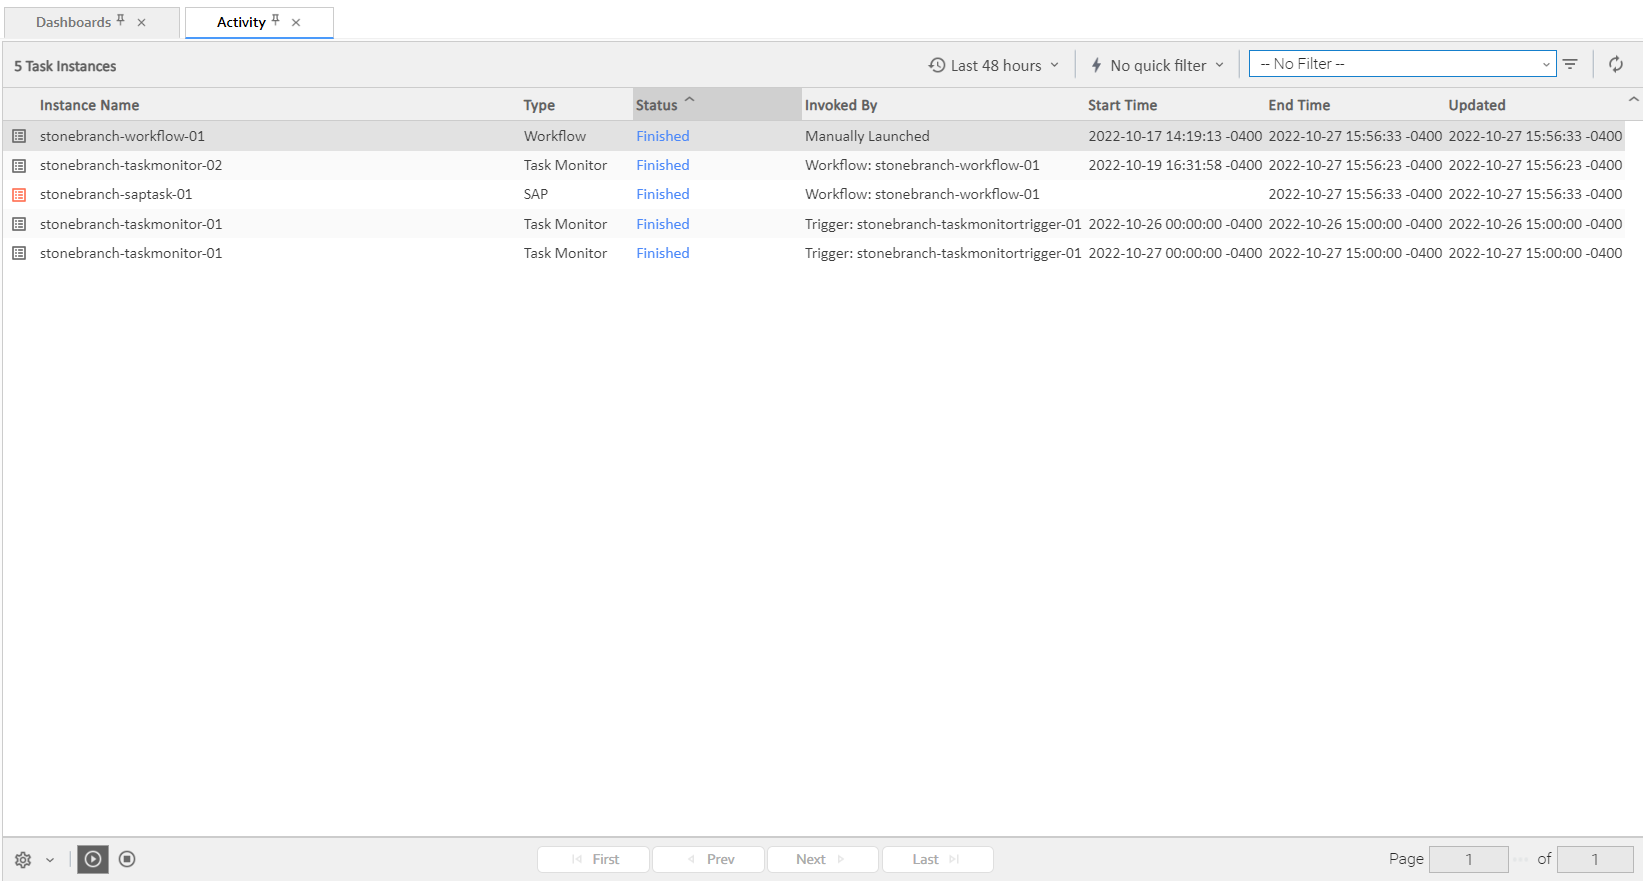
- Activity Monitor
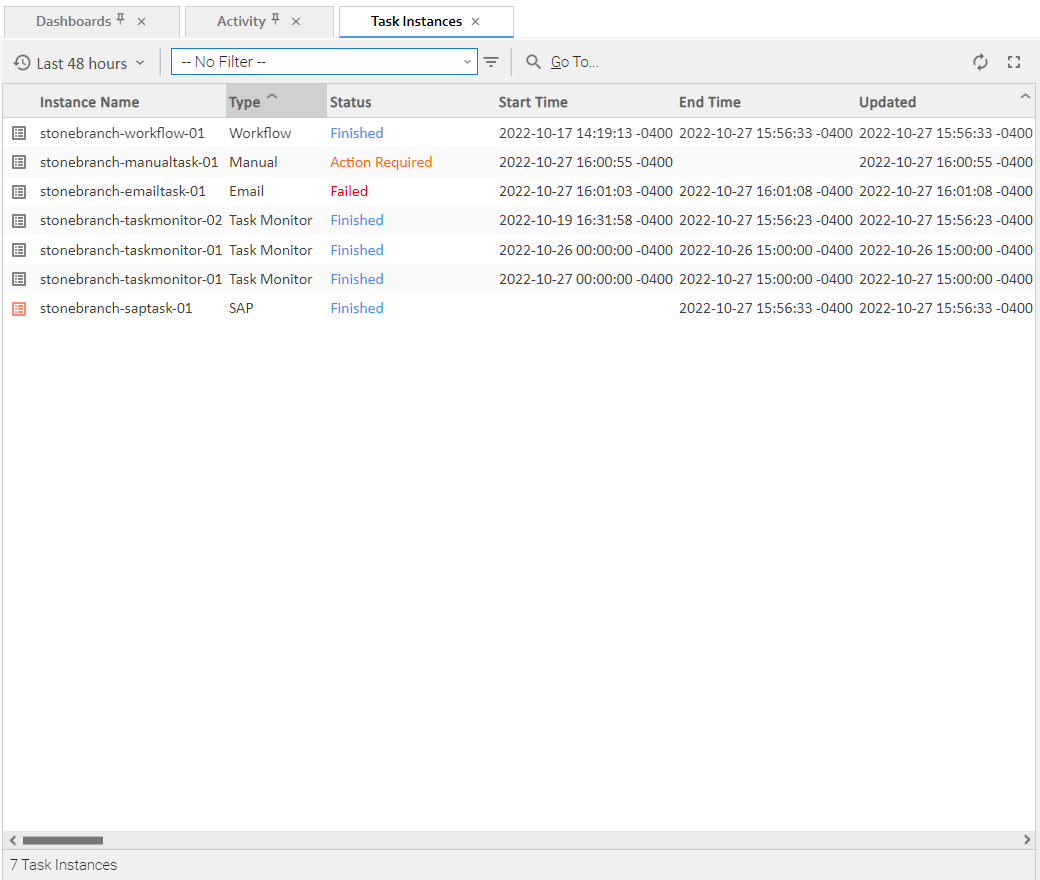
- Task Instances list (and the Task Instances list for a specific task)
- Workflow Monitor.
See Commands Supported for Task Instance Statuses for a list of task instances (and their statuses) for which these commands can be issued.
See Task Instance Status Types for a description of each type of task instance status.
Command | Description |
|---|---|
Cancel | Cancels a running task instance (see Cancelling a Task Instance), including a task instance in a completed workflow (status = Success, Finished, Skipped). |
Clear All Dependencies | Workflow tasks only: Clears all dependencies (predecessors, resources, and exclusive) of a task instance (see Clearing All Dependencies of a Task Instance). |
Clear Exclusive | Clears mutually exclusive dependencies of a task instance (see Clearing Mutually Exclusive Dependencies of a Task Instance). |
Clear Predecessors | Workflow tasks only: Clears predecessor dependencies of a task instance (see Clearing Predecessor Dependencies of a Task Instance). |
Clear Resources | Clears resource dependencies of a task instance (see Clearing Resource Dependencies of a Task Instance). |
Clear Time/Wait Delay | Clears all Wait To Start and Delay On Start specifications for this task instance (see Clearing Time Wait/Delay Specifications of a Task Instance). |
Force Finish | Places a task instance into the Finished status (see Force Finishing a Task Instance), including a task instance in a completed workflow (status = Success, Finished, Skipped). |
Force Finish (Halt) | Places a task instance into the Finished status (see Force Finishing (Halt) a Task Instance), including a task instance in a completed workflow (status = Success, Finished, Skipped). |
Force Finish/Cancel | Cancels a task and places it into the Finished status (see Force Finish/Cancelling a Task Instance); including a task instance in a completed workflow (status = Success, Finished, Skipped). |
Force Finish/Cancel (Halt) | Cancels a task and places it into the Finished status (see Force Finish/Cancelling (Halt) a Task Instance). |
Hold | Temporarily prevents a task instance from running (see Putting a Task Instance on Hold). |
Release | Removes a task instance from being on Hold (see Releasing a Task Instance from Hold). |
Release Recursive | Workflow tasks only: Removes a workflow and its task instances from being on Hold (see Releasing a Task Instance from Hold). |
Re-run | Not applicable for Workflow tasks: Re-runs a task instance (see Re-running a Task Instance), including a task instance in a completed workflow (status = Success, Finished, Skipped). |
Re-run (Suppress Intermediate Failures) | Not applicable for Workflow tasks: Re-runs a task instance (see Re-running a Task Instance) specifying that intermediate failures be suppressed, including a task instance in a completed workflow (status = Success, Finished, Skipped). |
Retrieve Output | Retrieves output (Standard Output and/or Standard Error, or in the case of z/OS, the Job Log) for any running or completed task instance, limited to the following supported task types:
|
Set Completed | Sets a Manual Task instance to the Success status. |
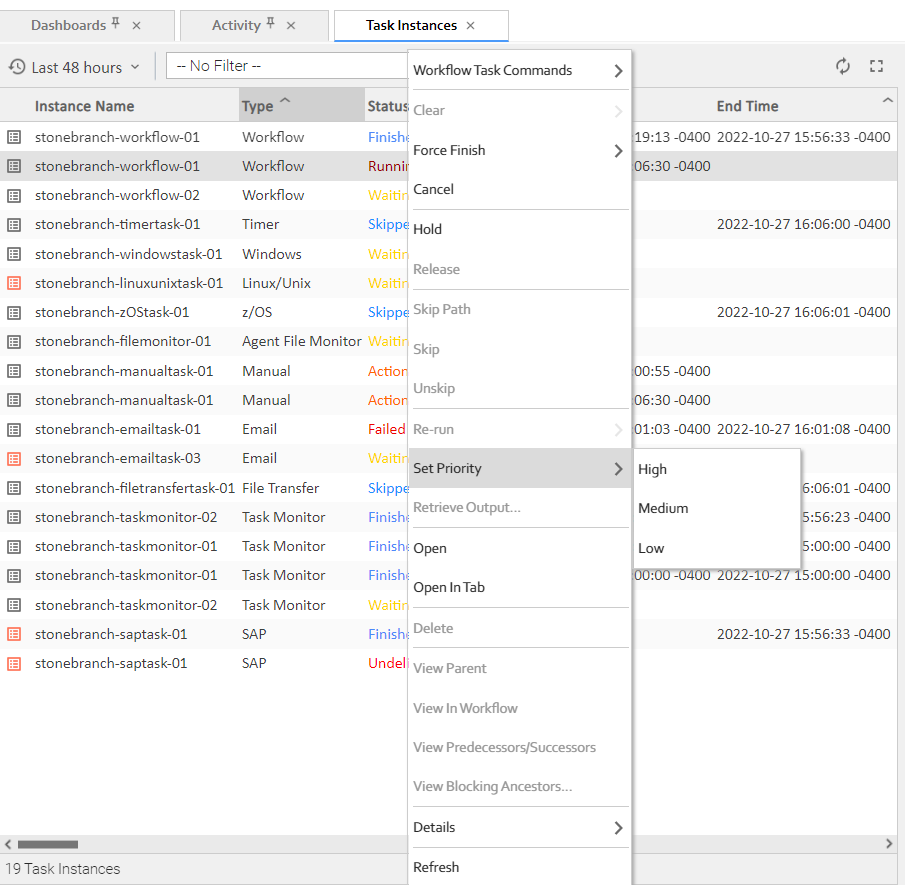
Set Priority | Sets the priority of a task instance in Started, Running, or Queued status to High, Medium, or Low (see Changing the Priority of a Task Instance). |
Set Started | Resets the Started Time of a Manual Task instance. |
Skip | Disregards a task instance (see Skipping a Task Instance). |
Skip Path | Disregards a task instance and all of its dependent task instances (see Skipping a Task Instance). |
Unskip | Removes the Skip status of a task instance (see Unskipping a Task Instance). |
Issuing Commands from the Activity Monitor
Issue a Command Against a Single Task Instance
Either:
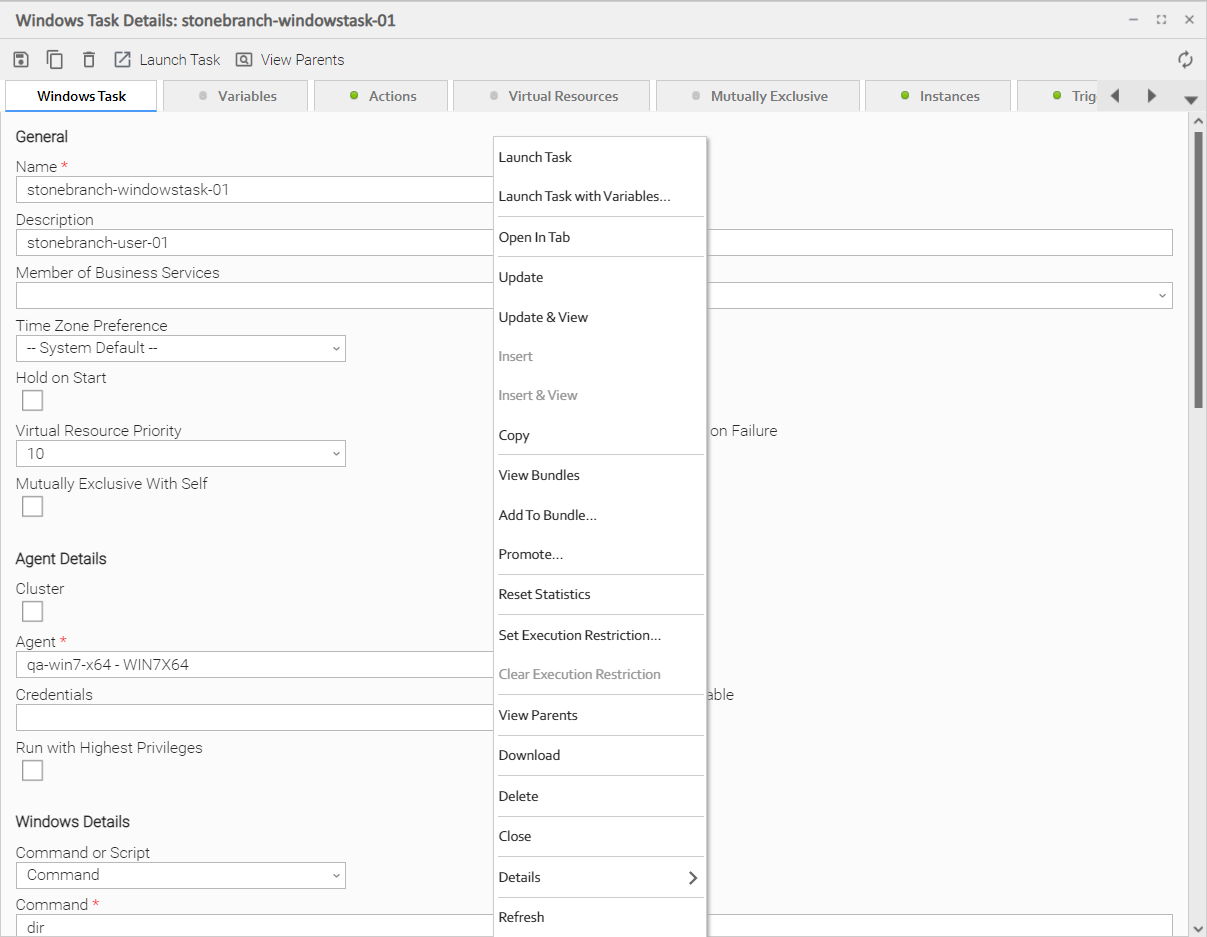
- Right-click a task instance on the list to display an Action menu of available commands for that task instance.
- Click the Details icon of a task instance to display the Task Instance Details, and then right-click in the Details to display an Action menu of available commands for that task instance.
Issue a Command Against Multiple Task Instances
Press Ctrl and right-click each task instance that you want to issue a command against to display an Action menu of available commands that can be issued against all of the selected task instances.
(You also can press Ctrl and right-click a single task instance and then press Shift and right-click another task instance to select the group of task instances between the first and second task instance, inclusive.)
Issuing Commands from the Task Instances List
Issue a Command Against a Single Task Instance
Either:
- Right-click a task instance to display an Action menu of available commands for that task instance.
- Click a task instance to display the Task Instance Details below the list, or click the Details icon to display a Details pop-up for the task instance, and then right-click in the Details to display an Action menu of available commands for that task instance.
Issue a Command Against Multiple Task Instances
Press Ctrl and right-click each task instance that you want to issue a command against to display an Action menu of available commands that can be issued against all of the selected task instances.
(You also can press Ctrl and right-click a single task instance and then press Shift and right-click another task instance to select the group of task instances between the first and second task instance, inclusive.)
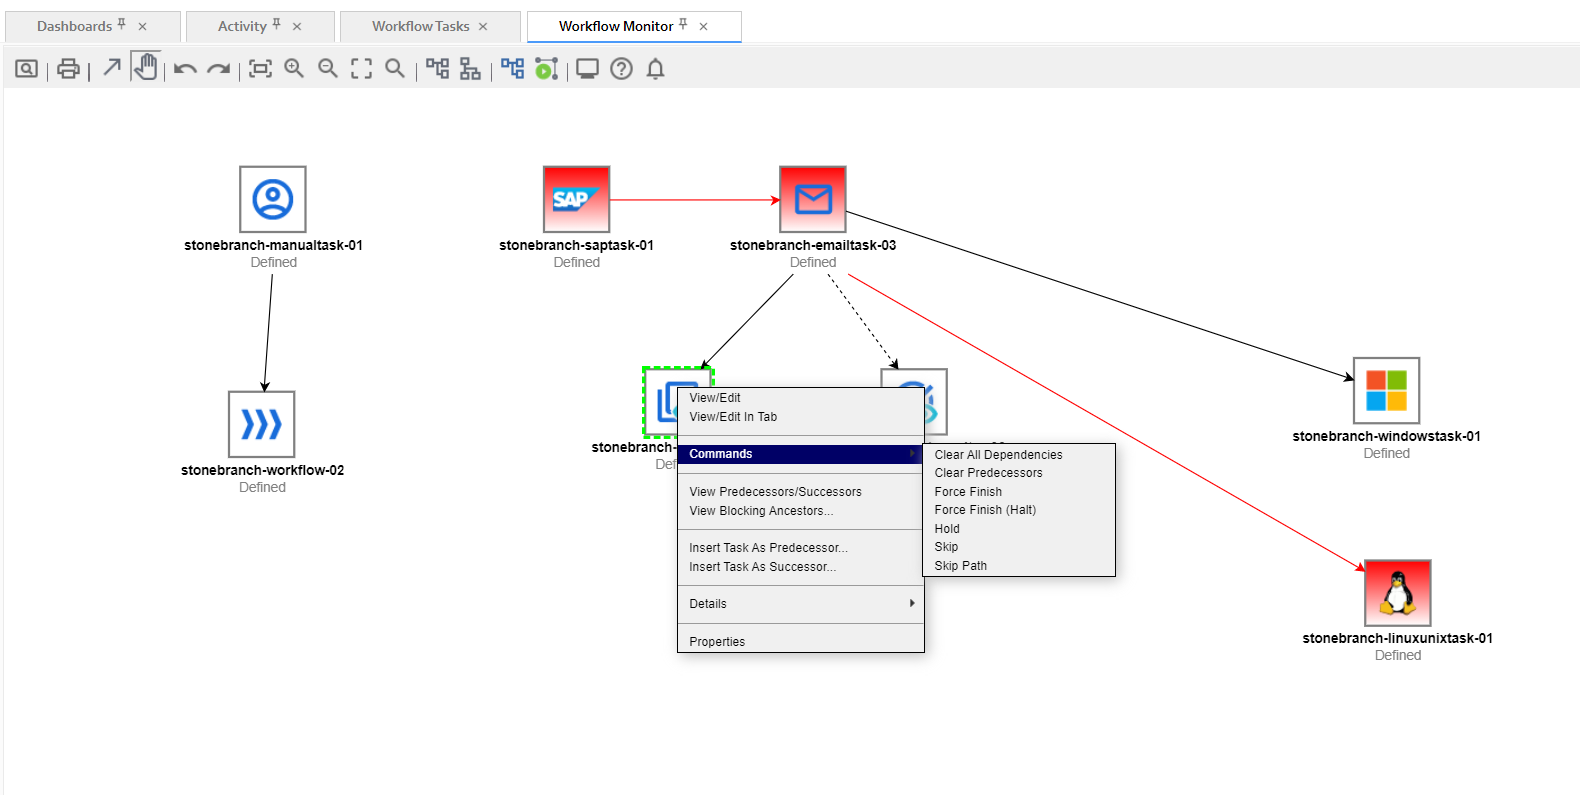
Issuing Commands from the Workflow Monitor
From the Workflow Monitor, you can issue a command against a single task instance within the workflow or against the workflow task instance itself.
Command Confirmation
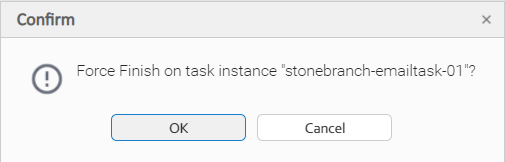
If you want to receive a confirmation message after issuing a command but before the command is performed, set the System Default Confirm Task Instance Commands Universal Controller system property to Yes (the default is No).
For example:
Issue a Command Against a Task Instance within the Workflow
Step 1 | Right-click the task instance to display a pop-up menu of commands appropriate for the selected task instance. |
|---|---|
Step 2 | Click Commands and then click the command that you want to issue against the selected task instance. |
For example:
Issue a Command Against the Workflow Task Instance
Step 1 | Right-click the Workflow Monitor canvas to display a pop-up menu of commands appropriate for the workflow task instance. |
|---|---|
Step 2 | Click Commands and then click the command that you want to issue against the workflow task instance. |
For example:

Commands Supported for Task Instance Statuses
The following table identifies all possible task instance statuses, the task types they are valid for, and the commands that you can issue against a task instance in each status.
For a description of each status, see Task Instance Status Types.
For a description of each command, see Issuing Commands Against Task Instances.
For details and instructions on issuing these commands, see the specific section (below) on this page.
Status | Task Type | Supported Commands |
|---|---|---|
Action Required (60) | Manual |
|
Cancel Pending (99) |
| |
Cancelled (130) | All |
|
Confirmation Required (125) | z/OS |
|
Defined (0) | All |
|
Exclusive Requested (22) | All |
|
Exclusive Wait (23) | All |
|
Execution Wait (33) |
| |
Failed (140) | All (except Workflows) |
|
Finished (190) | All |
|
Held (20) | All |
|
In Doubt (110) |
| |
Queued (40) |
| |
Resource Requested (25) | All tasks using Virtual Resources |
|
Resource Wait (30) | All tasks using Virtual Resources |
|
Running (80) | All |
|
Running Problems (81) | Workflow |
|
Skipped (180) | All |
|
Start Failure (120) | All |
|
Started (70) | Agent-based and Manual |
|
Submitted (43) | z/OS |
|
Success (200) | All |
|
Time Wait (15) | All (except Timer) |
|
Undeliverable (35) |
| |
Waiting (10) | All |
|
Agent-Based Task Types
The following task types are Agent-based task types:
- Linux/Unix
- Windows
- z/OS
- Universal Command
- SAP
- PeopleSoft
- File Transfer
- Agent File Monitor
- Remote File Monitor
- System Monitor
- Universal
Manually Launching a Task
Two methods are available for manually launching a task:
- From a tasks list
- From task Details
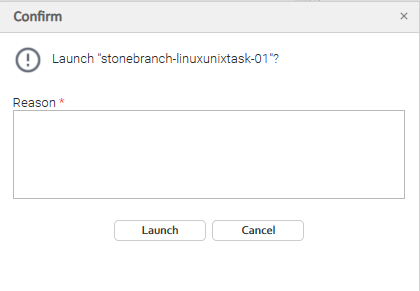
Set the Task Launch Reason Required system property to true to add a required launch reason field to the manual launch command of a task or trigger. These details will be added to the Notes section of the task instance details.
Launch One or More Tasks from a Tasks List
Step 1 | From the Automation Center navigation pane, select Tasks > <type of task>. The Tasks list for that task type displays. |
|---|---|
Step 2 | Either:
An Action menu displays. |
Step 3 | Select either:
Note If you selected multiple tasks, Launch with Variables is disabled. |
Step 4 | To view Details about running task instances, select Task Instances > Activity from the Automation Center navigation pane and click on the task instance. |

Launch a Task from Task Details
Step 1 | Select the task you want to launch. |
|---|---|
Step 2 | Either:
|
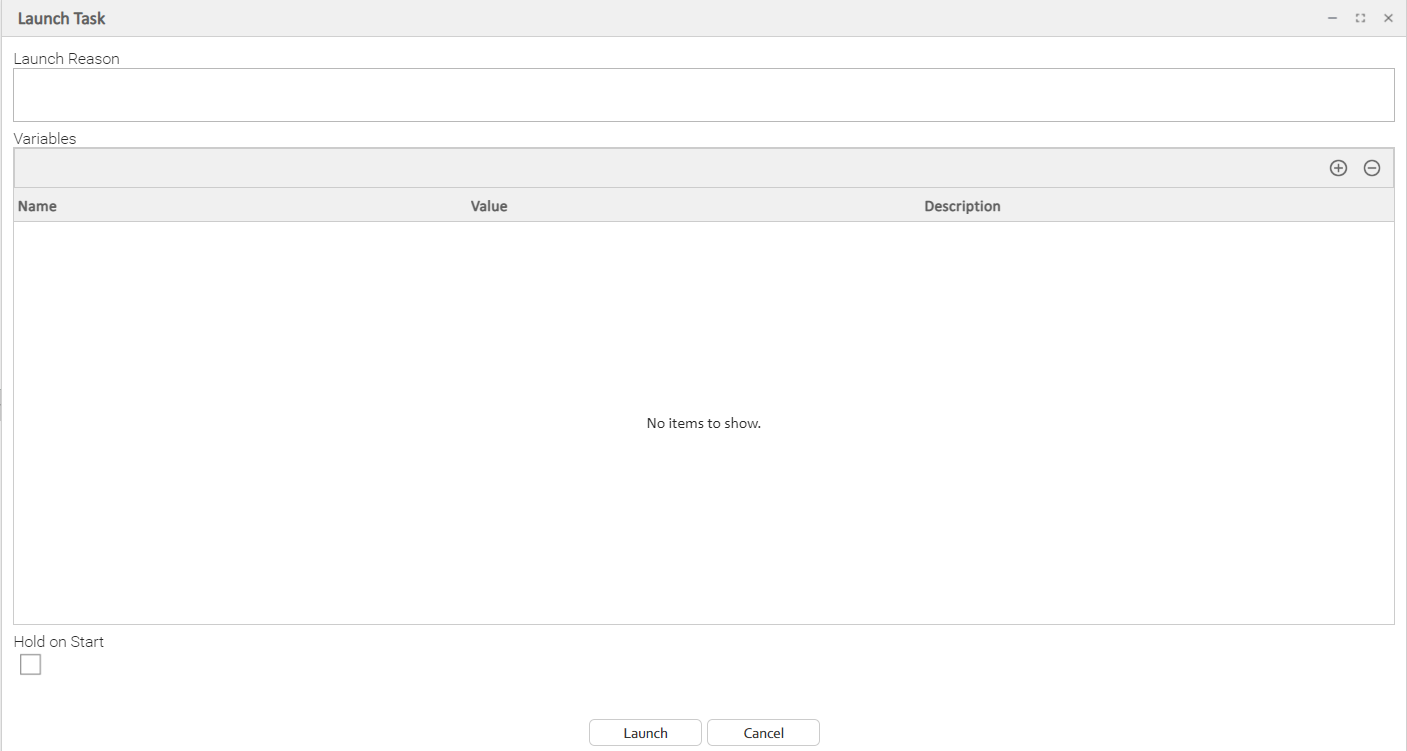
Launch a Task Manually with Temporary Variable Values
The Controller supports a Launch with Variables feature that allows you to quickly provide values for the variables specified in the task and launch it. All task types support the Launch with Variables feature.
(In the following procedure, the task is a Workflow already set up with variables where required.)
To launch a task using Launch with Variables:
Step 1 | Display the task you want to launch. |
|---|---|
Step 2 | Access the Action menu. |
Step 3 | Select Launch Task with Variables.... The Launch Task (with Variables) dialog displays. Any variables attached to this task automatically are displayed in alphabetic order (a-z). |
Step 4 | As needed, set the variable values or add new variables. |
Step 5 | If you want to put the task instance in held status when the task is started, select Hold on Start. A Hold Reason field then displays which allows you to enter information about why the task will be put on hold when it starts. |
Step 6 | If the task is a Workflow (as shown here), and:
Time Zone lets you select a time zone for this specific launch of the Workflow so that it runs, and evaluates both Run Criteria and Execution Restrictions, according to that time zone. |
Step 7 | When you are finished, click Submit. The Controller populates the variables with the values you supplied and launches the task. |

Variable Resolution
If the Task Field Resolution Required Universal Controller system property is set to true, and there is a variable in a resolvable field - such as Command, Script, Parameters (including z/OS Parameters), and Environment Variables - that is unresolved at runtime, the task will transition to Start Failure.
A resolution check is not performed for variables used in the following places:
Workflow Task
Notification
PeopleSoft Task: Run Time Parameters
Stored Procedure Task: Stored Procedure Parameters
Email Template
Email Monitor: Advanced Criteria
Abort Action
Set Variable Action
Wait/Delay Options
Recurring Task: Override Variables
Note
For a Recurring task, the task will transition to Start Failure only if there are unresolved variables in the Recurring task definition itself. Unresolved variables in the target task are irrelevant when determining if the Recurring task should transition to Start Failure.
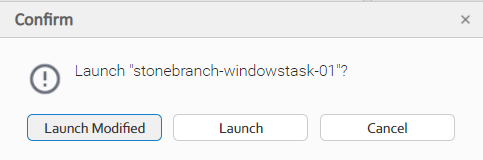
Launch a Task Using Unsaved Modifications
When you select to launch a task, a dialog displays that ask you to confirm that task that you want to launch:
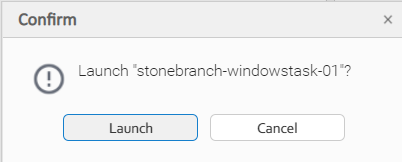
You also can launch a task that you have modified without saving the modifications.
When you select to launch a modified but unsaved task (single task only), the confirmation dialog specifies that you are about to launch a task with unsaved modifications:
Changing the Priority of a Task Instance
You can change the priority of a task instance so that it will run sooner or later, as described below.
The priority specified here is meaningful only in relation to the priority setting of other tasks sent to that Agent from the same Controller instance.
You can change the priority of a Linux/Unix, Universal, Windows, or z/OS task instance while it is in any of the following statuses: Started, Running, Queued.
Two methods are available for changing the priority of a task instance:
- From the Activity Monitor or Task Instances list
- From the Workflow Monitor
Set Priority on a Task Instance from the Activity Monitor or Task Instances List
Step 1 | Select the task instance for which you want to set the priority. |
|---|---|
Step 2 | Right-click the task instance and, on the Action menu, select the priority level. |
Step 3 | When the Set Priority command has been executed, the Controller displays the following message at the bottom of the list: |
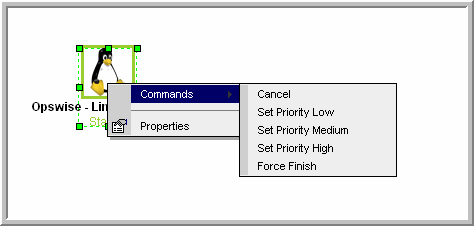
Set Priority on a Task Instance from the Workflow Monitor
Step 1 | View the Workflow that contains the task instance for which you want to set the priority. |
|---|---|
Step 2 | Select the task instance for which you want to set priority. |
Step 3 | Select Commands. |
Step 4 | Select a priority for the task instance. |
Re-running a Task Instance
If a task instance is part of a Workflow, you can re-run the task instance as long as the task instance and the Workflow have not been deleted.
If a task instance is not part of a Workflow, you can re-run the task instance as long as the task instance has not been been deleted.
To qualify for re-run, a task instance must be in one of the following statuses: Success, Start Failure, Failed, Cancelled, Finished.
Additionally, you can re-run a task instance in the In Doubt status if the Allow In Doubt Re-run Universal Controller system property is set to true.
To suppress intermediate failures during a manual re-run, use Re-run (Suppress Intermediate Failures) instead of Re-run.
Typically, you can re-run multiple task instances; however, task instances in the In Doubt status must be re-run one instance at a time.
You can re-run a task even if it already is scheduled for automatic retry. The retry attempt counts as one of the scheduled retries.
Note
You cannot re-run a Workflow task instance. However, you can re-insert a sub-Workflow into an active Workflow task instance in order to re-run it.
When you re-run a task instance, the Controller uses the same task instance. That is, the new task instance has the same sys_id. However, you can view the two task instances distinctly on the History list (one for each time it ran).
Two methods are available for re-running a task instance:
- From the Activity Monitor or Task Instances list
- From the Workflow Monitor (if the task instance is running as part of a Workflow)
Suppressing Intermediate Failures
If a task instance is in the Failed status following the usage of Re-run (Suppress Intermediate Failures), the following will be suppressed.
- All Actions (Abort, Email Notification, Set Variable, SNMP Notification, and System Operation) defined for the task instance on a Failed status.
- Workflow conditional path processing; any Successors waiting on a failure path will not be released.
- Task Monitors will not be notified of the Failed status. Also, any Task Monitor task that has a Time Scope in the past will disqualify any matching task instance in the past with a Failed status resulting from Re-run (Suppress Intermediate Failures).
- Any Workflow containing the Failed task instance will not transition to the Running/Problems status.
Re-run a Task Instance from the Activity Monitor or Task Instances List
Step 1 | Select the task instance you want to re-run. |
|---|---|
Step 2 | Click Re-run. The task status changes to the next appropriate status as though it had just been launched. |
Re-run a Task Instance from the Workflow Monitor
Step 1 | View the Workflow that contains the task instance you want to re-run. |
|---|---|
Step 2 | Select the task instance you want to re-run. |
Step 3 | Select Commands. |
Step 4 | Select Re-run. The task status changes to the next appropriate status as though it had just been launched, and the Workflow Console opens to display information about the re-run. |
Re-run a z/OS Task Instance in the In Doubt Status
If a z/OS task instance is in the In Doubt status, re-running the task instance will re-submit it from the beginning, which is equivalent to performing an Insert Task of the same task into the Workflow except, in this case, the UUID will not change.
Note
The standard clean-up of sequential datasets still applies to avoid a NOTCAT2 condition. For information on how to prevent automatic data set deletion from occurring when the task instance is re-submitted, see Disabling Automatic Data Set Deletion.
If you choose to re-run a z/OS task instance from an In Doubt status, a confirmation pop-up displays to make sure that you are aware that the task instance will be re-submitted from the beginning.
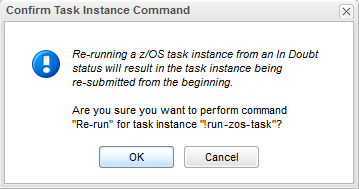
Note
The confirmation for z/OS Re-run from an In Doubt status will happen regardless of the System Default Confirm Task Instance Commands Universal Controller system property value.
Cancelling a Task Instance
The Cancel command cancels a running task instance.
You can cancel a task instance while it is in any of the following statuses: Queued, Action Required, Started, Running.
If the task instance is part of a Workflow, you also can Cancel the task instance if the task instance is re-run after the Workflow completes.
For tasks that run on Agents, including Windows, Linux, Unix, z/OS, FTP, Agent File Monitor, and Universal Command tasks, the Cancel command is sent to the Agent.
- If the task instance has not yet been launched, it does not launch.
- If the task instance already has been launched, the Agent cancels it, if possible.
- If the task instance is a Workflow, any of its task instances in Running status go to Cancelled status; the Workflow itself goes to Running/Problems status.
- If the task instance is in a Workflow, the Workflow goes to Running/Problems status. If the task is re-run, the Workflow returns to Running status.
Note
For Extension-based Universal Task Instances, the Controller allows you to forcibly execute the Cancel command while already in Cancel Pending, which immediately terminates the extension process and any custom cancel logic being executed.
Two methods are available for cancelling a task instance:
- From the Activity Monitor or Task Instances list
- From the Workflow Monitor (if the task instance is running as part of a Workflow)
Note
Cancelling a Web Service task instance with Protocol = SOAP is not supported.
Cancelling a PeopleSoft task instance cancels the PeopleSoft process itself, not the PeopleSoft task process. Once the Peoplesoft process has been cancelled, its status will filter through to the PeopleSoft task.
Cancel a Task Instance from the Activity Monitor or Task Instances List
Step 1 | Select the task instance you want to cancel. |
|---|---|
Step 2 | Click Cancel. The task status changes to Cancelled. |
Cancel a Task Instance from the Workflow Monitor
Step 1 | Open the Workflow Monitor for the workflow that contains the task instance you want to cancel. |
|---|---|
Step 2 | |
Step 3 | Select Commands. |
Step 4 | Select Cancel. The task status changes to Cancelled and the Workflow Console opens to display information about the cancellation. |
Force Finishing a Task Instance
The Force Finish command puts a task instance into the Finished status, regardless of what the task instance is doing.
You can Force Finish a task instance while it is in any of the following statuses: Defined, Waiting, Held, Resource Wait, Queued, Action Required, Started, Running, Cancel Pending, In Doubt, Failure to Start, Cancelled, Failed.
If the task instance is part of a Workflow, you also can Force Finish the task instance if the task instance is re-run after the Workflow completes.
Note
The Force Finish command also cancels a Universal Task instance if Always Cancel On Force Finish is enabled for its Universal Template.
Since force finishing a Workflow task instance also force finishes its children, Force Finish also cancels a child Universal Task instance if Always Cancel On Force Finish is enabled for its Universal Template.
Although Force Finish sets the status of a task instance to Finished, the associated process (if any) will continue to run. For example, when force finishing a Windows task, the process will not be canceled by the agent and will continue to run until completion.
One purpose of Force Finish is to allow successor task instances in a workflow to launch without waiting for the current task instance to complete. You also may want to Force Finish a stand-alone task instance; for example, you may want to mark a failed job as Finished, rather than rerunning the job.
If a task instance is running when the user issues a Force Finish, the Controller marks the task instance as Finished even though the actual process continues running. Two exceptions are the Agent File Monitor and Remote File Monitor; for these task types, the monitoring processes are aborted by a Force Finish command. Assuming they have no other dependencies, all successor task instances waiting for successful completion of this task instance will start.
When you issue a Force Finish against a Workflow, the Workflow and any of its tasks that are not already in Success, Finished, or Skipped status will go to Finished status.
Two methods are available for Force Finishing a task instance:
- From the Activity Monitor or Task Instances list
- From the Workflow Monitor (if the task instance is running as part of a Workflow)
Force Finish a Task Instance from the Activity Monitor or Task Instances List
Step 1 | Select the task instance you want to Force Finish. |
|---|---|
Step 2 | Click Force Finish. The task status changes to Finished. |
Force Finish a Task Instance from the Workflow Monitor
Step 1 | View the workflow that contains the task instance you want to Force Finish. |
|---|---|
Step 2 | |
Step 3 | Select Commands. |
Step 4 | Select Force Finish. The task status changes to Finished and the Workflow Console opens to display information about the Force Finish. |
Force Finishing (Halt) a Task Instance
Just as with the Force Finish command, the Force Finish (Halt) command puts a task instance into the Finished status, regardless of what the task instance is doing.
You can Force Finish (Halt) a task instance while it is in any of the following statuses: Defined, Waiting, Held, Resource Wait, Queued, Action Required, Started, Running, Cancel Pending, In Doubt, Failure to Start, Cancelled, Failed.
If the task instance is part of a Workflow, you also can Force Finish (Halt) the task instance if the task instance is re-run after the Workflow completes.
However, Force Finish (Halt) prevents successor task instances in a Workflow from being run. Those tasks will not run until you re-run the task against which you had executed Force Finish (Halt).
Although Force Finish sets the status of a task instance to Finished, the associated process (if any) will continue to run. For example, when force finishing a Windows task, the process will not be canceled by the agent and will continue to run until completion.
If a task instance is running when the user issues a Force Finish (Halt), the Controller marks the task instance as Finished even though the actual process continues running. Two exceptions are the Agent File Monitor and Remote File Monitor; for these task types, the monitoring processes are aborted by a Force Finish (Halt) command. All successor task instances waiting for successful completion of this task instance will remain in Waiting status.
Similarly, task monitors are not released if a Force Finish (Halt) is executed against a task being monitored.
Note
There are two areas in the user interface that you can check to determine if a task instance was forced finished with halt:
- Additional Information field in the Audit Details for that force finished task instance.
- Status Description field in the Task Instance Details for that force finished task instance.
Two methods are available for Force Finishing (Halt) a task instance:
- From the Activity Monitor
- From the Workflow Monitor (if the task instance is running as part of a Workflow)
Force Finish (Halt) a Task Instance from the Activity Monitor or Task Instances List
Step 1 | Select the task instance you want to Force Finish (Halt). |
|---|---|
Step 2 | Click Force Finish (Halt). The task status changes to Finished. |
Force Finish (Halt) a Task Instance from the Workflow Monitor
Step 1 | View the workflow that contains the task instance you want to Force Finish (Halt). |
|---|---|
Step 2 | |
Step 3 | Select Commands. |
Step 4 | Select Force Finish (Halt). The task status changes to Finished and the Workflow Console opens to display information about the Force Finish (Halt). |
Force Finish/Cancelling a Task Instance
The Force Finish/Cancel command cancels a task instance and puts it into Finished status, regardless of what the task instance is doing.
You can Force Finish/Cancel a task instance while it is in any of the following statuses: Queued, Action Required, Started, Running.
If the task instance is part of a Workflow, you also can Force Finish/Cancel the task instance if the task instance is re-run after the Workflow completes.
Force Finish/Cancel sets the status of a task instance to Finished and cancels the associated process (if any).
One purpose of Force Finish/Cancel is to cancel a task instance and allow successor task instances in a Workflow to launch without waiting for that task instance to complete. You also may want to Force Finish/Cancel a stand-alone task instance; for example, you may want to mark a failed job as Finished, rather than rerunning the job.
Note
The Force Finish/Cancel command is not implemented for Timer tasks, since for this type of task, the Cancel and Force Finish commands essentially perform the same function.
For tasks that run on Agents, including Windows, Linux, Unix, z/OS, FTP, Agent File Monitor, and Universal Command tasks, the Force Finish/Cancel command is sent to the Agent.
- If the task instance has not yet been launched, it does not launch.
- If a task instance is running when the user issues a Force Finish/Cancel command, the Agent cancels the task instance, if possible, and then the Controller marks the task instance as Finished; processing does not continue. Assuming they have no other dependencies, all successor task instances waiting for successful completion of this task instance will start.
- If the task instance is a workflow, any eligible task instances in the workflow are cancelled and set to the Finished status, and then the workflow itself is set to the Finished status.
Two methods are available for Force Finish/Cancelling a task instance:
- From the Activity Monitor or Task Instances list
- From the Workflow Monitor (if the task instance is running as part of a Workflow)
Force Finish/Cancel a Task Instance from the Activity Monitor
Step 1 | Select the task instance you want to Force Finish/Cancel. |
|---|---|
Step 2 | Click Force Finish/Cancel. The task status changes to Finished. |
Force Finish/Cancel a Task Instance from the Workflow Monitor
Step 1 | View the workflow that contains the task instance you want to Force Finish/Cancel. |
|---|---|
Step 2 | |
Step 3 | Select Commands. |
Step 4 | Select Force Finish/Cancel. The task status changes to Finished and the Console opens to display information about the Force Finish/Cancel. |
Force Finish/Cancelling (Halt) a Task Instance
Just as with the Force Finish/Cancel command, the Force Finish/Cancel (Halt) command cancels a task instance and puts it into Finished status, regardless of what the task instance is doing.
If the task instance is part of a Workflow, you also can Force Finish/Cancel (Halt) the task instance if the task instance is re-run after the Workflow completes.
Force Finish/Cancel sets the status of a task instance to Finished and cancels the associated process (if any).
However, Force Finish/Cancel (Halt) prevents successor task instances in a Workflow from being run. Those tasks will not run until you re-run the task against which you had executed Force Finish/Cancel (Halt).
Task monitors are not released if a Force Finish/Cancel (Halt) is executed against a task being monitored.
You can Force Finish/Cancel (Halt) a task instance while it is in any of the following statuses: Queued, Action Required, Started, Running.
Note
The Force Finish/Cancel (Halt) command is not implemented for Timer tasks, since for this type of task, the Cancel and Force Finish commands essentially perform the same function.
For tasks that run on Agents, including Windows, Linux, Unix, z/OS, FTP, Agent File Monitor, and Universal Command tasks, the Force Finish/Cancel (Halt) command is sent to the Agent.
- If the task instance has not yet been launched, it does not launch.
- If a task instance is running when the user issues a Force Finish/Cancel (Halt) command, the Agent cancels the task instance, if possible, and then the Controller marks the task instance as Finished; processing does not continue. All successor task instances waiting for successful completion of this task instance remain in Waiting status.
- If the task instance is a workflow, any eligible task instances in the workflow are cancelled and set to the Finished status, and then the workflow itself is set to the Finished status.
Note
There are two areas in the user interface that you can check to determine if a task instance was forced finish / cancelled with halt:
- Additional Information field in the Audit Details for that force finish / cancelled task instance.
- Status Description field in the Task Instance Details for that force finish / cancelled task instance.
Two methods are available for Force Finish/Cancelling (Halt) a task instance:
- From the Activity Monitor
- From the Workflow Monitor (if the task instance is running as part of a Workflow)
Force Finish/Cancel (Halt) a Task Instance from the Activity Monitor
Step 1 | Select the task instance you want to Force Finish/Cancel (Halt). |
|---|---|
Step 2 | Click Force Finish/Cancel (Halt). The task status changes to Finished. |
Force Finish/Cancel (Halt) a Task Instance from the Workflow Monitor
Step 1 | View the workflow that contains the task instance you want to Force Finish/Cancel (Halt). |
|---|---|
Step 2 | |
Step 3 | Select Commands. |
Step 4 | Select Force Finish/Cancel (Halt). The task status changes to Finished and the Console opens to display information about the Force Finish/Cancel (Halt). |
Putting a Task Instance on Hold
If you put a Workflow on hold that has not yet started, the Workflow and all the task instances in it are put on hold.
If you put a Workflow on hold when it is in Running status, all the task instances within the Workflow that have not yet started are put on hold; however, the Workflow itself does not go to Hold status because it already has started.
To release the Workflow and all of its task instances that are on hold, issue the Release Recursive command against the Workflow.
To release the Workflow but keep the task instances on hold until you release them one by one, use Release on the Workflow first, then use Release on each task instance.
You can put a task instance on hold while it is in any of the following statuses: Defined, Waiting, Resource Wait, Queued.
Two methods are available for putting a task instance on hold:
- From the Activity Monitor or Task Instances list
- From the Workflow Monitor (if the task instance is running as part of a Workflow)
Hold a Task Instance from the Activity Monitor or Task Instances List
Step 1 | Select the task instance you want to put on hold. |
|---|---|
Step 2 | Click Hold. The task status changes to Held. |
Hold a Task Instance from the Workflow Monitor
Step 1 | View the workflow that contains the task instance you want to put on hold. |
|---|---|
Step 2 | |
Step 3 | Select Commands. |
Step 4 | Select Hold. The task status changes to Held and the Workflow Console opens to display information about the hold. |
Releasing a Task Instance from Hold
For Workflows, if the user held a Workflow that already was running, only the task instances within the Workflow that had not started yet are put into Held status. In this case, the Workflow itself does not go to Held status.
You can release a non-Workflow task instance from hold from the Activity Monitor or Task Instances list while it is in the following status: Held.
To release the Workflow, use one of the following commands:
- To release the entire held Workflow and its task instances, use Release Recursive.
- To release a Workflow that is not in Held status but has task instances that are in Held status, use Release Recursive. In this case, you can issue Release Recursive on a Workflow in any of the following statuses: Defined, Waiting, Held, Resource Wait, Running.
- To release the Workflow but keep the task instances inside on hold so that you can release them one by one, use Release. In this case, release the Workflow first, then release each task instance manually.
Two methods are available for releasing a task instance from hold:
- From the Activity Monitor or Task Instances list
- From the Workflow Monitor (if the task instance is running as part of a Workflow)
Release a Held Task Instance from the Activity Monitor or Task Instances List
Step 1 | Select the task instance you want to release from hold. |
|---|---|
Step 2 | Click Release or Release Recursive. The task status changes to the next appropriate status according to where it was in processing at the time it was put on hold. |
Release a Held Task Instance from the Workflow Monitor
Step 1 | View the Workflow that contains the task instance you want to release. |
|---|---|
Step 2 | |
Step 3 | Select Commands. |
Step 4 | Select Release. The task status changes to the next appropriate status according to where it was in processing, and the Workflow Console opens to display information about the release. |
Skipping a Task Instance
You can skip a task instance or a task instance path so that the task instance and all of its dependent task instances automatically are skipped as well.
You can skip any task instance as long as it has not yet started running; that is, while it is in any of the following statuses: Defined, Waiting, Held, Resource Requested, Resource Wait.
Two methods are available for skipping a task instance:
- From the Activity Monitor or Task Instances list
- From the Workflow Monitor (if the task instance is running as part of a Workflow)
Note
You also can specify that a task instance will be skipped (before the task or its Workflow is launched) by:
- Modifying a trigger Details (using the trigger's Skip Count field) so that the Controller skips the next N number of trigger occurrences for launching the task.
- Modifying a Workflow Details by specifying conditional paths that may place one or more task instances in the Skipped status when the workflow is run.
- Modifying a Workflow Details by specifying that one or more task instances should be skipped (or run) at specific times (see Adding Skip/Run Criteria for Specific Tasks).
If you skip a Workflow task instance, all the task instances within the Workflow also are skipped, along with any nested Workflows.
Once a task instance has been skipped, the only command you can run against it is Unskip.
Skip a Task Instance from the Activity Monitor or Task Instances List
Step 1 | Select the task instance you want to skip. |
|---|---|
Step 2 | Click Skip. The task status changes to Skipped. |
Step 3 | To skip the task instance and all of its dependent task instances, click Skip Path. The task status of the task instance and all of its dependent task instances changes to Skipped. |
Skip a Task Instance from the Workflow Monitor
Step 1 | View the Workflow that contains the task instance you want to skip. |
|---|---|
Step 2 | |
Step 3 | Select Commands. |
Step 4 | Select Skip. The task status changes to Skipped, and the Console opens to display information about the skip. |
Step 5 | To skip the task instance and all of its dependent task instances, click Skip Path. The task status of the task instance and all of its dependent task instances changes to Skipped, and the Console opens to display information about the skip. |
Showing or Hiding Skipped Task Instances
You can select whether to show or hide skipped task instances on the Workflow Monitor either:
- Before the Workflow is running
- While the Workflow is running
Three methods are available for selecting whether or not to show or hide skipped task instances:
- From the Workflow Task Details
- From the Workflow Task Instance Details
- From the Workflow Monitor
Setting Show / Hide Skipped Tasks from the Workflow Task Details
Step 1 | Display the Workflow Task Details for the Workflow that you want to show/hide Skipped task instances. |
|---|---|
Step 2 | Use the Show / Hide Skipped Tasks field to select whether you want to show or hide skipped task instances (default is Show Skipped). When viewing a running Workflow in the Workflow Monitor, the skipped task instances will be shown or hidden based on your selection. |
Setting Show / Hide Skipped Tasks from the Workflow Task Instance Details
Step 1 | Display the Workflow Task Instance Details for the Workflow task instance that you want to show/hide Skipped task instances. |
|---|---|
Step 2 | Use the Show / Hide Skipped Tasks field to select whether you want to show or hide skipped task instances (default is Show Skipped). When viewing the Workflow instance in the Workflow Monitor, the skipped task instances will be shown or hidden based on your selection. |
Setting Show / Hide Skipped Tasks from the Workflow Monitor
Open the Workflow task instance in the Workflow Monitor. By default, the Workflow Monitor will show or hide skipped task instances based on the Workflow task instance's Show / Hide Skipped Tasks option.
To temporarily change the behavior, right-click in the Workflow Monitor canvas and select either of the following entries from the pop-up menu:
- Show Skipped / Restore
- Hide Skipped
Unskipping a Task Instance
If a task instance in a Workflow has been skipped (perhaps at trigger time due to run criteria or manually by running the skip command), you can unskip that task instance while the Workflow is running.
Note
If you unskip a task instance that was skipped by issuing a Skip Path command against it, which automatically skip all of its dependent tasks, those dependent tasks stay in Skipped status. You must manually unskip each task to remove them from Skipped status.
Two methods are available for unskipping a task instance:
- From the Activity Monitor or Task Instances list
- From the Workflow Monitor
Unskip a Task Instance from the Activity Monitor or Task Instances List
Step 1 | Select the task instance you want to unskip. |
|---|---|
Step 2 | Click Unskip. The task instance will run when all of its dependencies have been satisfied. |
Unskip a Task Instance from the Workflow Monitor
Step 1 | View the Workflow that contains the task instance(s) you want to unskip. |
|---|---|
Step 2 | Select a task instance. (You can issue commands only against one task at a time within the Workflow Monitor.) |
Step 3 | Select Commands. |
Step 4 | Select Unskip. A confirmation message will appear in the Console, and the task instance will run when all of its dependencies have been satisfied. |
Marking a Dependency as Satisfied
For task instances running inside of a Workflow, you can mark a single predecessor dependency as satisfied to allow the task instance to run.
Marking a dependency as satisfied has the same result as clearing a dependency.
You can mark a dependency as satisfied on task instances in the following status: Defined, Waiting, Held.
One method is available for marking a dependency as satisfied:
- From the Workflow Monitor
Marking a Dependency as Satisfied from the Workflow Monitor
Step 1 | View the Workflow that contains the task instance whose dependencies you want to satisfy. |
|---|---|
Step 2 | Locate and right-click on the task dependency (the connector line between two tasks). |
Step 3 | Select Commands. |
Step 4 | Select Mark as Satisfied. If all other dependencies are satisfied, the task instance is launched normally. |
Evaluating a Dependency

For task instances running inside of a Workflow, you can evaluate a variable condition dependency.
When the Evaluate Edge command is executed, an Evaluate dialog pops up and display the First Value, First Value(resolved), Operator, Second Value, Second Value(resolved), and the Evaluation result.
One method is available for evaluating a dependency:
- From the Workflow Monitor
Evaluating a Variable Condition Dependency from the Workflow Monitor
Step 1 | View the Workflow that contains the task instance whose dependencies you want to evaluate. |
|---|---|
Step 2 | Locate and right-click on the task dependency (the connector line between two tasks). |
Step 3 | Select Commands. |
Step 4 | Select Evaluate. |
Clearing Predecessor Dependencies of a Task Instance
For a task instance running inside of a Workflow, you can clear all predecessor dependencies to allow that task instance to run. Clearing a predecessor dependency has the same result as satisfying a predecessor dependency.
You can clear predecessor dependencies of a task instance while it is in any of the following statuses: Defined, Waiting, Held.
Note
Clearing predecessor dependencies does not include the clearing of resource and mutually exclusive dependencies. To clear these dependencies, see Clearing Resource Dependencies of a Task Instance and Clearing Mutually Exclusive Dependencies of a Task Instance, below. To clear all dependencies, see Clearing All Dependencies of a Task Instance, below.
One method is available for clearing predecessor dependencies of a task instance:
- From the Workflow Monitor
Clearing Predecessor Dependencies of a Task Instance from the Workflow Monitor
Step 1 | View the Workflow that contains the task instance whose predecessor dependencies you want to satisfy. |
|---|---|
Step 2 | Select the task instance for which you want to clear predecessor dependencies. |
Step 3 | Select Commands. |
Step 4 | Select Clear Predecessors. The task instance is launched normally. |
Clearing Resource Dependencies of a Task Instance
For task instances for which resources have been defined, you can clear those resource dependencies.
You can clear resource dependencies of task instances while it is in the following status: Resource Wait.
Two methods are available for clearing resource dependencies from task instances:
- From the Activity Monitor or Task Instances list
- From the Workflow Monitor
Clear Resource Dependencies of a Task Instance from the Activity Monitor or Task Instances List
Step 1 | Select the task instance whose resources you want to clear. |
|---|---|
Step 2 | Click Clear Resources. Resource dependencies are cleared from the task instance. |
Clear Resource Dependencies of a Task Instance from the Workflow Monitor
Step 1 | View the Workflow that contains the task instance(s) you want to clear of resource dependencies. |
|---|---|
Step 2 | Select a task instance. (You can issue commands only against one task at a time within the Workflow Monitor.) |
Step 3 | Select Commands. |
Step 4 | Select Clear Resources. A confirmation message will appear in the Console, and the task instance will run without resources. |
Clearing Mutually Exclusive Dependencies of a Task Instance
For task instances that are mutually exclusive with other task instances, you can clear those mutually exclusive dependencies.
Any task instances that were mutually exclusive with this task instance will no longer be mutually exclusive.
You can clear mutually exclusive dependencies of a task instance while it is in the following status: Exclusive Wait.
Two methods are available for clearing mutually exclusive dependencies from task instances:
- From the Activity Monitor or Task Instances list
- From the Workflow Monitor
Clear Mutually Exclusive Dependencies of a Task Instance from the Activity Monitor or Task Instances List
Step 1 | Select the task instance whose mutually exclusive dependencies you want to clear. |
|---|---|
Step 2 | Click Clear Exclusive. Mutually exclusive dependencies of the task instance are cleared, and the task instance is launched normally. |
Clear Mutually Exclusive Dependencies of a Task Instance from the Workflow Monitor
Step 1 | View the Workflow that contains the task instance you want to clear of mutually exclusive dependencies. |
|---|---|
Step 2 | Select a task instance. (You can issue commands only against one task at a time within the Workflow Monitor.) |
Step 3 | Select Commands. |
Step 4 | Select Clear Exclusive. A confirmation message will appear in the Console, and the task instance will run normally. |
Clearing All Dependencies of a Task Instance
You can clear all dependencies (time wait/delay, predecessors, resources, and exclusive) to allow a task instance to run.
You can clear all dependencies of a task instance while it is in any the following status: Defined, Waiting, Held, Exclusive Requested, Exclusive Wait, Resource Requested, Resource Wait.
Three methods are available for clearing all dependencies of a task instance:
- From the Activity Monitor or Task Instances list
- From the Workflow Monitor (for a task instance within the Workflow)
- From the Workflow Monitor (for the Workflow itself)
If you issue a Clear All Dependencies command against a Workflow task instance, all dependencies of only the Workflow task instance are cleared, not the dependencies of any of its task instances.
Clear All Dependencies of a Task Instance from the Activity Monitor or Task Instances List
Step 1 | Select the task instance whose dependencies you want to clear. |
|---|---|
Step 2 | Click Clear All Dependencies. All dependencies are cleared from the task instance and it is launched normally. |
Clear All Dependencies of a Task Instance within a Workflow from the Workflow Monitor
Step 1 | View the Workflow that contains the task instance whose dependencies you want to clear. |
|---|---|
Step 2 | Select the task instance for which you want to clear predecessor dependencies. |
Step 3 | Select Commands > Clear All Dependencies. All dependencies are cleared from the task instance and it is launched normally. |
Clear All Dependencies of a Workflow Task Instance from the Workflow Monitor
Step 1 | View the Workflow whose dependencies you want to clear. |
|---|---|
Step 2 | Right-click the Workflow Monitor canvas to display a menu of available actions. |
Step 3 | Select Commands > Clear All Dependencies. All dependencies are cleared from the Workflow. |
Clearing Time Wait/Delay Specifications of a Task Instance
You can clear all Wait To Start and Delay On Start specifications of a task instance to allow a task instance to run without waiting.
You can clear all Wait To Start and Delay On Start specifications of a task instance while it is in any the following status: Defined, Waiting, Time Wait, Held.
Three methods are available for clearing Time Wait/Delay specifications of task instances:
- From the Activity Monitor or Task Instances list
- From the Workflow Monitor
- From the task instance Details
Clear All Time Wait/Delay Specifications of a Task Instance from the Activity Monitor or Task Instances List
Step 1 | Select the task instance whose Time Wait/Delay specifications you want to clear. |
|---|---|
Step 2 | Click Clear Time Wait/Delay. The task instance is launched normally. |
Clear All Time Wait/Delay Specifications of a Task Instance from the Workflow Monitor
Step 1 | View the Workflow that contains the task instance whose Time Wait/Delay specifications you want to clear. |
|---|---|
Step 2 | Select the task instance for which you want to clear Time Wait/Delay specifications. |
Step 3 | Select Commands. |
Step 4 | Select Clear Time Wait/Delay. The task instance is launched normally. |
Clear All Time Wait/Delay Specifications of a Task Instance from the Task Instance Details
Step 1 | Open the Task Instance Details for the task instance that you want to clear Time Wait/Delay specifications. |
|---|---|
Step 2 | Right-click in the task instance Details and select Clear > Clear Time Wait/Delay. |