| Panel | ||||
|---|---|---|---|---|
|
Overview
A Workflow is a task comprised of one or more tasks of one or more task types, including other Workflows.
To create a Workflow, you enter task Details just as you would for any task, and then design the Workflow on the Workflow Editor, where you add, connect, and organize the tasks that will comprise the Workflow.
During and after a Workflow run, you can view detailed results of the run in the Workflow Task Instance Details, and monitor the status of the Workflow on the Workflow Monitor.
Although a typical Workflow is a single group of tasks, a Workflow can contain multiple groups of tasks and/or individual tasks. Each task in a group of tasks is connected to one or more other tasks in that group. Each connection is made from one task (the predecessor) to another task (the successor). There is no limit to the number of connections that can be made to or from a task.
The following sample Workflow contains a single group of tasks.

When you launch a Workflow, the first predecessor task in all task groups, and all individual tasks, begin to run. In this example, task stonebranch-saptask-01 would begin to run.
Built-In Variables
The following built-in variables can be used in a Workflow task to pass data where appropriate:
| Anchor | ||||
|---|---|---|---|---|
|
Creating a Workflow Task
Step 1 | From the Automation Center navigation pane, select Tasks > Workflow Tasks. The Workflow Tasks list displays a list of all currently defined Workflow tasks. |
|---|---|
Step 2 | Enter/select Details for a new Workflow task, using the field descriptions below as a guide.
To display more of the Details fields on the screen, you can either:
|
Step 3 | Click a |
Step 4 | Click the Edit Workflow button to display a blank Workflow Editor canvas. |
Step 5 | Follow the instructions provided below for designing the Workflow in the Workflow Editor. |


| Note | ||
|---|---|---|
| ||
To open an existing record on the list, either:
|
| Anchor | ||||
|---|---|---|---|---|
|
Workflow Task Details
The following Workflow Task Details is for an existing Workflow task.
Depending on the values that you enter / select for these fields, and whether or not the Workflow task has ever been launched, more (or less) fields may display. See the field descriptions, below, for a description of all fields that may display in the Workflow Task Details.

For information on how to access additional details - such as Metadata and complete database Details - for Workflows (or any type of record), see Records.
| Anchor | ||||
|---|---|---|---|---|
|
Workflow Task Details Field Descriptions
The following table describes the fields, buttons, and tabs that display in Workflow Task Details.
Field Name | Description | ||||||||||||||
|---|---|---|---|---|---|---|---|---|---|---|---|---|---|---|---|
General | This section contains general information about the Workflow task. | ||||||||||||||
Name |
| ||||||||||||||
Version |
| ||||||||||||||
Description |
| ||||||||||||||
Member of Business Services |
| ||||||||||||||
Resolve Name Immediately |
| ||||||||||||||
Time Zone Preference |
| ||||||||||||||
Hold on Start |
| ||||||||||||||
Hold Reason |
| ||||||||||||||
Virtual Resource Priority |
| ||||||||||||||
| Mutually Exclusive With Self |
| ||||||||||||||
|
| ||||||||||||||
Workflow Details | This section contains assorted detailed information about the Workflow task. | ||||||||||||||
|
| ||||||||||||||
Auto Layout | If Show/Hide Skipped Tasks = Hide Skipped; specification for the layout of the Workflow Monitor.
| ||||||||||||||
| Default calendar used by the Workflow. If the Workflow is launched by a trigger, the trigger calendar overrides this default calendar. | ||||||||||||||
| If enabled, uses the selected Default Calendar for this Workflow instead of the calendar used in the trigger or parent Workflow. | ||||||||||||||
Wait / Delay Options | This section contains specifications for waiting to start and/or delaying on start the task. | ||||||||||||||
|
| ||||||||||||||
|
| ||||||||||||||
|
| ||||||||||||||
|
| ||||||||||||||
|
| ||||||||||||||
|
| ||||||||||||||
|
| ||||||||||||||
|
| ||||||||||||||
|
| ||||||||||||||
Time Options | This section contains time-related specifications for the task. | ||||||||||||||
|
| ||||||||||||||
|
| ||||||||||||||
|
| ||||||||||||||
|
| ||||||||||||||
|
| ||||||||||||||
|
| ||||||||||||||
|
| ||||||||||||||
|
| ||||||||||||||
|
| ||||||||||||||
|
| ||||||||||||||
|
| ||||||||||||||
|
| ||||||||||||||
|
| ||||||||||||||
|
| ||||||||||||||
|
| ||||||||||||||
|
| ||||||||||||||
|
| ||||||||||||||
|
| ||||||||||||||
|
| ||||||||||||||
|
| ||||||||||||||
|
| ||||||||||||||
|
| ||||||||||||||
|
| ||||||||||||||
|
| ||||||||||||||
|
| ||||||||||||||
|
| ||||||||||||||
|
| ||||||||||||||
Critical Path Options | This section contains Critical Path-related specifications for the task. | ||||||||||||||
|
| ||||||||||||||
|
| ||||||||||||||
|
| ||||||||||||||
|
| ||||||||||||||
Workflow Execution Options | This section contains Execution Restriction specifications for the task if it is within a Workflow. | ||||||||||||||
|
| ||||||||||||||
|
| ||||||||||||||
|
| ||||||||||||||
|
| ||||||||||||||
|
| ||||||||||||||
|
| ||||||||||||||
|
| ||||||||||||||
Statistics | This section contains time-related statistics for task instances of the task. | ||||||||||||||
| First Execution |
| ||||||||||||||
Last Execution |
| ||||||||||||||
Last Instance Duration |
| ||||||||||||||
Lowest Instance Time |
| ||||||||||||||
Average Instance Time |
| ||||||||||||||
Highest Instance Time |
| ||||||||||||||
Number of Instances |
| ||||||||||||||
Metadata | This section contains Metadata information about this record. | ||||||||||||||
UUID | Universally Unique Identifier of this record. | ||||||||||||||
Updated By | Name of the user that last updated this record. | ||||||||||||||
Updated | Date and time that this record was last updated. | ||||||||||||||
Created By | Name of the user that created this record. | ||||||||||||||
Created | Date and time that this record was created. | ||||||||||||||
Buttons | This section identifies the buttons displayed above and below the Workflow Task Details that let you perform various actions. | ||||||||||||||
Save | Saves a new task record in the Controller database. | ||||||||||||||
Save & New | Saves a new record in the Controller database and redisplays empty Details so that you can create another new record. | ||||||||||||||
Save & View | Saves a new record in the Controller database and continues to display that record. | ||||||||||||||
New | Displays empty (except for default values) Details for creating a new task. | ||||||||||||||
Update |
| ||||||||||||||
View Parents |
| ||||||||||||||
Launch Task |
| ||||||||||||||
Edit Workflow | Displays the Workflow Editor for this task. | ||||||||||||||
Copy | Creates a copy of this task, which you are prompted to rename. | ||||||||||||||
Delete |
| ||||||||||||||
Refresh | Refreshes any dynamic data displayed in the Details. | ||||||||||||||
Close | For pop-up view only; closes the pop-up view of this task. | ||||||||||||||
Tabs | This section identifies the tabs across the top of the Workflow Task Details that provide access to additional information about the task. | ||||||||||||||
Workflow Task | Displays details about this Workflow task. | ||||||||||||||
Task Run Criteria |
| ||||||||||||||
Step Conditions |
| ||||||||||||||
Variables |
| ||||||||||||||
Actions |
| ||||||||||||||
Virtual Resources |
| ||||||||||||||
Mutually Exclusive |
| ||||||||||||||
| Critical Endpoints | Lists all critical endpoints defined for this task. | ||||||||||||||
Step Actions | Lists all step actions created for this task. | ||||||||||||||
| Lists all instances of this Workflow. | ||||||||||||||
Triggers |
| ||||||||||||||
Notes |
| ||||||||||||||
|
|
| Anchor | ||||
|---|---|---|---|---|
|
Viewing a Workflow Task Instance
When a Workflow task is launched, the Controller creates a task instance record of that Workflow (and task instance records of all tasks in that Workflow).
A task instance contains detailed information about a single execution of that task.
You can access a Workflow task instance from:
- Instances tab on the Workflow Task Details for that task
- Activity Monitor
- Task Instances list
| Anchor | ||||
|---|---|---|---|---|
|
Workflow Task Instance Details
The following Workflow Task Instance Details contains information on the execution of the Workflow shown in the Workflow Task Details.

| Anchor | ||||
|---|---|---|---|---|
|
Workflow Task Instance Details Field Descriptions
The following table describes the fields, buttons, and tabs that display in Workflow Task Instance Details.
Field Name | Description | ||||||||||||||
|---|---|---|---|---|---|---|---|---|---|---|---|---|---|---|---|
General | This section contains general information about the task instance. | ||||||||||||||
| Name of this task instance. | ||||||||||||||
Instance Number |
| ||||||||||||||
Description |
| ||||||||||||||
Member of Business Services |
| ||||||||||||||
Task |
| ||||||||||||||
| Source Version |
| ||||||||||||||
Launch Source |
| ||||||||||||||
Source Instance |
| ||||||||||||||
Invoked by |
| ||||||||||||||
|
| ||||||||||||||
Calendar |
| ||||||||||||||
Time Zone Preference |
| ||||||||||||||
Virtual Resource Priority |
| ||||||||||||||
| Mutually Exclusive With Self |
| ||||||||||||||
| Simulate |
| ||||||||||||||
Status | This section contains information about the current status of the task instance. | ||||||||||||||
Status |
| ||||||||||||||
Exit Code |
| ||||||||||||||
Status Description |
| ||||||||||||||
Operational Memo |
| ||||||||||||||
Evaluation Time |
| ||||||||||||||
Critical |
| ||||||||||||||
Wait Until Time |
| ||||||||||||||
Queued Time |
| ||||||||||||||
|
| ||||||||||||||
|
| ||||||||||||||
|
| ||||||||||||||
End Time |
| ||||||||||||||
Duration |
| ||||||||||||||
Progress | Number of tasks in the Workflow that are in Success, Skipped, or Finished status / Total number of tasks in the Workflow. | ||||||||||||||
Workflow Details | This section contains assorted detailed information about the task instance. | ||||||||||||||
Show/Hide Skipped Tasks |
| ||||||||||||||
Wait / Delay Options | This section contains specifications for waiting to start and/or delaying on start the task. | ||||||||||||||
|
| ||||||||||||||
|
| ||||||||||||||
|
| ||||||||||||||
|
| ||||||||||||||
|
| ||||||||||||||
|
| ||||||||||||||
|
| ||||||||||||||
|
| ||||||||||||||
Time Options | This section contains information on time-related specifications for the task instance. | ||||||||||||||
|
| ||||||||||||||
|
| ||||||||||||||
|
| ||||||||||||||
|
| ||||||||||||||
|
| ||||||||||||||
|
| ||||||||||||||
|
| ||||||||||||||
|
| ||||||||||||||
|
| ||||||||||||||
|
| ||||||||||||||
|
| ||||||||||||||
|
| ||||||||||||||
|
| ||||||||||||||
|
| ||||||||||||||
|
| ||||||||||||||
|
| ||||||||||||||
|
| ||||||||||||||
|
| ||||||||||||||
|
| ||||||||||||||
|
| ||||||||||||||
|
| ||||||||||||||
|
| ||||||||||||||
|
| ||||||||||||||
|
| ||||||||||||||
|
| ||||||||||||||
|
| ||||||||||||||
|
| ||||||||||||||
|
| ||||||||||||||
|
| ||||||||||||||
Critical Path Options | This section contains Critical Path-related specifications for the task. | ||||||||||||||
|
| ||||||||||||||
|
| ||||||||||||||
|
| ||||||||||||||
|
| ||||||||||||||
Workflow Execution Options | This section contains Execution Restriction specifications for the task if it is within a Workflow. | ||||||||||||||
|
| ||||||||||||||
|
| ||||||||||||||
|
| ||||||||||||||
|
| ||||||||||||||
|
| ||||||||||||||
|
| ||||||||||||||
|
| ||||||||||||||
Statistics | This section contains time-related statistics for the task instance. | ||||||||||||||
|
| ||||||||||||||
Lowest Estimated End Time |
| ||||||||||||||
Average Estimated End Time |
| ||||||||||||||
Highest Estimated End Time |
| ||||||||||||||
| Projected Start Time |
| ||||||||||||||
Projected End Time | System-supplied; projected end time of the task instance, calculated by the Controller based on the projected end time of its predecessor (or the maximum projected end time of all its predecessors, if more than one path exists to that task instance) plus its estimated critical path duration. | ||||||||||||||
Metadata | This section contains Metadata information about this record. | ||||||||||||||
UUID | Universally Unique Identifier of this record. | ||||||||||||||
Updated By | Name of the user that last updated this record. | ||||||||||||||
Updated | Date and time that this record was last updated. | ||||||||||||||
Created By | Name of the user that created this record. | ||||||||||||||
Created | Date and time that this record was created. | ||||||||||||||
Status History | History of all statuses that the task instance has gone through. | ||||||||||||||
Buttons | This section identifies the buttons displayed above and below the Workflow Task Instance Details that let you perform various actions. | ||||||||||||||
Update |
| ||||||||||||||
Force Finish |
| ||||||||||||||
Hold |
| ||||||||||||||
Skip |
| ||||||||||||||
Release Recursive |
| ||||||||||||||
View Parent |
| ||||||||||||||
View Workflow |
| ||||||||||||||
Delete |
| ||||||||||||||
Refresh | Refreshes any dynamic data displayed in the Details. | ||||||||||||||
Close | For pop-up view only; closes the pop-up view of this task instance. | ||||||||||||||
Tabs | This section identifies the tabs across the top of the Workflow Task Instance Details that provide access to additional information about the task instance. | ||||||||||||||
Workflow Task Instance | Displays details about this Workflow task instance. | ||||||||||||||
| Actions |
| ||||||||||||||
Virtual Resources |
| ||||||||||||||
Exclusive Requests |
| ||||||||||||||
Step Conditions |
| ||||||||||||||
Notes |
|
| Anchor | ||||
|---|---|---|---|---|
|
| Anchor | ||||
|---|---|---|---|---|
|
Designing a Workflow
The Workflow Editor lets you select tasks for a Workflow, position them within the Workflow, and specify dependency relationships between the tasks.
Workflows can be as simple or elaborate as necessary. Zooming and scrolling features are provided that allow you to work on small areas of a very large Workflow, or to create simple ad hoc Workflows.
| Anchor | ||||
|---|---|---|---|---|
|
| Note | ||
|---|---|---|
| ||
The name of the workflow that you are editing is shown:
|
See Workflow Editor Icons for a guide to the editing tools available for designing Workflows; for more detailed instructions, see the individual topics in this section, below.
Designing, Modifying, or Viewing Multiple Workflows
You can design, modify, or simply view multiple Workflows in the Workflow Editor at the same time.
Step 1 | From the Workflow Tasks list, open the Workflow task for which you want to design, modify, or view the Workflow. |
|---|---|
Step 2 | Click the Edit Workflow button to display the Workflow Editor for the Workflow. |
Step 3 | Click the Workflow Tasks tab at the top of the Workflow Editor (next to the Workflow Editor tab) to redisplay the Workflow Tasks list. |
Step 4 | Open another Workflow task for which you want to design, modify, or view the Workflow. |
Step 5 | Click the Edit Workflow button to display the Workflow Editor for this second Workflow under a second tab. |
Step 6 | Open and display as many Workflows as desired, clicking the appropriate tab to create, modify, and view each one. |
| Anchor | ||||
|---|---|---|---|---|
|
Workflow Editor Modes
The actions you can perform within the Workflow Editor depend on the Workflow Editor mode.
The Workflow Editor has three modes. Each mode, which you select by clicking the appropriate icon in the Workflow Editor toolbar, allows you to use one or more specific Workflow Editor tools.
Icon | Mode | Description | |||||||||||
|---|---|---|---|---|---|---|---|---|---|---|---|---|---|
|
| Clicking the Select icon on the Workflow Editor toolbar places the Workflow Editor in Select mode, which allows you to use all Workflow Editor tools except Connect and Pan. The Select mode is the default mode for the Workflow Editor. | |||||||||||
|
| Clicking a Connect icon on the Workflow Editor toolbar places the Workflow Editor in Connect mode, which allows you to create connections between tasks. | |||||||||||
|
| Clicking the Pan icon on the Workflow Editor toolbar places the Workflow Editor in Pan mode, which allows you to scroll around in the Workflow. (You also can use the Outline tool in any mode) to scroll around in the Workflow.
|
| Anchor | ||||
|---|---|---|---|---|
|
Workflow Editor Toolbar
The Workflow Editor toolbar, which displays above the Workflow Editor, contains icons for every tool that you need to design a Workflow.
A shadowed outline around the icon in the toolbar indicates the currently selected Workflow Editor mode.
The following example shows that the Workflow Editor is in Select mode.

You also can perform all task actions and connector actions in any mode.
| Anchor | ||||
|---|---|---|---|---|
|
Workflow Editor Tools
The following table describes the tools used to define Workflows, including the tools associated with the three Workflow Editor modes. The tools are listed by icon, as they appear - left to right - in the Workflow Editor toolbar.
Icon | Tool | Description | |||||||||||
|---|---|---|---|---|---|---|---|---|---|---|---|---|---|
| Go to Parent | If this Workflow is embedded in another Workflow, navigates to the parent. If this Workflow has more than one parent, clicking this icon displays a list of all parent Workflows; in this case, to navigate to a parent Workflow, double-click the Workflow's icon. To return to your original Workflow, click its name. (The current Workflow name displays in the lower right corner of the editor.)
| |||||||||||
| Open Workflow | Displays an Open Workflow pop-up dialog from which you can select a Workflow to replace the Workflow currently displayed in the Workflow Editor. (Make sure to save the current Workflow before replacing it.)
| |||||||||||
| Save | Saves the current Workflow. | |||||||||||
| Prints the current Workflow. | ||||||||||||
| Add Task | Displays the Task Find dialog, which allows you to search for and select tasks for the Workflow from a searchable list of defined tasks. (The Workflow Search Result Limit Universal Controller system property defines how many tasks display on the list.)
| |||||||||||
| Select | Places the Workflow Editor in Select mode. | |||||||||||
| Pan | Places the Workflow Editor in Pan mode. | |||||||||||
| Connect (bent) | Places the Workflow Editor in Connect mode.
| |||||||||||
| Undo | Click to undo the most recent change. | |||||||||||
| Redo | Click to redo the most recent change that you undid by clicking Undo. | |||||||||||
| Cut | Deletes the selected element(s): tasks, connectors, or both. Use Ctrl+Click to select and cut multiple elements. You can paste cut tasks into the same Workflow Editor or into the Workflow Editor of any other Workflow. If you cut a connector, and include its source and target tasks in the cut, you can paste the cut connector (and the tasks) into the same Workflow Editor or into the Workflow Editor of any other Workflow.
| |||||||||||
| Copy | Copies the selected element(s): tasks, connectors, or both. Use Ctrl+Click to select and copy multiple elements. You can paste copied tasks into the same Workflow Editor or into the Workflow Editor of any other Workflow. If you copy a connector, and include its source and target tasks in the copy, you can paste the copied connector (and the tasks) into the same Workflow Editor or into the Workflow Editor of any other Workflow. | |||||||||||
| Paste | Pastes the copied or cut element(s) into the currently open Workflow Editor or into the Workflow Editor of any other Workflow. If you want to paste a cut or copied connector, you must include the source and target tasks of the connector in the cut or copy. | |||||||||||
| Delete | Permanently deletes the selected elements. Delete does not keep a copy of the deleted elements in memory. | |||||||||||
| Fit | Fits the Workflow into the display. If necessary, this shrinks the icons and size of the Workflow in order to make it fit. You can undo a Fit by clicking the Actual Size icon. | |||||||||||
| Zoom In | Zooms in (enlarges) the Workflow. To return the Workflow to its default size, click the Actual Size icon. | |||||||||||
| Zoom Out | Zooms out (diminishes) the Workflow. To return the Workflow to its default size, click the Actual Size icon. | |||||||||||
| Actual Size | Returns the Workflow to its default size after a Fit or Zoom. | |||||||||||
| Zoom | Opens a window that allows you to specify a zoom ratio. For example, to double the size of the Workflow, enter 200 and click OK. To return the Workflow to its default size, click the Actual Size icon. | |||||||||||
| Horizontal Layout | Reformats the Workflow into a horizontal layout. | |||||||||||
| Vertical Layout | Reformats the Workflow into a vertical layout. | |||||||||||
| Toggle Vertex Style | For running Workflows, switches the icon display between status-related icons and task-related icons (see Monitoring Workflows). This icon only appears on the icon bar when you are monitoring a running Workflow. | |||||||||||
| Outline | For large Workflows, the outline provides a way of positioning a specific area of the Workflow in the display, without using the Pan mode.
| |||||||||||
| Help | Displays help documentation for Workflows. | |||||||||||
| Console | While a Workflow is running, you can click the Console icon to display processing messages. |

| Anchor | ||||
|---|---|---|---|---|
|
Searching For and Adding Tasks
Step 1 | Click the Add Task icon. The Task Find dialog displays. |
|---|---|
Step 2 | Several methods are available for finding tasks:
The Task Find dialog lists the task(s) that match your search criteria. |
Step 3 | To add a task to the Workflow Editor canvas, click the icon to the left of the task and drag it onto the canvas. |
Step 4 | Repeat these steps until you have added all the tasks you need. |
Step 5 | Position the tasks on the canvas as desired. The connections that you will make between the tasks determine the order in which the tasks run, so position the tasks accordingly. For example: |
Step 6 | To close the Task Find window, click the X in the upper right corner. Or, to keep the window open but minimized, click the minimize icon. |


| Anchor | ||||
|---|---|---|---|---|
|
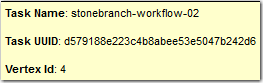
Task Details
You can display the following detailed information for any task by hovering your mouse over the task.
| Anchor | ||||
|---|---|---|---|---|
|
Task Actions
For each task in a Workflow, the Controller provides a menu of actions that you can take on that task. You can perform task actions in any Workflow Editor mode.
To display the menu of task actions, right-click a task.

The following table describes each action in the menu:
Action | Description |
|---|---|
View/Edit | Allows you to view and edit the Task Details for this task. |
View/Edit In Tab | Allows you to view and edit the Task Details for this task in a new tab. |
Cut | Cuts the task from its location in the Workflow. You can paste a cut task back into the same Workflow Editor or into the Workflow Editor of any other Workflow. |
Copy | Creates a copy of the task for inclusion in the same Workflow Editor or for inclusion in the Workflow Editor of any other Workflow. |
Paste | Pastes a copy of the task into the Workflow or into the Workflow Editor of any other Workflow. |
Delete | Deletes the task from the Workflow. You cannot paste a deleted task back into the Workflow. |
View/Edit Run Criteria | Allows you to view and edit any run criteria that has been created for this task. |
| View/Edit Critical Endpoint | Allows you to view and edit any critical endpoint that has been created for this workflow. |
View/Edit z/OS Step Actions | z/OS Tasks only; Allows you to view and edit any z/OS step actions that have been created for this task. |
View Predecessors/Successors | Allows you to view all predecessors and successors of this task in the Workflow. |
Details > Show Details | Allows you to display complete database details for this task. |
Properties | Displays a menu of properties for the task. |
| Anchor | ||||
|---|---|---|---|---|
|
Task Properties
One of the task actions available for any task in a Workflow is to display a list of properties for that task.

You can change the name of a task within a Workflow by entering a new name in the name field. By Default, the name of a task is its name in the Task Details. Changing the name of a task within a Workflow does not change its name in the Task Details.
| Anchor | ||||
|---|---|---|---|---|
|
For the workflow displayed in the Workflow Editor, the Controller provides a menu of actions that you can take on that workflow. You can perform task actions in any Workflow Editor mode.
To display the menu of workflow task actions, right-click any white space in the Workflow Editor canvas.

The following table describes each action in the menu:
Action | Description |
|---|---|
| New Task... | Allows you to create and insert a new task into a Workflow and connect it to other tasks in the Workflow. |
View/Edit | Allows you to view and edit the Task Details for this workflow task. |
View/Edit In Tab | Allows you to view and edit the Task Details for this workflow task in a new tab. |
View Children | Allows you to view a list of child tasks of this workflow task. |
Paste | Allows you to paste cut or copied elements from this workflow or any other workflow into the Workflow Editor. |
Launch Workflow | Allows you to launch this workflow task |
Find In Workflow... | Allows you to find a task in this workflow task. |
Pan To Top | Allows you to restore the displayed Workflow Editor for this workflow task to its default, top-left position. |
Details > Show Details | Allows you to display complete database details for this workflow task. |
| Anchor | ||||
|---|---|---|---|---|
|
Create and Insert Task
One of the task actions available for a Workflow displayed in the Workflow Editor is New Task..., which lets you create and insert a new task into the the Workflow Editor.
Step 1 | Select New Task... in the Task Actions for Workflow menu to display a list of task types. |
|---|---|
| Step 2 | Select a task type and, in the task Details for that task type, create a new task. |
| Step 3 | Click the Save button to insert the new task into the Workflow Editor where the Action menu is created (the right-click location). |
| Step 4 | Locate and connect the new task to other tasks in in the Workflow and click the Save icon. |

| Anchor | ||||
|---|---|---|---|---|
|
Specifying Critical Endpoints for Critical Paths
You can add special instructions that can identify specific tasks within a workflow or sub-workflow as Critical Endpoints used when computing the critical path(s) of a workflow.
When a workflow is launched or triggered, each task within the workflow specified as a Critical Endpoint will be identified in the task instance with a Critical Endpoint flag. The Critical Endpoint flag instructs the workflow to compute the critical path(s) to the Critical Endpoints instead of leaf nodes within the workflow.
Additionally, when specifying a Critical Endpoint, you can optionally override the task-level Late Start and Late Finish conditions. If you leave the Late Start and Late Finish options unchecked, the task-level conditions will remain unchanged.
Step 1 | Display the Details of the Workflow for which you want to specify a critical endpoint. |
|---|---|
Step 2 | Click the Critical Endpoints tab. The critical endpoint list displays a list of any existing critical endpoints for that task. |
Step 3 | Click the |
Step 4 | Select a Task from the drop-down menu to be a Critical Endpoint in the workflow. Enable Late Start or Late Finish to override task level Late Start and Late Finish conditions. If you leave the Late Start and Late Finish options unchecked, the task-level conditions will remain unchanged. |
Step 5 | Click the |

| Anchor | ||||
|---|---|---|---|---|
|
After you have added tasks and positioned them on the Workflow Editor canvas, you must connect the tasks.
Step 1 | Click one of the Connect icons to place the Workflow Editor in Connect mode. |
|---|---|
Step 2 | Click the predecessor task; that is, the task whose status will trigger the next task.
|
Step 3 | Drag your mouse to the successor task; that is, the task that will be triggered. As you drag your mouse, a red line display. Drag your mouse all the way to the center of the successor task; the red line becomes a dotted, green line - the connector between the tasks - and the successor task is highlighted. |
Step 4 | Release the mouse button. The connector becomes a highlighted, solid green line (identifying it as a default Success condition).. Optionally, you can reposition the connection by dragging it to a new location. Arrows on the connectors indicate the direction of the Workflow. |
Step 5 | Repeat this process for other connectors to be added. |


| Anchor | ||||
|---|---|---|---|---|
|
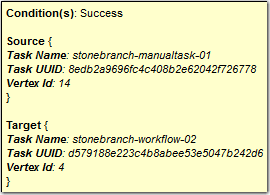
Connector Details
You can display detailed information for any connector by hovering your mouse over it.
For example:
| Anchor | ||||
|---|---|---|---|---|
|
Connector Actions
For each connector in a Workflow, the Controller provides a menu of actions that you can take on that connector. You can perform connector actions in any Workflow Editor mode.
To display the menu of connector actions, right-click a connection.

The following table describes each action in the menu:
Action | Description |
|---|---|
Conditions | Allows you to select a dependency condition for the connection. |
Go To Source | Highlights the predecessor task for the connector and moves it to the center of the Workflow Editor display. |
Go To Target | Highlights the successor task for the connector and moves it to the center of the Workflow Editor display. |
Cut | Cuts the connector from its location in the Workflow. If you include the source and target tasks of a connector in the cut, you can paste the cut connector (and the tasks) into the same Workflow Editor or into the Workflow Editor of any other Workflow. |
Copy | Creates a copy of the connector for inclusion in the Workflow if you include the source and target tasks of the connector in the copy. You can paste the copied connector (and the tasks) into the same Workflow Editor or into the Workflow Editor of any other Workflow. |
Paste | Pastes a copy of the connector (if you also copied the source and target tasks of the connector) into the Workflow. |
Delete | Deletes the connector from the Workflow. You cannot paste a deleted connector back into the Workflow. |
Properties | Displays a menu of properties for the connector. |
| Anchor | ||||
|---|---|---|---|---|
|
Connector Properties
One of the connector actions available for any connector in a Workflow is to display a list of properties for that connector.

The information in the connector properties is view-only.
| Anchor | ||||
|---|---|---|---|---|
|
Specifying Conditions on Connections

When you create a connection between the tasks in a Workflow, you can specify a dependency condition between the predecessor and successor task. The successor task will run if the condition that you specify matches the condition of the predecessor task.
By default, a Success condition is specified automatically for a connection when you create it; if the predecessor task runs to Success, the successor task will run.
The dependency condition that you select for a connection, as allowed for the task type of the predecessor task (see Conditions per Task Type, below), determines the format of the connector in the Workflow Editor.
Condition | Connector Format | Description | ||||||
|---|---|---|---|---|---|---|---|---|
Success | Solid black line | Run the successor task if the predecessor task goes to Success. | ||||||
Failure | Dotted black line | Run the successor task if the predecessor task goes to Failure. | ||||||
Success/Failure | Dotted black line | Run the successor task if the predecessor task goes to Success or Failure. | ||||||
| Variable | Dotted black line | Run the successor task if the variable condition specified in the variable window is met.
| ||||||
| Dotted black line | Run the successor task if the predecessor task returns one of the specified exit code(s). Format: Numeric. Use commas to list a series of exit codes; use hyphens to specify a range. Example: 1,5, 22-30. | ||||||
Dotted gray line | For predecessor z/OS tasks only: Run the successor task if the running predecessor z/OS task has a step end matching the specified Step Condition(s). |
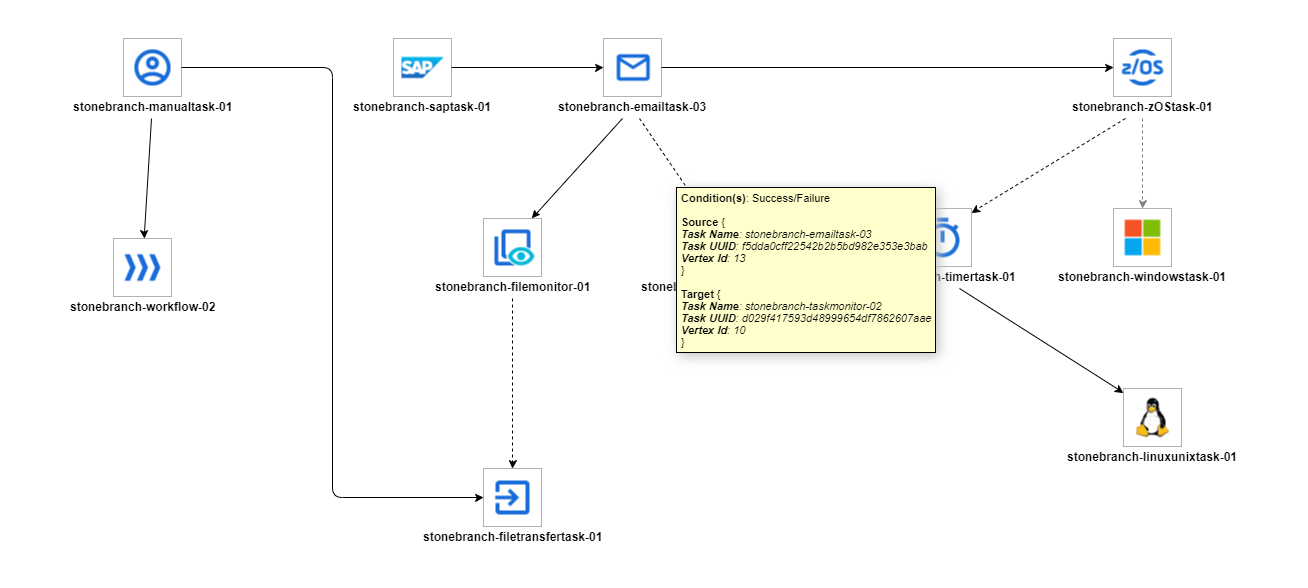
Connector Graphics for All Condition Types, below, illustrates a Workflow containing connectors for all condition types.
| Anchor | ||||
|---|---|---|---|---|
|
Conditions per Task Type
The following table identifies the dependency conditions that are supported for each type of task:
Task Type | Success | Failure | Success/Failure | Step Condition(s) | Variable | Exit Code(s) |
|---|---|---|---|---|---|---|
|
| |||||
|
|
|
| |||
|
|
|
| |||
|
|
|
|
| ||
|
|
|
| |||
|
|
|
| |||
|
|
|
| |||
|
|
|
| |||
|
| |||||
|
| |||||
|
|
|
| |||
|
|
|
| |||
|
|
|
| |||
|
|
|
| |||
| Recurring | ||||||
|
|
|
| |||
|
|
|
| |||
|
|
|
| |||
|
|
|
| |||
|
|
|
| |||
|
|
|
| |||
|
|
|
| |||
|
|
|
|
| Anchor | ||||
|---|---|---|---|---|
|
Specifying a Condition
To specify a dependency condition for a connection between a predecessor and successor task:
Step 1 | Hover your mouse over the connection to view the currently selected condition. If you want to change the condition, right-click the connection to display a Connector Actions menu. |
|---|---|
Step 2 | Select Conditions. The Conditions dialog displays. |
Step 3 | Specify a condition (as supported for each task type). |
Step 4 | If you selected Step Condition(s) for a connection to a predecessor z/OS task, click the View/Edit... button to display a Step Conditions dialog that lets you define the step conditions. |
Step 5 | Click OK on the Conditions dialog. |
Step 6 | To see the condition that is specified for a connection, hover your cursor over the connector (see Connector Graphics for All Condition Types, below). |


| Anchor | ||||
|---|---|---|---|---|
|
Step Conditions
A Step Condition - for a z/OS task only - is an intermediate condition that is evaluated immediately after each z/OS step end. In other words, it does not specify a condition to be met when the z/OS task completes.
In this way, Step Conditions allow a successor task to run before its predecessor task has completed. The successor task may require only that a step in the z/OS task completes, not the entire task.
Step Condition connectors display in gray to distinguish the difference between intermediate Step Conditions and task completion Conditions.
On z/OS task instance completion - specifically, Failed, Success or Finished - Step Conditions are not relevant and are not evaluated. If one or more non-Step Condition dependencies were satisfied, all remaining unsatisfied dependencies, including Step Condition dependencies, become unreachable and their associated paths are skipped.
| Anchor | ||||
|---|---|---|---|---|
|
Step Condition(s) Field Descriptions
The following table describes the fields on the Step Condition(s) dialog.
Field Name | Description | ||||||
|---|---|---|---|---|---|---|---|
| Job step name to match. A blank value or an asterisk ( | ||||||
| Procedure step name to match. A blank value or an asterisk ( | ||||||
| Program name to match. A blank value or an asterisk ( | ||||||
| Conditions codes are integer return codes from the program or ABEND codes. Integer return codes are specified as a comma-separated list of integer values or ranges. Ranges are specified with a dash ( |
Variable Conditions
Variable Conditions are available for all task types. Variable Conditions support Variables and Functions.
At runtime, the First Value and Second Value will be resolved and evaluated based on the Operator specified. If the First Value and/or Second Value stay unresolved, the edge will be skipped automatically, without further evaluation.
| Note |
|---|
For workflow edge variable conditions that use functions to evaluate STDOUT, STDERR, FILE, or JOBLOG output, you must enable Wait For Output when setting up Automatic Output Retrieval. |
Specifying a Variable Condition
To specify a dependency condition for a connection between a predecessor and successor task:
Step 1 | Hover your mouse over the connection to view the currently selected condition. To change the condition, right-click the connection to display a Connector Actions menu. |
|---|---|
Step 2 | Select Conditions. The Conditions dialog displays. |
Step 3 | Select Variable and click View/Edit... button to display a Variable dialog that lets you define the Variable Condition. |
Step 4 | Using the field descriptions below as a guide, complete the fields and click OK.
|
Step 5 | Click OK on the Conditions dialog. |
Step 6 | To see the condition that is specified for a connection, hover your cursor over the connector (see Connector Graphics for All Condition Types, below). |


Variable Condition Field Descriptions
Field Name | Description |
|---|---|
First Value | Variable and Function supported. |
Operator | Available options:
|
Second Value | Variable and Function supported. |
| Anchor | ||||
|---|---|---|---|---|
|
Connector Graphics for All Condition Types
The following illustration shows the connector formats for all condition types and the details that displays for each condition type (in this case, Success/Failure) when you hover your cursor over the connector.
| Anchor | ||||
|---|---|---|---|---|
|
Creating Conditional Paths
The Controller allows you to specify a separate processing path for each possible condition between a predecessor task and a successor task. The Controller selects the appropriate conditional path when the predecessor task goes to a finished status (Success or Failure). As a result, at least one successor dependency is satisfied and at least one successor dependency is not satisfied.
For example, you could specify a conditional path containing a group of tasks that will run if the predecessor task goes to Success, and a second conditional path containing a group of tasks that will run if the predecessor task goes to Failure. When the predecessor task has run to completion, the tasks in the path whose condition meets the condition of the predecessor task will run, and the tasks in the path whose condition does not meet the condition of the predecessor task will go to a Skipped status.
Further examples:
Example 1
Task A is at the top of the Workflow. Three conditional paths have been specified for Task A: one for Failure and two for Success. Task A executes and goes to Success status. The Controller places all of the tasks in the Failure conditional path into Skipped status and the tasks in the two Success conditional paths begin running.
Example 2
Task A is at the top of the Workflow. Two conditional paths have been specified: one for exit codes 1 through 10, the second for exit codes 11 through 20.
- If Task A completes with exit code 5, the tasks in the first path run and the second path is skipped.
- If Task A completes with exit code 15, the first path is skipped and the tasks in the second path run.
- If Task A completes with exit code 25, neither condition is satisfied and both paths remain in Waiting status.
Conditions for Multiple Connections
If a task is connected to multiple predecessor tasks, that successor task remains in Waiting status until the condition of each of its immediate predecessor tasks is evaluated. If all of its immediate predecessor tasks have been Skipped, the successor task is Skipped. If at least one of its immediate predecessor tasks has run to completion, the successor task will run if the specified dependency condition matches the condition of the predecessor task.
For example, if a task has four immediate predecessor tasks, and three of the immediate predecessor tasks have been Skipped and the fourth predecessor task has failed, and the dependency condition between the fourth predecessor task and the successor task is Failure, the successor task will run. (Likewise, if the fourth predecessor task has run to Success, and the dependency condition between the fourth predecessor task and the successor task is Success, the successor task will run.)
The status of the tasks in the conditional paths leading to the immediate predecessor tasks do not affect whether or not the successor tasks will run. All tasks leading to an immediate predecessor tasks do not have to have run in order for the successor task to run.
| Anchor | ||||
|---|---|---|---|---|
|
Moving Workflow Elements
After you have positioned tasks and connectors on the Workflow Editor canvas, you can move these elements as needed.
Move a Single Task
Click a task and drag it to a new location. If the task has any connectors attached, they remain connected, and lengthen or shorten as necessary. |
Move a Single Connector
Step 1 | Click the connector you want to move. |
|---|---|
Step 2 | Position your cursor over either end of the connector (at the predecessor or successor task) and, when the cursor changes to a "pointing hand" icon, drag that end of the connector so that it connects to a different task. |
Step 3 | As desired, repeat Step 2 for the other end of the connector. |
Move a Group of Tasks and Connectors
Step 1 | |
|---|---|
Step 2 | Position the cursor near the group that you want to move. |
Step 3 | Click the Workflow Editor canvas and begin dragging. A blue shaded box appears. This identifies the selection area. |
Step 4 | Drag the selection area over the tasks you want to select, as shown in the following example: |
Step 5 | When you have selected the group of tasks and connectors that you want to move, release the mouse. The tasks and connectors included in the group are highlighted, as shown: |
Step 6 | Hover your cursor over any element in the group until the Move cursor displays, then click that element and drag the group to the new location. All selected elements are moved. |
Step 7 | To deselect the group, click elsewhere in the Workflow Editor canvas. |


| Note | ||
|---|---|---|
| ||
You also can use Ctrl+click to select a group of elements or a selection of individual elements and drag them to a new location. |
| Anchor | ||||
|---|---|---|---|---|
|
Deleting Workflow Elements
Step 1 | Click an element, drag your cursor across the Workflow Editor canvas to select a group of elements, or use Ctrl+click to select one element, a group of elements, or a selection of individual elements. |
|---|---|
Step 2 | Click the Delete icon. The selected element or group of elements is deleted. |
| Anchor | ||||
|---|---|---|---|---|
|
Copying Workflow Elements
Step 1 | Click an element, drag your cursor across the Workflow Editor canvas to select a group of elements, or use Ctrl+click to select one element, a group of elements, or a selection of individual elements. | |||||
|---|---|---|---|---|---|---|
Step 2 | Click the Copy icon to create a copy of the selected elements. | |||||
Step 3 | Click the Paste icon to paste the copied element(s) into the Workflow next to the original element(s). | |||||
Step 4 | Click the copied element (or any element in a copied group) and drag it to a new location.
|
Undoing and Redoing Workflow Changes
To undo the most recent change, click the Undo icon. To redo a change you just undid, click the Redo icon.
Zooming In and Out
Several features are available for zooming in and out on large Workflows:
- Click the Fit icon to fit the entire Workflow onto the display.
- Click the Zoom In icon to increase the size of the Workflow (to view details).
- Click the Zoom Out icon to decrease the size of the Workflow (to view the entire Workflow)
- Click the Actual Size icon to return the Workflow to its actual (original) size.
- Click the Zoom icon to enter a zoom percentage.
| Anchor | ||||
|---|---|---|---|---|
|
Panning Around in Large Workflows
For large Workflows that cannot be viewed entirely on your screen, you can pan around from area to area.
Two methods are provided:
Pan Mode Method
Step 1 | |
|---|---|
Step 2 | Click the Workflow Editor canvas and drag the Workflow so that it displays the area you want to work on. |
Outline Tool Method
Step 1 | Click the Outline icon icon to open the Outline window. |
|---|---|
Step 2 | In the Outline window, move and/or resize the blue box to identify the area of the Workflow you want to work on. The display repositions itself as indicated in the Outline window. |
| Note | ||
|---|---|---|
| ||
You also can move to different areas of a Workflow by using the Find in Workflow... tool. |
| Anchor | ||||
|---|---|---|---|---|
|
Workflow Coordinates
If you use Pan mode (or Find in Workflow...) to view different areas of a Workflow, the Controller preserves the coordinates of the last area that you viewed. If you leave the Workflow and return to it in the same browser session, the last viewed area of the Workflow displays.
To restore the displayed Workflow to its default, top-left position, you can either:
- Right-click anywhere in the Workflow Editor canvas to display a pop-up menu and click Pan To Top.
- Start a new browser session.
Automatically Formatting a Workflow
You can apply automatic formatting to your Workflow. This process does not change any connections or content, but reorganizes the Workflow into a more legible display.
- To create a horizontal layout, click the Horizontal Layout icon.
- To create a vertical layout, click the Vertical Layout icon.
Displaying Workflow Documentation
To display documentation on monitoring Workflows, click the Help icon.
Displaying Processing Messages
While a Workflow is running, you can click the Console icon to display processing messages. For more details, see Monitoring Workflows.
Saving the Workflow
Click the Save icon.
Switching Between Workflows
You can switch between Workflows without using the navigation pane (see Designing, Modifying, or Viewing Multiple Workflows.
| Anchor | ||||
|---|---|---|---|---|
|
Adding Skip/Run Criteria for Specific Tasks
You can add special instructions that specify conditions under which a specific task (or sub-Workflow) within the Workflow should be run or skipped. The Controller evaluates these instructions when determining whether to run each task within a Workflow.
For example, you might want to skip a specific task in a Workflow on a certain day or date, or you might want to run a specific task only if a certain variable is set to a specific value.
| Note | ||
|---|---|---|
| ||
Calendar-based criteria are always evaluated using the task instance Trigger Time (or the task instance Created time, if the workflow was launched manually). |
When a workflow is launched or triggered, the Task Run Criteria provide a mechanism to decide whether a specific task (or sub-Workflow) within the Workflow should be run or skipped. If no Task Run Criteria are specified, a task will always run when the Workflow is launched or triggered. If Task Run Criteria are specified to run or skip a task, these will be evaluated as follows:
- Skip criteria will run the task unless the skip criteria is met. For example, a workflow is triggered every business day, and a task has a skip criteria of Tuesday. The task will run Monday, Wednesday, Thursday, and Friday. The task will not run on Tuesday.
- Run criteria will only run the task when the run criteria is met. For example, a workflow is triggered every business day and a task has a run criteria of Tuesday, The task will run on Tuesday. The task will be skipped on Monday, Wednesday, Thursday, and Friday.
Multiple conditions can be specified in a single Task Run Criteria definition. In this case, all of the conditions need to be met. For example, if in a single Task Run Criteria you specify for the task to run on a specific day of Tuesday, and if the variable RUN_ME resolves to the value YES at Run Time, the task will be skipped unless both of these conditions are true.
When multiple Task Run Criteria definitions are specified for a single task, these are evaluated independently.
| Note | ||
|---|---|---|
| ||
If skip criteria and run criteria both are met (true) on a given day, the skip criteria will take precedence. |
| Anchor | ||||
|---|---|---|---|---|
|
Creating Skip/Run Criteria
Step 1 | Display the Details of the Workflow for which you want to specify skip/run criteria. |
|---|---|
Step 2 | Click the Task Run Criteria tab. The Task Run Criteria list displays a list of any existing skip/run criteria for that task. |
Step 3 | Click New. Task Run Criteria Details displays: |
Step 4 | Using the field descriptions, below, as a guide, complete the fields as needed. For example, to tell the Controller not to run a specific task on business days or holidays, select Skip Criteria in the Type field, select the task and enable Business Day and Holiday. |
Step 5 | Click the Save button to save the record. |

| Anchor | ||||
|---|---|---|---|---|
|
Skip/Run Criteria Field Descriptions
The following table provides descriptions for each field in the Task Run Criteria Details.
Field Name | Description | |||||||||||
|---|---|---|---|---|---|---|---|---|---|---|---|---|
Type | User-defined; indicates whether this is providing instructions on when to run or not run the task.
| |||||||||||
Description |
| |||||||||||
Task | User-defined; task for which you are specifying run or skip criteria. Select a task from the drop-down list of all tasks in this Workflow. | |||||||||||
Vertex ID | Vertex ID of the task selected in the Task field. Each task within a Workflow has a unique Vertex ID, which distinguishes it from other tasks of the same name, if any. | |||||||||||
Business Day | If enabled, the task runs or skips on all business days. | |||||||||||
| If enabled, the task runs or skips on holidays. | |||||||||||
| If Holiday is enabled; Specification for adjusting a Holiday by a less or plus number of days or business days. Options:
Default is – None -- | |||||||||||
| If Adjustment is Less or Plus; Number of days or business days to adjust a Holiday. Default is 1. | |||||||||||
| If Adjustment is Less or Plus; Type of day by which to adjust a Holiday. Options:
Default is Day. | |||||||||||
Specific Day(s) – Sunday through Saturday | If enabled, the task runs or skips on the day(s) you select in the right-hand column. | |||||||||||
| If enabled, the task runs or skips on the day you select in the Custom Day Choice field.
| |||||||||||
| If Custom Day is enabled, select the custom day for which you are specifying run or skip criteria. Enter the name of an existing Custom Day, select a Custom Day from the drop-down list of all existing Custom Days, or click the Details icon to create a new Custom Day.
| |||||||||||
| If enabled, the task runs or skips on the day(s) indicated in the Adjective, Noun, and Qualifier fields. | |||||||||||
| If Complex is enabled, you can use this field to specify which in a series of days you want to select. Used in conjunction with the Noun, Qualifier, and Nth Amount (if Adjective = Nth) fields. For example, to specify "the 15th business day of the month," select Adjective: Nth, Noun: Business Day, Qualifier: Month, Nth Amount: 15.
| |||||||||||
| If Complex is enabled, you can use this field to specify the type of day(s) you want to select. Used in conjunction with the Adjective, Qualifier, and Nth Amount (if Adjective = Nth) fields. For example, to specify "the 1st business day of the month," select Adjective: 1st, Noun: Business Day, Qualifier: Month.
| |||||||||||
| If Complex is enabled, you can use this field to specify the period(s) for your selection formula. Used in conjunction with the Adjective, Noun, and Nth Amount (if Adjective = Nth) fields. For example, to specify "the 1st business day of the month," select Adjective: 1st, Noun: Business Day, Qualifier: Month.
| |||||||||||
| If Adjective = Nth; Sequential occurrence of the day selected in Noun within the selected Qualifier. | |||||||||||
| If Complex is enabled; Specification for adjusting a complex day by a less or plus number of days or business days. Options:
Default is – None -- | |||||||||||
| If Adjustment is Less or Plus; Number of days or business days to adjusting a complex day. Default is 1. | |||||||||||
| If Adjustment is Less or Plus; Type of day by which to adjust a complex day. Options:
Default is Day. | |||||||||||
| If enabled, instructs the Controller to run or not run the task, depending on the value of a specific variable. Used in conjunction with fields: Evaluate At, Name, Operator, and Value. | |||||||||||
| If Variable = enabled; Allows you to specify when you want the Controller to evaluate the variable.
| |||||||||||
| If Variable = enabled; Specifies the name of the variable being evaluated. The variable does not need to exist when this record is created. | |||||||||||
| If Variable = enabled; Allows you to select the operator to be used in the evaluation. Options: =, !=, >, >=, <, <=, regex (regular expression). | |||||||||||
| If Variable = enabled; Allows you to specify the value or regular expression (up to 255 alphanumeric characters) that the Controller should look for when evaluating the variable. | |||||||||||
Buttons | This section identifies the buttons displayed above and below the Task Run Criteria that let you perform various actions. | |||||||||||
Save | Saves a new record in the Controller database. | |||||||||||
Update |
| |||||||||||
New | Displays empty (except for default values) Details for creating a new Database Connection. | |||||||||||
Delete |
| |||||||||||
Refresh | Refreshes any dynamic data displayed in the Details. | |||||||||||
Close | For pop-up view only; closes the pop-up view of this Database Connection. |
| Anchor | ||||
|---|---|---|---|---|
|
Copying Skip/Run Criteria
You can copy the skip/run criteria of a task in a Workflow and copy it to any other task in that Workflow.
Step 1 | Display the Details of the Workflow task for which you want to copy the skip/run criteria of one of its tasks. |
|---|---|
Step 2 | Click the Task Run Criteria tab. The Task Run Criteria list displays a list of any existing skip/run criteria for that task. |
Step 3 | Click the Details icon for the skip/run criteria that you want to copy. The Task Run Criteria Details for that task displays. |
Step 4 | Click the Task field drop-down list to display a list of all tasks in the Workflow. |
Step 5 | Select a task from the drop-down list and then right-click anywhere in the Task Run Criteria Details to display an Action menu. |
Step 6 | Click Insert to copy the skip/run criteria to the selected task and re-display the Task Run Criteria list, or click Insert & View to copy the skip/run criteria to the selected task and continue viewing the Task Run Criteria Details for that task, which you can Update or Close. |

Specifying When a Workflow Runs
As with other task types, you can run a Workflow manually or specify triggers that run the Workflow task automatically based on times or events.
You also can specify skip and run criteria for specific tasks within the Workflow.
Monitoring Workflow Execution
You can monitor all Controller activity from the Activity Monitor.
Modifying an Existing Workflow
Step 1 | From the Automation Center navigation pane, select Tasks > Workflow Tasks. The Workflow Tasks list displays. |
|---|---|
Step 2 | Click the Task Name of the Workflow task that you want to modify. Workflow Task Details for that task displays. |
Step 3 | Click Edit Workflow to display the Workflow Editor. |
Step 4 | Modify the Workflow and click the Save icon. |
| Anchor | ||||
|---|---|---|---|---|
|
Cloning a Workflow
You can clone a Workflow to create a copy of it and a copy of every task in the Workflow. Optionally, cloning a Workflow will also create a copy of its Virtual Resources.
Step 1 | From the Automation Center navigation pane, select Tasks > Workflow Tasks. The Workflow Tasks list displays. |
|---|---|
Step 2 | Right-click the Workflow that you want to clone, or open the Workflow and right-click anywhere in the Details, to display an Action menu for that Workflow. |
Step 3 | Click Clone... in the Action menu to display the Clone Workflow Task pop-up: |
Step 4 | Enter a Prefix and/or Suffix, which will be applied to the Workflow clone and all of its tasks. |
Step 5 | If you want to clone all Virtual Resources of the Workflow, click the Clone Virtual Resources check box. |
Step 6 | Click Submit to clone the Workflow. The Workflow clone will display in the Workflows list. In the Workflow Editor, each task clone will have the same prefix and/or suffix as the Workflow clone, and the task clones will display in the task lists for those task types. |

Deleting a Workflow
Step 1 | From the Automation Center navigation pane, select Tasks > Workflow Tasks. The Workflow Tasks list displays. |
|---|---|
Step 2 | Right-click the Workflow that you want to delete to display an Action menu. (If you want to delete multiple Workflows, use Ctrl+click to select each one and then right-click any of the selected Workflows.) |
Step 3 | Click Delete. |
| Anchor | ||||
|---|---|---|---|---|
|
Finding a Task in a Workflow
For any Workflow task, or any Workflow task instance (running or complete), you can find the location of any task (or multiple tasks) within that Workflow:
Step 1 | On the Workflow Tasks list, right-click a Workflow task to display an Action menu. | ||||||
|---|---|---|---|---|---|---|---|
Step 2 | Click Edit Workflow to display the Workflow Editor for that Workflow. | ||||||
| Right-click any white space in the Workflow Editor canvas. A pop-up menu displays. | ||||||
Step 4 | Click Find in Workflow... to display a Find in Workflow dialog. | ||||||
Step 5 | Select an operator for the search (contains, starts with, or equals), enter the full or partial name of the task(s) that you want to find, and press enter. The Controller locates and displays the first task within the Workflow that matches the search criteria. Click the Next and/or Previous buttons to find any other tasks that match the search criteria. |


| Note | ||
|---|---|---|
| ||
You also can locate a task in a Workflow by using the Pan tool. |
| Anchor | ||||
|---|---|---|---|---|
|
Workflow Coordinates
If you use Find in Workflow... (or Pan mode) to view different areas of a Workflow, the Controller preserves the coordinates of the last area that you viewed. If you leave the Workflow and return to it in the same browser session, the last viewed area of the Workflow displays.
To restore the displayed Workflow to its default, top-left position, you can either:
- Right-click any white space in the Workflow Editor canvas to display a pop-up menu and click Pan To Top.
- Start a new browser session.
| Anchor | ||||
|---|---|---|---|---|
|
Viewing a Task Instance in a Workflow from the Activity Monitor or Task Instances List
From the Activity Monitor or Task Instances list, you can view the location and status of a task instance in a Workflow.
Step 1 | Open the Activity Monitor or Task Instances List. |
|---|---|
Step 2 | Right-click a task instance to display the Action menu. |
Step 3 | Click View in Workflow. The parent Workflow of the selected task instance displays, with that task instance highlighted. |
| Note | ||
|---|---|---|
| ||
You also can view any predecessor or successor task instance of a task instance in a Workflow from the View Predecessors/Successors pop-up dialog. |
| Anchor | ||||
|---|---|---|---|---|
|
Inserting a Task in an Active Workflow
After a Workflow has been launched, you can insert a new task (including a Workflow task) into an active Workflow task instance.
You can insert the task as a predecessor or successor of another task instance within the Workflow instance using the Insert Task as Predecessor or Insert Task as Successor command, respectively. Alternatively, you can use the Insert Task... command to insert a task with any number of predecessors and successors.
If you are inserting a Workflow task into an active Workflow task instance, and that Workflow task (or any sub-Workflow within that Workflow task) has the Calculate Critical Path field enabled, that field will be disabled automatically. However, if the active Workflow task instance has the Calculate Critical Path field enabled, and any task (including a Workflow task) that you are inserting into the Workflow task instance impacts the Critical Path of the Workflow task instance, the Critical Path will adjust accordingly.
See the following sections:
- Insert Non-Workflow Task as Predecessor
- Insert Workflow Task as Predecessor
- Insert Non-Workflow Task as Successor
- Insert Workflow Task as Successor
- Insert Task with Multiple Predecessors/Successors
| Anchor | ||||
|---|---|---|---|---|
|
Insert Non-Workflow Task as Predecessor
Step 1 | In the Workflow Monitor, right-click a task instance. |
|---|---|
Step 2 | Click Insert Task As Predecessor.... The Task Insert > Task Selection dialog displays. |
Step 3 | Find the task you want to insert (see Searching For and Adding Tasks) and drag the task's icon onto the Workflow Editor canvas where you would like it to be inserted. |
Step 4 | By default, the inserted task will inherit the Trigger Time of the parent Workflow. If the Trigger Time of the parent Workflow is undefined, the Launch Time will be inherited as the Trigger Time instead. |
| Anchor | ||||
|---|---|---|---|---|
|
Insert Workflow Task as Predecessor
Step 1 | In the Workflow Monitor, right-click a task instance. |
|---|---|
Step 2 | Click Insert Task As Predecessor.... The Task Insert > Task Selection dialog displays. |
Step 3 | Find the Workflow that you want to insert (see Searching For and Adding Tasks) and drag the Workflow's icon onto the Workflow Editor canvas where you would like it to be inserted. The Task Insert > Predecessor/Successor Selection dialog displays and identifies the task that you right-clicked, which the selected Workflow will be the Predecessor of. |
Step 5 | Optionally, you can modify the selection of Predecessors and Successors before proceeding. |
Step 6 | By default, the inserted Workflow will inherit the Trigger Time of the parent Workflow. If the Trigger Time of the parent Workflow is undefined, the Launch Time will be inherited as the Trigger Time instead. Therefore, by default, for task instances within an inserted Workflow, Run Criteria will be evaluated using the inherited Trigger Time. |
Step 7 | Click OK. The Controller inserts the Workflow task as a predecessor to the selected task instance. |

| Anchor | ||||
|---|---|---|---|---|
|
Insert Non-Workflow Task as Successor
Step 1 | In the Workflow Monitor, right-click a task instance. |
|---|---|
Step 2 | Click Insert Task As Successor.... The Task Insert > Task Selection dialog displays. |
Step 3 | Find the task you want to insert (see Searching For and Adding Tasks) and drag the task's icon onto the Workflow Editor canvas where you would like it to be inserted. |
Step 4 | By default, the inserted task will inherit the Trigger Time of the parent Workflow. If the Trigger Time of the parent Workflow is undefined, the Launch Time will be inherited as the Trigger Time instead. |
| Anchor | ||||
|---|---|---|---|---|
|
Insert Workflow Task as Successor
Step 1 | In the Workflow Monitor, right-click a task instance. |
|---|---|
Step 2 | Click Insert Task As Successor.... The Task Insert > Task Selection dialog displays. |
Step 3 | Find the Workflow that you want to insert (see Searching For and Adding Tasks) and drag the Workflow's icon onto the Workflow Editor canvas where you would like it to be inserted. The Task Insert > Predecessor/Successor Selection dialog displays and identifies the task that you right-clicked, which the selected Workflow will be the Successor of. |
Step 5 | Optionally, you can modify the selection of Predecessors and Successors before proceeding. |
Step 6 | By default, the inserted Workflow will inherit the Trigger Time of the parent Workflow. If the Trigger Time of the parent Workflow is undefined, the Launch Time will be inherited as the Trigger Time instead. Therefore, by default, for task instances within an inserted Workflow, Run Criteria will be evaluated using the inherited Trigger Time. |
Step 7 | Click OK. The Controller inserts the Workflow task as a successor to the selected task instance. |

| Anchor | ||||
|---|---|---|---|---|
|
Insert Task with Multiple Predecessors/Successors
Step 1 | In the Workflow Monitor, right-click any white space in the Workflow Editor canvas. | |||||
|---|---|---|---|---|---|---|
Step 2 | Click Insert Task.... The Task Insert > Task Selection dialog displays. | |||||
Step 3 | Find the task you want to insert (see Searching For and Adding Tasks) and drag the task's icon onto the Workflow Editor canvas where you would like it to be inserted. | |||||
Step 4 | The Task Insert > Predecessor/Successor Selection dialog displays. | |||||
Step 5 | Select zero or more predecessors and zero or more Successors for the inserted task. | |||||
Step 6 | By default, the inserted task will inherit the Trigger Time of the parent Workflow. If the Trigger Time of the parent Workflow is undefined, the Launch Time will be inherited as the Trigger Time instead. For task instances within an inserted Workflow, Run Criteria will be evaluated using the inherited Trigger Time. | |||||
Step 7 | Click OK. The Controller inserts the task as a successor to the selected predecessor task instance(s) and as a predecessor to the selected successor task instance(s).
|

| Anchor | ||||
|---|---|---|---|---|
|
Viewing Children Tasks
You can view workflow children tasks for a Workflow task and a Workflow task instance.
Viewing Children Tasks of a Workflow Task
You can view all children tasks of a Workflow task (and children tasks of any sub-workflow) from any of the following locations:
All Tasks list | Right-click any workflow task in the list to access the View Children action from the Workflow Task Commands menu. |
|---|---|
Workflow Tasks List | Right-click any workflow task in the list to access the View Children action from the Workflow Task Commands menu. |
Workflow Task Details | Right-click anywhere in the Details to access the View Children action from the Workflow Task Commands menu. |
Workflow Editor | Right-click any white-space or workflow task vertex to access the View Children action. |
Workflow Forecast | Right-click any white-space or workflow task vertex to access the View Children action. |

Viewing Children Tasks of a Workflow Task Instance
You can view all children tasks of a Workflow task instance (and children tasks of any sub-workflow) from any of the following locations:
Activity Monitor | Right-click any workflow task instance in the list to access the View Children action from the Workflow Task Commands menu. |
|---|---|
Task Instances list | Right-click any workflow task instance in the list to access the View Children action from the Workflow Task Commands menu. |
Workflow Task Instance Details | Right-click anywhere in the Details to access the View Children action from the Workflow Task Commands menu. |
Workflow Monitor | Right-click any white-space or workflow task instance vertex to access the View Children action. |
Workflow Task Details | Click the Instances tab of any workflow task, then right-click any workflow task instance in the list to access the View Children action from the Workflow Task Commands menu. |

| Anchor | ||||
|---|---|---|---|---|
|
Viewing a Workflow Tree
You can view a Workflow tree (that is, a hierarchical display of the workflow and its tasks) for a Workflow task and a Workflow task instance.
| Note | ||
|---|---|---|
| ||
You can apply the same layout to a Workflow Tree as you can to any list. |
| Anchor | ||||
|---|---|---|---|---|
|
You can view a Workflow Tree for a workflow task from any of the following locations.
All Tasks list | Right-click any workflow task in the list to access the View Tree action from the Workflow Task Commands menu. |
|---|---|
Workflow Tasks List | Right-click any workflow task in the list to access the View Tree action from the Workflow Task Commands menu. |
Workflow Task Details | Right-click anywhere in the Details to access the View Tree action from the Workflow Task Commands menu. |
Workflow Editor | Right-click any white-space or workflow task vertex to access the View Tree action. |
Workflow Forecast | Right-click any white-space or workflow task vertex to access the View Tree action. |
Tree View | Right-click any workflow task within a Tree View to access the View Tree action from the Workflow Task Commands menu. The Tree View for that workflow task will display in a new tab. |

| Anchor | ||||
|---|---|---|---|---|
|
Viewing a Workflow Tree for a Workflow Task Instance
You can view a Workflow Tree for a workflow task instance from any of the following locations.
Activity Monitor | Right-click any workflow task instance in the list to access the View Tree action from the Workflow Task Commands menu. |
|---|---|
Task Instances list | Right-click any workflow task instance in the list to access the View Tree action from the Workflow Task Commands menu. |
Workflow Task Instance Details | Right-click anywhere in the Details to access the View Tree action from the Workflow Task Commands menu. |
Workflow Monitor | Right-click any white-space or workflow task instance vertex to access the View Tree action. |
Workflow Task Details | Click the Instances tab of any workflow task, then right-click any workflow task instance in the list to access the View Tree action from the Workflow Task Commands menu. |
Tree View | Right-click any workflow task instance within a Tree View to access the View Tree action from the Workflow Task Commands menu. The Tree View for that workflow task instance will display in a new tab. |

| Note | ||
|---|---|---|
| ||
If the Critical Path Calculations Permitted Universal Controller system property is set to true, the Details icon for any task instance on the Critical Path will display in red. |
Expanding/Collapsing the Tree View
To view the child tasks of any sub-Workflow in a tree, click the + to expand the tree view for that sub-Workflow.
To hide the child tasks of any sub-Workflow in a tree, click the - to collapse the tree view for that sub-Workflow.
Additionally, you can use the Expand, Expand All, Collapse, and Collapse All buttons in the toolbar along the top of the Tree View.
Expand | Expands any collapsed and visible workflow nodes one level. |
|---|---|
Expand All | Expands all nodes in the tree. |
Collapse | Collapses one level of workflow nodes, starting from the open workflow node at the deepest level. |
Collapse All | Collapses all open workflow nodes, excluding the root-level workflow node. |
Refreshing the Tree View
To refresh the Tree View, click the refresh icon in the toolbar along the top of the Tree View.
| Anchor | ||||
|---|---|---|---|---|
|
Viewing a Timeline for a Workflow Task Instance
You can display the progress of a Workflow task instance in a timeline format from any of the following locations.
| Activity Monitor | Right-click any workflow task instance in the list to access the View Timeline... action from the Workflow Task Commands menu. |
|---|---|
| Task Instances list | Right-click any workflow task instance in the list to access the View Timeline... action from the Workflow Task Commands menu. |
| Workflow Task Instance Details | Right-click anywhere in the Details to access the View Timeline... action from the Workflow Task Commands menu. |
| Workflow Monitor | Right-click any white-space or workflow task instance vertex to access the View Timeline... action. |
| Step 1 | Display the Activity Monitor, Task Instances List, Workflow Task Instance Details, or Workflow Monitor. |
|---|---|
| Step 2 | Right-click to display an Action menu. |
| Step 3 | Click View Timeline... to display the View Timeline... pop-up dialog.
|
| Step 4 | Use the Instance Name Filter and Type Filter fields to reduce the number of task instances that are included in the Timeline. Instance Name Filter supports wildcard characters (* and ?) to specify Instance Name patterns. If specified, only task instances that match both the Instance Name Filterand the Type Filter will be included. |
| Step 5 | Click Submit. The Timeline for the Workflow task instance displays.
|
| Step 6 | Use the toolbar along the top of the Timeline View to specify the resolution of the timeline.
|

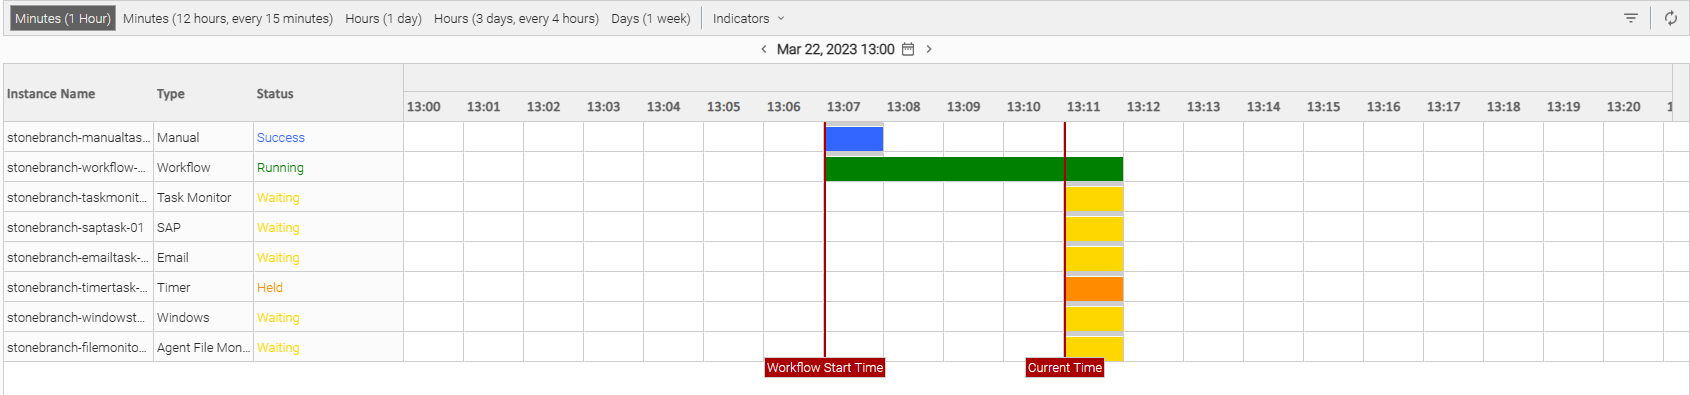
Refreshing the Timeline View
To refresh the Timeline View, click the refresh icon in the toolbar along the top of the Timeline View.
| Anchor | ||||
|---|---|---|---|---|
|
Viewing Task Predecessors/Successors
You can view all predecessors and successors of a task (or task instance) in a Workflow from:
- Activity Monitor
- Task Instances list
- Workflow Editor
- Workflow Monitor
You also can view all predecessors and successors of all tasks (or task instances) in a Workflow from:
- Workflows list
- Workflow task Details
- Activity Monitor
- Task Instances list
- Workflow task instance Details
See the following sections:
- Viewing Predecessors/Successors of a Single Task Instance from the Activity Monitor or Task Instances List
- Viewing Predecessors/Successors of a Single Task from the Workflow Editor
- Viewing Predecessors/Successors of a Single Task Instance from the Workflow Monitor
- Viewing Detailed Status of Predecessors/Successors of a Single Task Instance from Workflow Monitor
- Viewing Predecessors/Successors of All Tasks in a Workflow Task
- Viewing Predecessors/Successors of All Task Instances in a Workflow Task Instance
| Anchor | ||||
|---|---|---|---|---|
|
Viewing Predecessors/Successors of a Single Task Instance from the Activity Monitor or Task Instances List
Step 1 | Display the Activity Monitor or Task Instances List. |
|---|---|
Step 2 | Right-click a task instance to display an Action menu. |
Step 3 | Click View Predecessors/Successors to display the View Predecessors/Successors pop-up dialog. |
Step 4 | If you want to view the task instance Details of any predecessor or successor task instance, click that task instance. |
Step 5 | If you want to view a predecessor or successor task instance of the selected task instance within the Workflow, right-click that task instance to display an Action menu, and then click View Workflow. |


| Anchor | ||||
|---|---|---|---|---|
|
Viewing Predecessors/Successors of a Single Task from the Workflow Editor
Step 1 | Open the Workflow Editor. |
|---|---|
Step 2 | Right-click a task to display an Action menu. |
Step 3 | Right-click View Predecessors/Successors to display the View Predecessors/Successors pop-up.
|
Step 4 | Click Edit if you want to edit the predecessors and successors of this task in the workflow. |


| Anchor | ||||
|---|---|---|---|---|
|
Viewing Predecessors/Successors of a Single Task Instance from the Workflow Monitor
| Note | ||
|---|---|---|
| ||
To view more detailed task instance predecessor/successor information from the Workflow Monitor than is available via this procedure, see Viewing Detailed Status of Predecessors / Successors of a Single Task Instance from Workflow Monitor, below. |
Step 1 | Open the Workflow Monitor. |
|---|---|
Step 2 | Right-click a task instance to display an Action menu. |
Step 3 | Right-click View Predecessors/Successors to display the View Predecessors/Successors pop-up.
|

| Anchor | ||||
|---|---|---|---|---|
|
Viewing Detailed Status of Predecessors/Successors of a Single Task Instance from Workflow Monitor
Step 1 | Open the Workflow Monitor. |
|---|---|
Step 2 | Double-click a task instance, or right-click and select View/Edit, to see its Task Instance Details. |
Step 3 | Right-click in the Task Instance Details to display an Action menu. |
Step 4 | Click View Predecessors/Successors to display a detailed view of the View Predecessors/Successors pop-up dialog. |
Step 5 | If you want to view the task instance Details of any predecessor or successor task instance, click that task instance. |
Step 6 | If you want to view a predecessor or successor task instance of the selected task instance within the Workflow, right-click that task instance to display an Action menu, and then click View Workflow. |

| Anchor | ||||
|---|---|---|---|---|
|
Viewing Predecessors/Successors of All Tasks in a Workflow Task
You can view the predecessors/successors of all tasks in a Workflow task from:
- Workflow task on Workflows list
- Workflow task Details
- Workflow Editor
- Workflow Forecast
- Workflow Vertex in Workflow Editor and Workflow Forecast
Viewing predecessors/successors of all tasks in a Workflow task also lets you:
- View task run criteria for all tasks in the Workflow.
- View and/or download a list of predecessors/successors and task run criteria for all tasks in the Workflow.
Step 1 | Display the Workflows list. |
|---|---|
Step 2 | Right-click a Workflow on the list and select View Children from the Action menu, or right-click within the task Details for the Workflow and select View Children. A list of child tasks within that Workflow displays. |
Step 3 | Click the Expand icon ( |
Step 4 | For any Task Run Criteria on the list, click the Details icon to displays its record Details, or right-click it to display a menu of options available for that Task Run Criteria. |
Step 5 | For any Predecessor / Successor on the list, right-click it to display a menu of options available for that predecessor/successor. |
Step 6 | To view and/or save a list of all predecessors/successors and task run criteria for all child tasks within the Workflow, click the Download button on the View Children list. |
Step 7 | To print all currently displayed information on the list, click the Print button. |
Step 8 | To refresh all information on the list, click the Refresh button. |


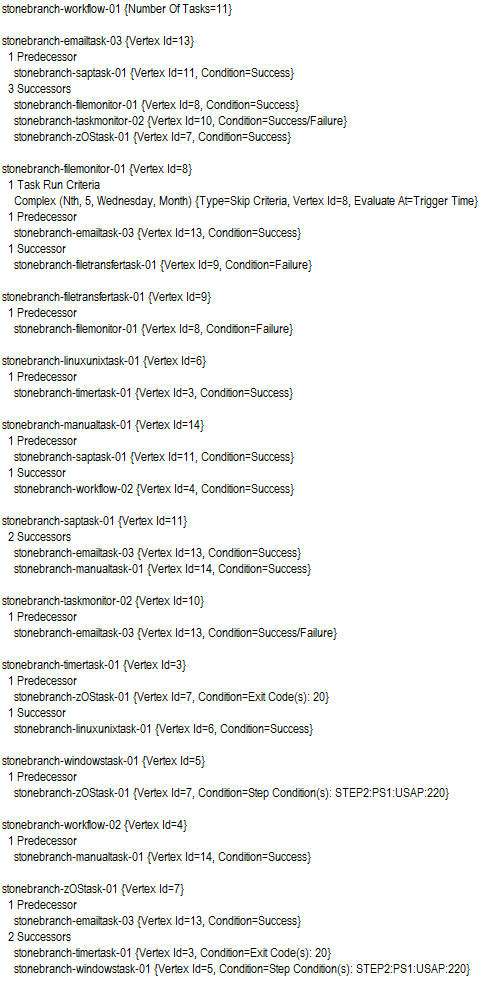
| Anchor | ||||
|---|---|---|---|---|
|
Viewing Predecessors/Successors of All Task Instances in a Workflow Task Instance
You can view the predecessors/successors of all task instances in a Workflow task instance from:
- Activity Monitor
- Task Instances list
- Workflow task instance Details
- Workflow Monitor
Step 1 | Display the Activity Monitor or Task Instances list. |
|---|---|
Step 2 | Right-click a Workflow on the Activity Monitor or Task Instances list, or open a Workflow on the Activity Monitor or Task Instances list and then right-click within that Workflow Details, to display an Action menu. |
Step 3 | Select Workflow Task Commands > View Children to display a list of child task instances within that Workflow. |
Step 4 | Click the Expand icon ( |
Step 5 | For any Predecessor / Successor on the list, right-click it to display a menu of options available for that predecessor/successor. |
Step 6 | To print all currently displayed information on the list, click the Print button. |
Step 7 | To refresh all information on the list, click the Refresh button. |


| Anchor | ||||
|---|---|---|---|---|
|
Editing Task Predecessors/Successors
You can edit all predecessors and successors of a task in a Workflow from the Workflow Editor.
Editing predecessors and successors refers to adding predecessors and successors to a selected task and/or removing predecessors and successors from a selected task.
When adding a predecessor or successor through the Edit Predecessors/Successors dialog, the condition for the dependency will always be added as a Success condition, using a straight edge.
Conditions for any existing predecessor or successor dependencies will be preserved, assuming the predecessor or successor dependencies are not removed.
Step 1 | Open the Workflow Editor. | |||||
|---|---|---|---|---|---|---|
Step 2 | Right-click a Task to display an Action menu. | |||||
Step 3 | Click Edit Predecessors/Successors to display the Edit Predecessors/Successors pop-up dialog. To resize the pop-up, hover over the window resize icon at the bottom right of the pop-up and drag the icon up or down.
| |||||
Step 4 | To add a task as a predecessor or successor to the selected task, hold the Ctrl key and click the name of that task. To remove a task as a predecessor or successor to the selected task, hold the Ctrl key and click the name of that task. | |||||
Step 5 | To add a task as a predecessor or successor to the selected task and remove all other predecessors or successors, click the name of that task. |

| Anchor | ||||
|---|---|---|---|---|
|
Viewing Blocking Ancestors
You can view the blocking ancestors of task instances in a Workflow task instance from:
- Activity Monitor
- Task Instances list
- Workflow Monitor
Only task instances that have not started (that is: Defined, Waiting or Held status) will qualify.
Step 1 | Display the Activity Monitor, Task Instances list, or Workflow Monitor. |
|---|---|
Step 2 | Right-click a task instance on the Activity Monitor or Task Instances list, or open a Workflow and then right-click within that Workflow Details, to display an Action menu. |
Step 3 | Select View Blocking Ancestors... to display a View Blocking Ancestors dialog. |
| Step 4 | Select how you want to view the blocking ancestors. |
| Step 5 | Select Include Potential Matches if you want to include potential matches for blocking task instances. (By default, Include Potential Matches is not be selected.) If you select Include Potential Matches, the dialog will displays a Qualifying From Date field that lets you specify a date from which potential matches may qualify (in other words, how far back to look for a potential match). |
| Step 6 | Select Expand/Inline Workflows if you want to expand/inline workflow task instances when displaying blocking ancestors as a List or Graph. |
| Step 7 | Click Submit to display the blocking ancestors in your selected view. |

View Blocking Ancestors - List

View Blocking Ancestors - Tree

View Blocking Ancestors - Graph

| Anchor | ||||
|---|---|---|---|---|
|
Forecasting a Workflow for a Specific Date/Time
You can display forecast information for a Workflow for a specific date and time. This provides a view of how a Workflow will look based on the Run/Skip Criteria for that date and time.
You can forecast a Workflow, without requiring a Trigger or Trigger forecast data, for any date/time within a span of five years in the past and 10 years in the future.
Step 1 | From the Automation Center navigation pane, select Tasks > All Tasks or Tasks > Workflow Tasks. | |||||
|---|---|---|---|---|---|---|
Step 2 | Display an Action menu either of three ways:
| |||||
Step 3 | Click Forecast... to display a Forecast dialog. | |||||
Step 4 | Select a Date, Time, Time Zone, and Calendar for when you want to forecast the Workflow (and all of its sub-Workflows, if any).
| |||||
Step 5 | Select a View in which you want to display the Forecast: Workflow or List. | |||||
Step 6 | If you selected Workflow View, a Calculate Critical Path field displays. Enable/disable this field depending on whether or not you want to calculate the Critical Path of the Workflow. | |||||
Step 7 | Click Submit to display the Forecast in the selected View.
If you enabled Calculate Critical Path:
|


| Anchor | ||||
|---|---|---|---|---|
|
Forecasting with Override Calendar Options
A workflow being forecasted by the Forecast... command will use the Calendar specified on the Forecast... dialog; the Override Calendar options (Default Calendar and Override Inherited Calendar) on the workflow being directly forecasted do not apply.
Any sub-workflow within the workflow being directly forecasted will honour its own Override Calendar options. If no Override Calendar options are defined, the command-specified Calendar is used.
If the sub-workflow within the workflow being directly forecasted contains a deeper sub-workflow, that deeper sub-workflow will honour its own Override Calendar options or, if none are specified, the Override Calendar options of a parent workflow (excluding the directly forecasted workflow for which the Calendar was specified on the Forecast... command). If no Override Calendar options are defined, the command-specified Calendar is used.
Modifying Tasks in a Workflow
You can make the following modifications for tasks in a Workflow:
- Changing the Priority of a Task Instance
- Re-running a Task Instance
- Cancelling a Task Instance
- Force Finishing a Task Instance
- Putting a Task Instance on Hold
- Releasing a Task Instance from Hold
- Skipping a Task Instance
- Showing or Hiding Skipped Task Instances
- Unskipping a Task Instance
- Clearing All Predecessor Dependencies for a Task Instance
- Marking a Task Instance Dependency as Satisfied