Record Lists
- Stonebranch (Deactivated)
Introduction
A record list is either a:
- Listing of records of the same type, such as tasks, calendars, or users.
- Listing of all records of the same type or category, such as all tasks or active triggers.
When you click a record type in the Services, a list of currently defined records for that record type displays.
List Task Bar
A task bar displays at the top of every list. For example:

The following table describes the different elements that can appear on a list task bar and the function of each element:
|
Task Bar Element |
Function |
|---|---|
|
|
Allows you to apply an existing filter to the records on the list. The default selection is -- No Filter -- (no Filter is applied). Click the down arrow to display a list of existing filters. |
|
|
Allows you to create, view, or edit a filter that you can save or apply to the records on the list. |
|
|
Allows you to create a quick record name filter that you can apply (but not save) to the records on the list. |
|
|
Allows you to create a new record of the record type displayed on the list. |
|
|
Allows you to refresh any dynamic data displayed on the list. |
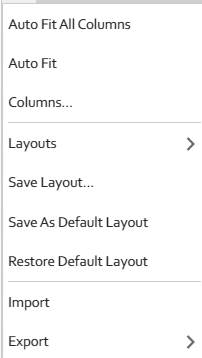
Formatting a List
For every list in the user interface, an Action menu of formatting options is available.
To display the menu of formatting options, click the down arrow that appears over the Detail icons column.
For all lists, you can right-click any column header on the list to display an Action menu of formatting options preceded by sort actions for the selected column.
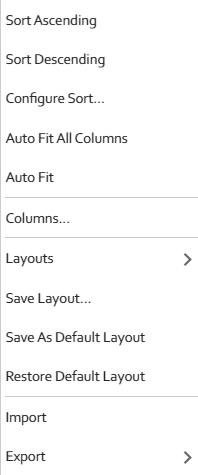
See Action Menus for a description of these formatting and sort options.
Sorting
By default, lists are sorted by <record type> Name in ascending, alphanumeric order (0-9, a-z).
You can sort a list in ascending or descending order of the entries in any displayed column.
There are two ways to sort a list:
- Click a column header; the list is sorted in ascending order of the entries in that column. A small arrow appears to the left of the column name to indicate the direction of sort. An up arrow indicates ascending alphanumerical order; a down arrow indicates descending alphanumerical. Re-click the header to reverse the direction of sort.
- Right-click a column header to display an Action menu and click either:
Sorting by Type
Type columns, such as Permission Type, Task Type, or Task Instance Status, are sorted by the Type underlying integer values, not alphabetically by the Type display names.
For example, if you sort the list of task instances on the Activity Monitor by Status, the list is sorted by the numeric Status Code, not the alphabetic Status Name:

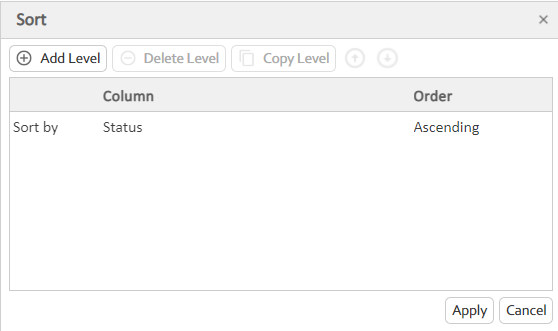
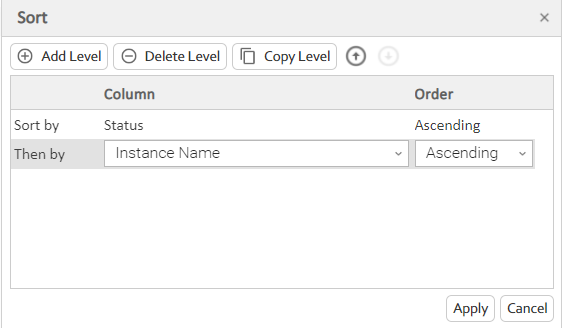
Configure a Multi-Level Sort
You can use the Configure Sort action to create a temporary, multi-level sort for any column.
|
Step 1 |
Click a column header to sort the list by the currently defined sort level of that column (default is column name in ascending order). |
|
Step 2 |
Right-click the same column header to display an Action menu. |
|
Step 3 |
Click Configure Sort... to display the Sort dialog. |
|
Step 4 |
Click the Add Level or Copy Level button to add a Then by row to the list. |
|
Step 5 |
Select a Column and Order for Then by. |
|
Step 6 |
Add as many sort levels as desired. To remove a level from the dialog (including the default level), select it and then click Delete Level. Use the up and down arrow buttons to re-arrange the order of the levels. |
|
Step 7 |
Click Apply. The list is sorted according to the levels that you have defined. Numbers display next to the column headers, identifying the sort order. |
|
Step 8 |
To remove the temporary sort levels for the column, either:
|

Filtering
You can apply a filter to a list so that it temporarily displays only records matching the filter criteria, and you can create and save a filter that can be applied at any time to the list.
You also can create a quick filter that will filter a list by full or partial record name.
For detailed information on creating and applying filters, see Filters.
Selecting Columns / Column Locations for a List
Initially, all lists display default columns of information in default locations. You can change a list to display any available column in any location.
The columns are based on the fields that exist for a record type in the Controller database; all fields that display in the user interface, including Metadata fields, are available as columns.
To select which columns you want displayed on a list:
|
Step 1 |
Display the list. |
|---|---|
|
Step 2 |
Access the Action menu of list formatting options. |
|
Step 3 |
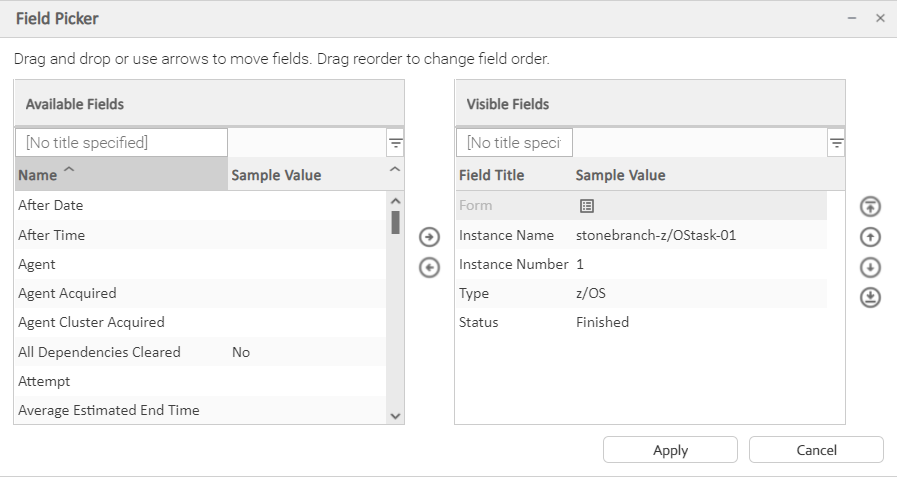
Click Columns... to display the Field Picker pop-up dialog.
|
|
Step 4 |
Drag and drop fields between the Available Fields and Visible Fields windows, as appropriate for whichever fields you want displayed on the list. Note You also can:
|
|
Step 5 |
To filter the fields listed in either window, enter characters in the text field above the Name column. Only fields containing that sequence of characters will display in the list. |
|
Step 6 |
Click the Apply button on the Field Picker dialog to save your relocation selections. |
List Layouts
Every list displays in its System Default layout when you first log in to the Controller.
You can sort, filter, select, and/or relocate columns in a list, and save that configuration of the list as a new layout.
You can create any number of layouts for a list, and:
- Pin any layout to a list, making it your Default layout whenever you display that list.
- Select any layout as a temporary layout for the list while it currently is being displayed.
To select a layout for a list, access the Action menu, which provides the following selections for saving and selecting list layouts:
|
Layouts > |
Displays a menu of all layouts, including the System Default layout, that you can apply to the list. |
|---|---|
|
Save Layout... |
Saves the current configuration of the list as a new layout and displays the layout in the Layouts menu. |
|
Save As Default Layout |
For the ops_admin role only; Saves the current configuration of the list as the System Default layout for this list. |
|
Restore the Default Layout |
For the ops_admin role only; Restores the System Default layout of this list to the original System Default layout. |
Layouts Menu
The Layouts menu identifies all currently defined layouts for the list, including the System Default layout.
Layouts menu Icons:
| Icon |
Description |
|---|---|
|
|
|
|
|
|
|
|
|
For example:
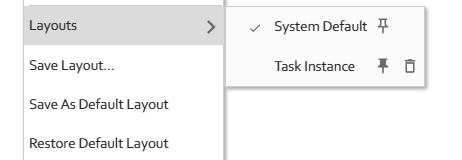
In this Layouts menu, the checkmark next to System Default indicates this is the currently selected layout.
Selecting a Layout for a List
There are two ways to select a layout for a list:
- Click the name of the layout in the Layouts menu. The check mark will display next to that layout, indicating that it is the currently selected layout for the list.
- Click the Layout icon next to the layout. The Default Layout icon and the check mark will display next to that layout, indicating that it is the currently selected layout for the list and is pinned as the Default layout for the list.
Note
Pinning a layout as your Default layout also selects it as the currently displayed layout, but selecting a layout as the currently displayed layout does not pin it as your Default layout.
Saving a Layout
You can save any configuration of a list as a list layout.
|
Step 1 |
Select Save Layout... from the Action menu. A Save As... pop-up dialog displays. |
|---|---|
|
Step 2 |
Enter a Name for the layout. (By default, the dialog displays the record type of the list as the Name.) |
|
Step 3 |
Select whether or not you want to pin the layout as your Default layout for this list. |
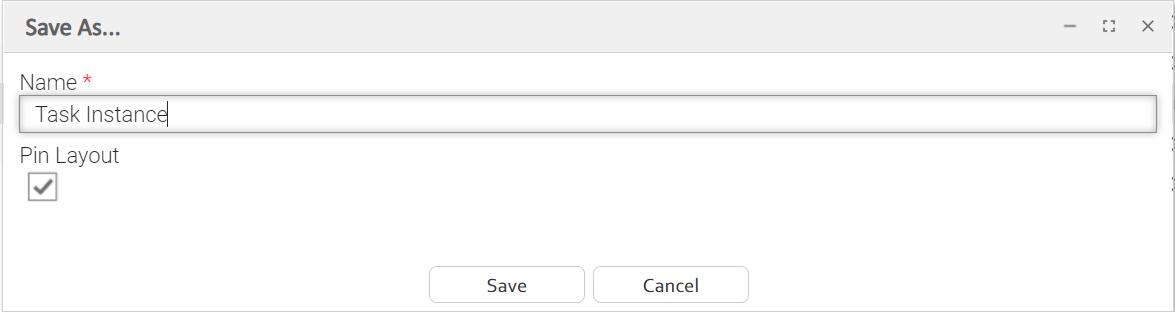
You can display a layout for a list without pinning it as your Default layout by clicking the layout name in the Layout > menu. The list will display in the selected layout, but your Default layout will remain the same.
Saving a Layout As Your Default Layout
To save a layout as your Default layout for a list, which pins the layout to the list, click the ![]() icon next to that layout in the Layouts menu.
icon next to that layout in the Layouts menu.
Saving a layout as your Default layout for a list does not make that layout the System Default layout; it only means that for you, as the user that saved the layout, it is pinned as your Default layout for the list whenever you display the list.
In the following example, Task Instance has been pinned as the your Default layout for the list, and System Default has been selected as the currently displayed layout.
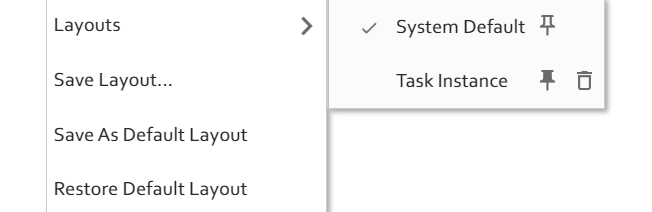
Deleting a Layout
To delete a list layout, click the ![]() icon that appears next to every layout (except the System Default layout, which cannot be deleted) in the Layouts menu.
icon that appears next to every layout (except the System Default layout, which cannot be deleted) in the Layouts menu.
If you delete a layout that is pinned as your Default layout for the list, the System Default layout automatically becomes your Default layout for the list.
Adding Records from a List
Adding a new record is a simple uniform procedure through the environment: from any list, click the ![]() button.
button.
Deleting Records from a List
To delete one or more records from a list of records:
|
Step 1 |
On the records list, Ctrl+right-click the records that you want to delete. Each selected record is highlighted. |
|---|---|
|
Step 2 |
On the Action menu that displayed after you made your first selection, click Delete. |
|
Step 3 |
On the Confirmation pop-up that displays, click OK. |

Note
You also can delete an individual record from its record Details (see Deleting a Record).
Updating Multiple Records from a List
You can update multiple records from any of the following lists:
- Agents list for any Agent type (Credentials field and Member of Business Services field only)
- All Agents list (Credentials field and Member of Business Services field only)
- Tasks list for any task type
- All Tasks list
- Triggers list for any trigger type
- All Triggers list
- Credentials list (all fields except Type and Key Location (FTP only))
- Email Templates list
- Global Variables list
- Scripts list
- Users (these fields only: Active, Command Line Access, Department, Locked Out, Manager, Password, Password Requires Reset, Time Zone, Web Browser Access, Web Service Access)
- Virtual Resources list
For detailed information on how to perform a multiple records update, see Updating Multiple Records.
Uploading Records to a List
You can upload records (as contained in a zip and/or json file) to any of the following lists:
- Agent Clusters list
- Bundles list
- Business Services list
- Calendars list
- Connections list (Database Connections, Email Connections, PeopleSoft Connections, and SAP Connections)
- Credentials list
- Custom Days list
- Email Templates list
- OMS Servers list
- Promotion Targets list
- Simulation list
- Scripts list
- SNMP Managers list
- Tasks list (for any task type)
- All Tasks list
- Triggers list (for any trigger type)
- All Triggers list
- Variables list
- Virtual Resources list
For detailed information on how to perform a multiple records upload, see Uploading Records.
Downloading Multiple Records from a List
You can download multiple records from a list (or download a single record from its record details) from any of the following lists:
- Agent Clusters list
- Bundles list
- Business Services list
- Calendars list
- Connections list (Database Connections, Email Connections, PeopleSoft Connections, and SAP Connections)
- Credentials list
- Custom Days list
- Email Templates list
- OMS Servers list
- Promotion Targets list
- Simulation list
- Scripts list
- SNMP Managers list
- Tasks list (for any task type)
- All Tasks list
- Triggers list (for any trigger type)
- All Triggers list
- Variables list
- Virtual Resources list
For detailed information on how to perform a multiple records downloads, see Download Records.
Performing Actions on One or More Records from a List
You can perform many actions on one or more records on a list without having to open the record(s).
- For a single record, right-click the record on the list to display an Action menu of all actions available for that record.
- For multiple records, press Ctrl and right-click each record. An Action menu of all actions available for multiple records of that type displays.
Note
The actions available for a record when selecting an Action menu from a list may not be the same as the actions available when you select an Action menu from its record Details.
Exporting Records to an Output File
This feature allows you to export record information for records on a list to any of the following file types:
- CSV (comma-separated values in an Excel file)
- Permissions for Group (XML for User Groups only)
- XLS (Excel)
- XLXS
- XML
- XML (Export References)
To export records, you first display the current list of those records.
By default, an export contains all records on the list. If you do not want to export all records on the list, use filtering to select the records to be exported.
Note
You cannot select records on a list manually to indicate which records are to be exported; you must filter the list in order to select the records.
Important!
It is strongly recommended that you do NOT use the Import and Export functions for modification of Universal Controller records. API functions are available if you need to programmatically update, copy, insert, or otherwise manipulate Universal Controller records.
Exporting Records to CSV, PDF, XLS (Excel), or XLSX
When you export to CSV, PDF, XLS (Excel), or XLXS, you export only the columns of information displayed on the list. To select which columns are displayed, see Selecting Columns / Column Locations for a List.
To run the export:
|
Step 1 |
Display the list of records. |
|---|---|
|
Step 2 |
Right-click in any column header of the list to display an Action menu. |
|
Step 3 |
Select Export. |
|
Step 4 |
Select CSV, PDF, XLS (Excel), or XLXS. |
|
Step 5 |
When the export is complete, select whether to open or save the file. |
Exporting Records to XML, XML (Export References), or Permissions for Group
When you export to XML, XML (Export References), or Permissions for Group (XML for User Groups only), you export the entire record.
To run the export:
|
Step 1 |
Display the list of records. |
|||||||||||||||||||||||||||
|---|---|---|---|---|---|---|---|---|---|---|---|---|---|---|---|---|---|---|---|---|---|---|---|---|---|---|---|---|
|
Step 2 |
Right-click in any column header of the list to display an Action menu. |
|||||||||||||||||||||||||||
|
Step 3 |
Select Export. |
|||||||||||||||||||||||||||
|
Step 4 |
Select either:
The following table provides notes on these export types for different record types.
|
|||||||||||||||||||||||||||
|
Step 5 |
When the export is complete, an Exported message displays above the list, indicating that the export is complete. (The export location is configurable; see the Export Path Universal Controller system property.) |
Importing Records from a File
You can import record information from any valid XML file to a list using the Import action that is available for all lists.
- Any Universal Template XML found in the import directory will be processed prior to any other XML.
- Universal Template XML will be processed only if the Universal Template does not exist by name or sys_id. You can create a Universal Template via List Import, but you cannot update a Universal Template via List Import; if the Universal Template exists, the Universal Template XML will be ignored.
- Any Universal Task XML must be validated to ensure that it conforms to the currently defined Universal Template it is associated with.
Important!
It is strongly recommended that you do NOT use the Import and Export functions for modification of Universal Controller records. API functions are available if you need to programmatically update, copy, insert, or otherwise manipulate Universal Controller records.